How to Style a Perfectly Messy Bun Easy Hair Tutorial for Beginners
We have all been there. You are standing in front of the mirror with a hair tie around your wrist, trying to achieve that effortless, cool girl aesthetic that looks like you just rolled out of bed looking fabulous. You pull your hair up, twist it, pin it, and suddenly you look less like a chic Parisian and more like you are heading to a very stressful gym session. The perfectly messy bun is the holy grail of hairstyling. It is the bridge between looking polished and feeling completely relaxed. It is the ultimate style for those who want to look put together without looking like they spent three hours under a blow dryer.
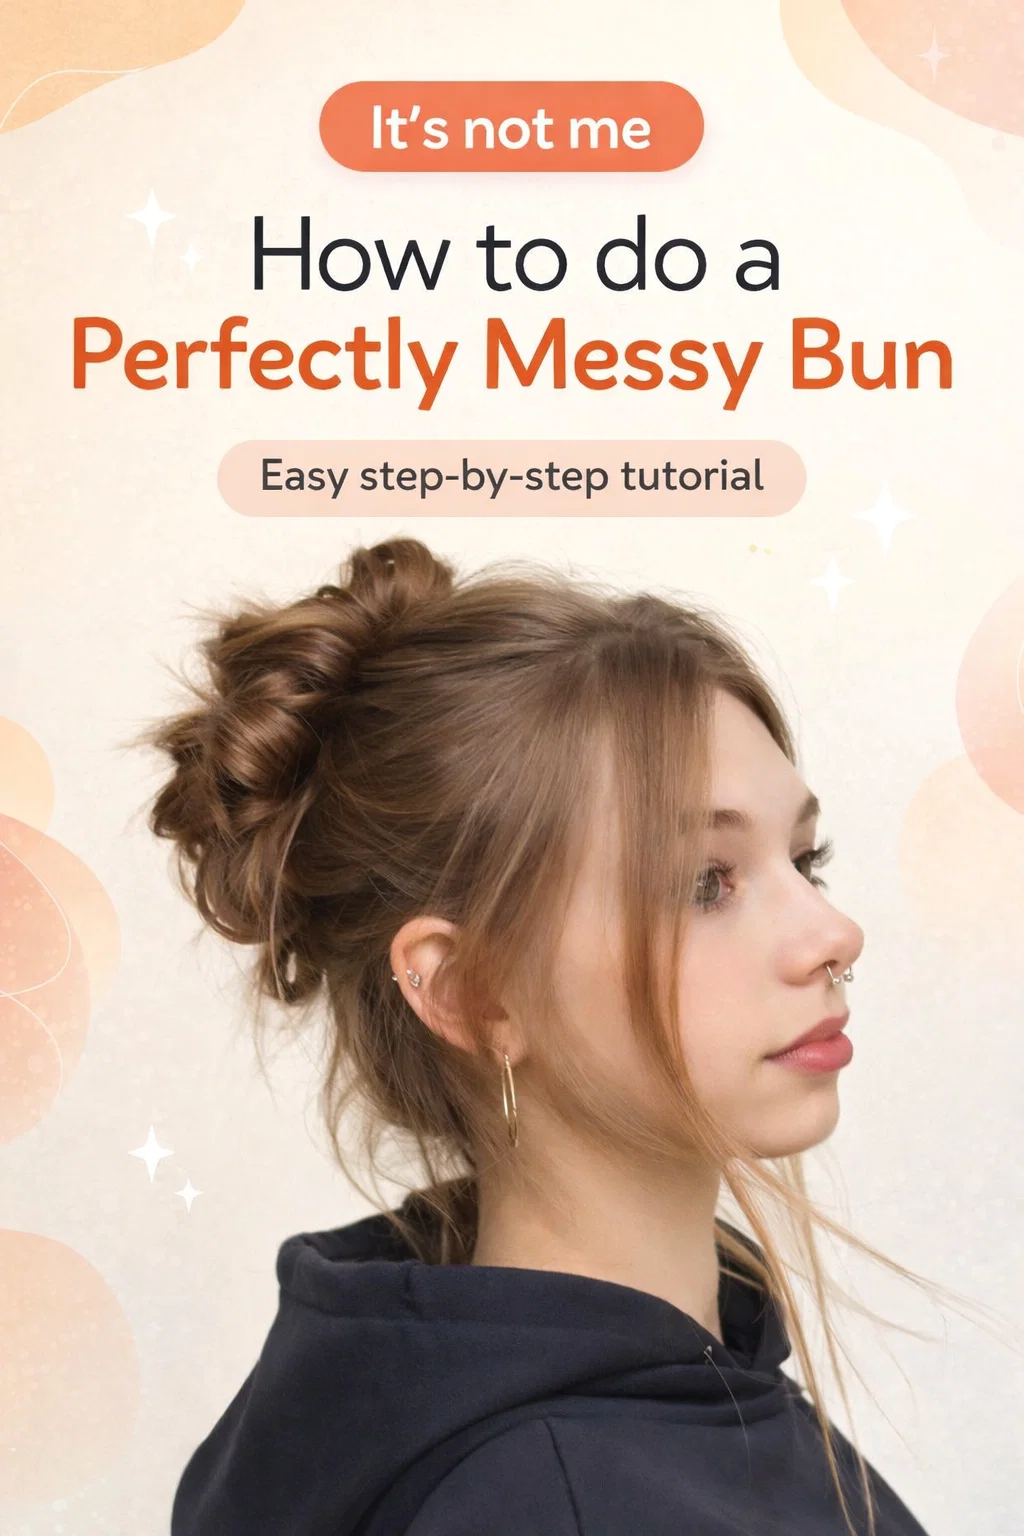
The beauty of this specific messy bun, as seen in the trending tutorials, lies in its architecture. It is not just a ball of hair on top of your head. It is a strategically loosened, texturized masterpiece that frames the face and provides volume where it matters most. If you have been struggling to get your hair to cooperate, you are not alone. Achieving the perfect balance of messy and intentional takes a bit of technique, the right products, and a little bit of patience. Let us dive deep into the world of effortless updos and find out how you can recreate this look at home.
The Foundations of a Great Messy Bun
Before you even pick up a hairbrush, you need to understand that the secret to a great messy bun is often what happens before the styling begins. Smooth, freshly washed hair is actually the enemy of the messy bun. If your hair is too clean, it will be slippery, flat, and lack the grit necessary to hold a shape. This is why second or even third day hair is usually the best canvas for this look. The natural oils in your scalp give the hair a bit of weight and hold that clean hair simply does not have.
If you have just washed your hair and absolutely need to style it, do not worry. You can fake the texture. A high quality dry shampoo or a sea salt spray is your best friend here. Spray it through your roots and the lengths of your hair to create some friction. This allows the hair to grab onto itself when you start twisting. Another pro tip is to lightly tease the crown of your head before you pull your hair back. This ensures that the top of your head does not look flat or plastered down, which is a common mistake that ruins the messy vibe.
Choosing the Right Tools
While the goal is to look like you did not use any tools at all, a few key items will make the process much smoother. You will need a seamless hair tie that matches your hair color. This prevents any bright neon elastic from peeking through your style. You will also need a handful of U shaped hair pins rather than standard bobby pins. U pins are designed to hold volume without flattening the hair, which is essential for that airy, fluffy bun look. Finally, keep a fine tooth comb or a soft bristle brush nearby to help manage the flyaways without smoothing out the texture too much.
Step by Step Guide to the Perfectly Messy Bun
Now that your hair is prepped and your tools are ready, it is time to get to work. Follow these steps to achieve the look seen in the image, characterized by soft face framing layers and a voluminous, multi textured bun.
Step one is the ponytail placement. For this specific style, a mid to high placement is ideal. Flip your head upside down and gather your hair at the crown. Instead of using a brush, use your fingers to rake the hair back. This creates those natural ridges and lines that add to the effortless feel. Once you have the height you want, secure it with your hair tie. On the final loop of the hair tie, do not pull your hair all the way through. Leave it in a large loop or a sprout shape. This creates the base of your volume.
Step two involves the twist and pin. Take the ends of the hair that are sticking out from the loop and wrap them loosely around the base of the hair tie. Do not wrap them too tight. You want the bun to look wide and full. Use your U pins to secure the ends into the base of the bun. The key here is to pin into the elastic so the bun feels secure but looks loose.
Refining the Messy Look
This is where the magic happens. Once the bun is secure, start gently pulling at different sections of the bun to expand its size. Think of it like fluffing a pillow. Pull small pieces out just a little bit to create different levels of height and texture. If a piece falls out completely, do not panic. Just pin it back in a slightly different spot. This randomness is exactly what makes the style look authentic.
Next, focus on the hair around your face. A perfectly messy bun always has some soft strands framing the face. Use your fingers to gently tug at the hair near your temples and ears. If you have bangs or layers, let them fall naturally. If your hair is all one length, you can pull out two thin sections at the front and use a curling iron to give them a very slight wave. This adds a romantic touch to the overall edgy aesthetic.
Customizing the Look for Different Hair Types
Not everyone has the same hair texture, and that means your messy bun might require a few adjustments. If you have very fine, thin hair, you might find that your bun looks a bit small. In this case, use a donut shaper or a small hair piece to add bulk. Alternatively, you can backcomb the ponytail heavily before looping it to create the illusion of thickness. Texture powder is also a miracle worker for fine hair, as it provides instant volume that lasts all day.
For those with thick or curly hair, the challenge is usually the opposite. Your bun might feel too heavy or bulky. Instead of doing one large loop, try dividing your ponytail into two sections. Twist them around each other loosely and then wrap them into a bun. This distributes the weight more evenly and allows the curls to provide natural texture. Do not try to smooth out your curls too much. Let them do the work for you. The more texture you have to start with, the better the messy bun will look.
The Role of Face Framing Layers
The image shows a style with beautiful, wispy layers that soften the profile. If you have a blunt cut, you can still achieve this by carefully pulling out shorter hairs from the underside of your ponytail. These smaller wisps around the ears and the nape of the neck are what give the style its lived in appearance. It bridges the gap between a formal updo and a casual daily look. If you are feeling bold, you can even ask your stylist for some curtain bangs or face framing layers specifically to enhance your updos.
Common Mistakes to Avoid
Even though it is called a messy bun, there is a fine line between looking stylish and looking like you actually forgot to comb your hair for a week. One common mistake is making the bun too tight. If the hair is pulled back too hard, it can look severe and even cause headaches. Always remember to loosen the hair at the scalp after you have secured the bun. Just a small tug upward will create the lift you need.
Another mistake is using too much hairspray too early. If you douse your hair in hairspray before you have finished shaping the bun, the hair will become crunchy and difficult to move. Save the hairspray for the very end. Use a light hold spray to keep the flyaways in check without losing the bounce and movement of the style. You want the bun to look like it could fall down at any second, even if it is actually pinned securely in place.
Accessorizing Your Messy Bun
Once you have mastered the basic technique, you can start having fun with accessories. A silk scrunchie can add a pop of color and is much gentler on your hair than traditional elastics. For a more sophisticated look, try adding a decorative hair fork or a few pearl pins tucked into the side of the bun. Even a simple ribbon tied around the base can transform the messy bun from a casual house look into something suitable for a wedding or a formal dinner. The versatility is endless.
Maintaining the Look Throughout the Day
The biggest worry with a messy bun is that it will slowly disintegrate as you go about your day. To prevent this, make sure your foundation is solid. The initial hair tie should be tight enough to hold the weight of your hair, even if the bun itself looks loose. If you feel the bun starting to sag, do not take the whole thing down. Simply add one or two more pins into the base to lift it back up.
Keep a small travel sized bottle of dry shampoo in your bag. If your hair starts to look flat by mid afternoon, a quick spray at the roots and a little bit of finger ruffling can bring the volume right back. The best part about this hairstyle is that if it does get a little messier over time, it usually just ends up looking even better. It is one of the few styles that actually improves with wear.
Conclusion
The perfectly messy bun is more than just a quick hairstyle. It is a confidence booster that works for almost any occasion. By understanding the importance of texture, placement, and those crucial face framing pieces, you can move away from the frustration of failed updos and into a world of effortless style. It takes a bit of practice to find the exact tension and fluffiness that works for your specific hair type, but once you find it, it will become your signature look.
Remember that hair is an expression of your personality. Do not be afraid to let a few strands fall out of place or to experiment with different heights. The most important ingredient in a messy bun is the ease with which you wear it. So, grab your pins, find your favorite texturizing spray, and start practicing. You are just a few twists away from your best hair day yet. Be sure to keep experimenting and find the version of this look that makes you feel the most like yourself.