DIY Whipped Shea Butter Hair Recipe for Dry Hair Growth Moisture Easy Mango Cocoa Butter
There is something deeply satisfying about whipping up your own beauty products in the kitchen. It feels like a mix of modern alchemy and traditional self care. If you have been struggling with dry, brittle, or unruly hair, you have likely realized that store bought moisturizers often fall short. They can be packed with alcohols and synthetic fillers that provide a temporary shine but leave your strands thirsting for real nourishment. That is where the magic of a homemade whipped hair butter comes into play. This rich, creamy, and entirely natural concoction is a powerhouse of hydration designed to seal the hair shaft and protect your crown from the elements.
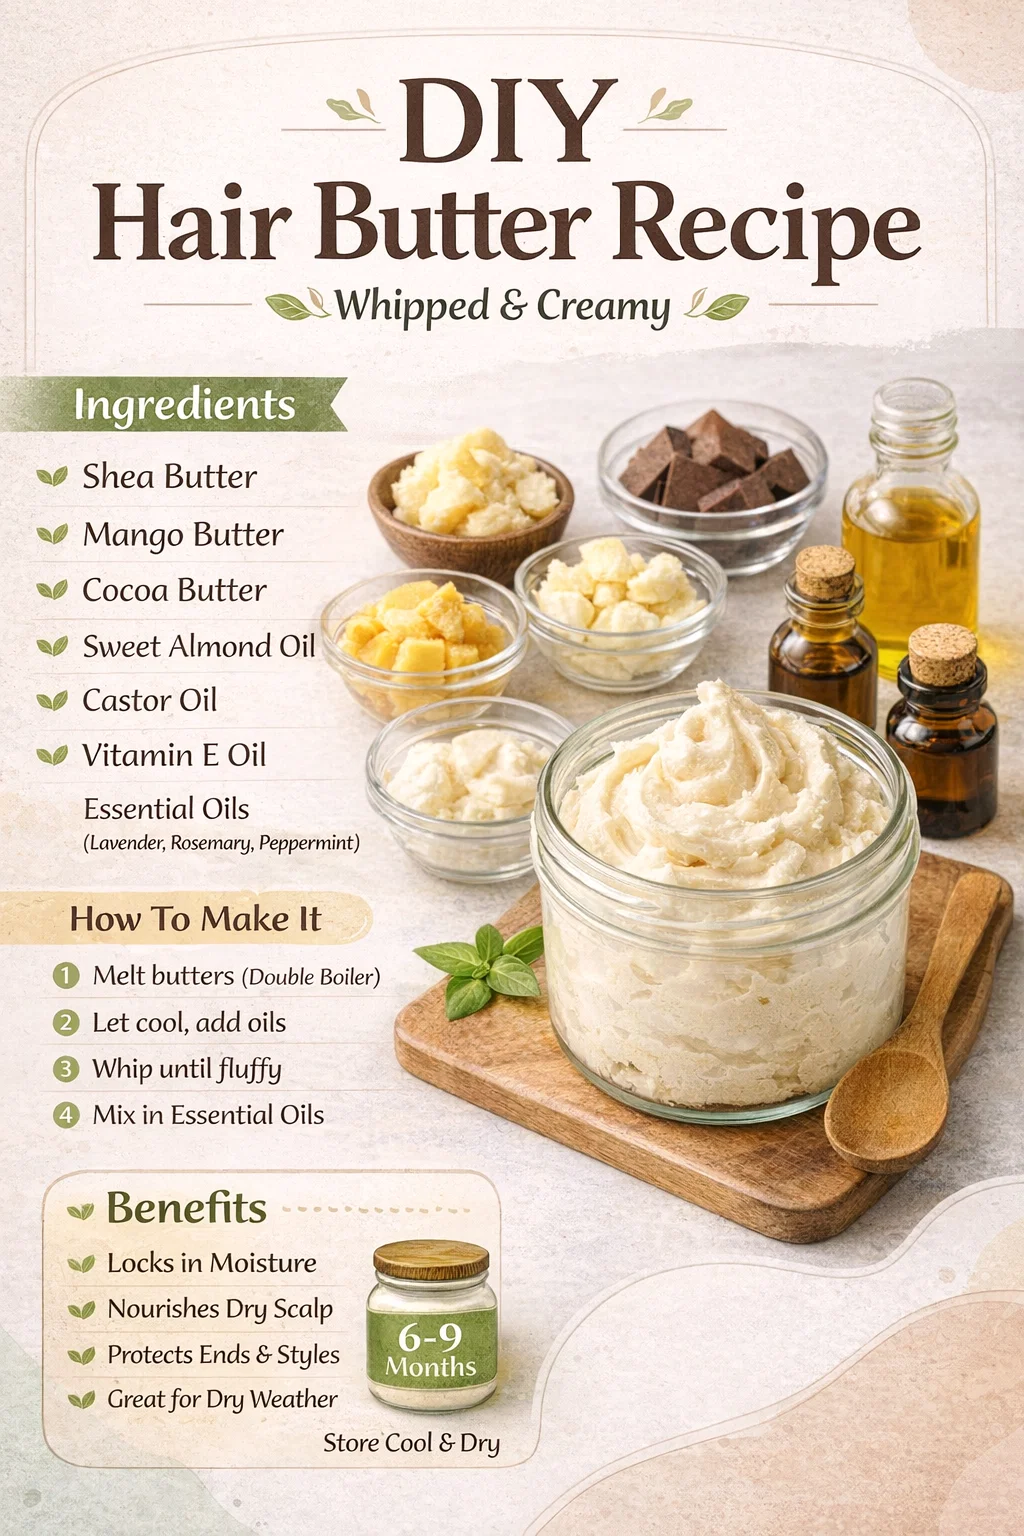
By using the recipe from the visual guide, we are looking at a blend of heavy hitting butters and lightweight oils that cater specifically to high porosity hair and those looking to retain length. This is not just a styling product; it is a treatment that transforms the health of your hair from the inside out. Let us dive deep into why this specific combination of ingredients works so well and how you can master the art of the perfect whip.
The Holy Trinity of Hair Butters
The foundation of any great hair butter lies in its solids. In this recipe, we are using a trifecta of Shea, Mango, and Cocoa butters. Each brings a unique molecular structure to the table, ensuring that your hair receives a full spectrum of fatty acids and vitamins.
Shea Butter: The Ultimate Sealant
Shea butter is the undisputed king of natural hair care. Derived from the nuts of the shea tree in Africa, it is incredibly rich in vitamins A and E. Its primary job in this DIY recipe is to act as an emollient. Because it is thick and stays solid at room temperature, it creates a breathable barrier over the hair cuticle. This prevents the water you applied during your wash day from evaporating, which is the secret to long lasting softness.
Mango Butter: The Lightweight Nourisher
If you find that pure shea butter is a bit too heavy for your hair, mango butter is the perfect balancer. It has a similar consistency but feels much lighter and less greasy on the strands. It is packed with salicylic acid and antioxidants, which help to shield the hair from harmful UV rays and environmental pollutants. It adds a subtle softness that makes the final whipped product feel more like a high end cream and less like a heavy wax.
Cocoa Butter: Strength and Elasticity
Cocoa butter provides the structural integrity of your hair butter. It is harder than the other two, which helps the whipped consistency hold its shape even in slightly warmer weather. Beyond its delicious chocolatey scent, cocoa butter is excellent for improving hair elasticity. If your hair snaps easily when you pull it, the saturated fats in cocoa butter will help lubricate the hair fibers, allowing them to stretch without breaking.
The Role of Liquid Gold: Essential Carrier Oils
While the butters provide the “body” of the recipe, the oils provide the “slip” and deep penetration. Without these liquid additions, your hair butter would be too hard to apply and might sit on top of the hair without doing much work.
Sweet Almond Oil for Shine
Sweet almond oil is a fantastic multipurpose oil. It is rich in magnesium, which is a vital mineral for hair health. In this DIY blend, the almond oil serves to fill in the gaps in the hair cuticle, resulting in a smoother surface that reflects light. This is how you achieve that healthy, natural glow without using silicones.
Castor Oil for Thickness and Growth
Castor oil is legendary in the hair community for a reason. It is a humectant, meaning it actually helps to attract moisture. It is also quite viscous, which adds a beautiful “grip” to the hair butter. When used in a scalp massage, castor oil is believed to increase blood flow to the follicles, potentially aiding in faster hair growth and thicker strands over time.
Vitamin E Oil: The Natural Preservative
Vitamin E oil serves a dual purpose. For your hair, it is a powerful antioxidant that reduces oxidative stress and preserves the protective lipid layer. For the recipe itself, it helps slow down the oxidation of the other oils, effectively extending the shelf life of your homemade batch. It keeps the oils from going rancid, ensuring your butter stays fresh for the full six to nine months.
A Step by Step Guide to the Perfect Whip
The difference between a gritty, hard mess and a cloud like hair butter is all in the technique. Follow these steps to ensure your DIY project is a success.
Step 1: The Gentle Melt
Never place your butters directly over a flame. This can scorched the delicate nutrients and ruin the texture. Always use a double boiler. If you do not have one, simply place a glass bowl over a pot of simmering water. Add your shea, mango, and cocoa butters and stir occasionally until they are completely liquid and transparent.
Step 2: The Cooling Period
This is the step most people skip, but it is the most important. Once melted, let the mixture sit for about 10 to 15 minutes at room temperature, then pop it in the fridge. You want it to reach a “semi solid” state. It should look opaque and be firm to the touch, but your finger should still be able to leave an indentation easily. If it gets too hard, you will not be able to whip it; if it is too liquid, it will never fluff up.
Step 3: Incorporating the Oils
Once you have that perfect semi solid base, add your sweet almond oil, castor oil, and Vitamin E. Use a hand mixer or a stand mixer to begin the whipping process. Start on a low speed to combine everything, then crank it up to high. You will see the yellow translucent mixture turn into a bright, white, fluffy cream that looks almost like marshmallow fluff.
Step 4: The Aromatic Finish
Now is the time to add your essential oils. Lavender is great for soothing the scalp, rosemary is excellent for stimulating growth, and peppermint provides a refreshing tingle that wakes up your follicles. Fold these in gently at the end so the scent is evenly distributed throughout the jar.
Optimizing Your Hair Care Routine
How you use this butter is just as important as how you make it. Because this recipe is oil based, it does not contain water. This means it is a sealant, not a hydrator. For the best results, always apply this butter to damp hair or directly over a water based leave in conditioner. This “locks” the water into the hair shaft, keeping it hydrated for days on end.
If you have high porosity hair, you can use this daily on your ends to prevent split ends. For those with low porosity hair, a little goes a long way. Focus on the mid lengths to the ends and avoid the roots if you find that your hair gets weighed down easily. This butter is also a dream for protective styles like braids or twists, as it keeps the hair lubricated and minimizes friction when it is time to take the style down.
Storage and Longevity
Because this recipe contains no water, it is much less prone to bacteria and mold than a traditional lotion. However, you should still store it in a cool, dry place away from direct sunlight. A glass amber jar is ideal as it protects the essential oils from light degradation. As noted in our guide, a well made batch can last between six to nine months. Just be sure to use clean hands when scooping it out to avoid introducing any contaminants into the jar.
Why DIY is Better for Your Hair and Your Wallet
When you buy a luxury hair butter at a boutique, you are often paying for the branding, the packaging, and the overhead of a large company. By making it yourself, you have 100 percent control over the quality of the ingredients. You can opt for raw, unrefined shea butter which retains all its natural healing properties, rather than the highly processed white shea often found in commercial products. Over time, buying these ingredients in bulk and making your own batches will save you a significant amount of money while providing your hair with a far superior level of care.
Conclusion: Embrace the Glow
Switching to a homemade hair butter is more than just a beauty choice; it is a commitment to understanding what your body needs. There is a special kind of confidence that comes from knowing exactly what is in your products and seeing the tangible results in the mirror. Whether you are looking to grow your hair to new lengths, define your curls, or simply survive a dry winter, this whipped shea, mango, and cocoa butter recipe is your new best friend. It is time to clear some space on your bathroom shelf and make room for the last hair moisturizer you will ever need.
So, gather your ingredients, set up your double boiler, and get ready to experience the softest hair of your life. Once you see the difference a real, nutrient dense butter makes, you will never go back to the bottled stuff again.