Granny Smith Apple Crumble Cheesecake Recipe Easy Fall Dessert Layered Apple Cheesecake
Imagine this: the air is crisp, the leaves are turning golden, and your kitchen is filled with the warm, comforting aroma of cinnamon and spiced apples. Fall is undeniably the season for cozy, decadent desserts, and there is one masterpiece that perfectly captures this feeling: the Sharrellz Granny Apple Crumble Cheesecake. Forget the standard pumpkin spice everything; this is the ultimate, luxurious fusion of your favorite apple crumble and a rich, creamy baked cheesecake. In this post, we’re going to deconstruct this show-stopping dessert, sharing the secrets, the easy steps, and exactly why this recipe is destined to become your signature autumn treat. Get ready to elevate your baking game and impress everyone at the dessert table.
Deconstructing the Masterpiece: What Makes a Luxury Dessert Stack?
The term luxury dessert stack isn’t just marketing jargon; it perfectly describes the architectural marvel of this cheesecake. When we look at the breathtaking full-page graphic provided, we see far more than just a typical cheesecake. It is a calculated construction of multiple sensory experiences, layered to perfection. A standard apple crumble is wonderful, but it lacks that rich, creamy foundation. A classic cheesecake is a timeless joy, but it often misses the textural complexity and fruitiness we crave in autumn. Sharrellz has masterfully combined these concepts into one cohesive, towering achievement.
What sets this apart and earns it the title of a signature dessert is the deliberate juxtaposition of textures and flavors. You have the dense, velvety texture of the slow-baked cheesecake contrasting with the slight crunch and warm, butter-toasted nuttiness of the graham cracker crust. Then comes the sweet, slightly tart bite of the caramelized apple layer, all crowned with the definitive, textured finish of the brown sugar crumble topping. Each spoonful is a journey, and this image perfectly captures that layered promise. From the very first glance, you understand that this isn’t just a simple baked good; it’s a detailed, structured, and carefully crafted experience.
Your Essential Toolkit: The Ingredients That Count
Every great recipe begins with quality ingredients, and the list provided for the Granny Apple Crumble Cheesecake is clear and precise. This image serves as your ultimate guide, organizing every element you will need for each layer, ensuring your baking session is organized from the start. Let’s break down these crucial components by category, exactly as they are presented, so you know exactly what is going into this masterpiece.
The Foundational Crust
The base of any great cheesecake needs structure and flavor, and this one relies on the classic, beloved graham cracker combination. You’ll need 2 cups of graham cracker crumbs, providing that fundamental toasty grain flavor. This is combined with ½ cup of melted butter to bind everything together into a pressable mixture. But the key to making this specifically an apple crumble base is the inclusion of brown sugar (¼ cup) and a touch of warmth from ½ teaspoon of cinnamon. This isn’t just a plain crust; it’s flavored from the very first layer, setting the tone for the entire dessert.
The Heart: The Cheesecake Filling
Moving up a layer, we arrive at the creamy, indulgent center. This section of the ingredient list tells us exactly what makes a classic, velvety New York-style cheesecake. You’ll need a substantial amount of cream cheese—specifically 3 (8oz) packages—which gives the dessert its characteristic rich density. This is sweetened with ¾ cup of white sugar and given depth and a hint of tanginess by ½ cup of sour cream. The critical aromatics are 1 teaspoon of vanilla extract and 3 large eggs, which are essential for structure and setting the filling during baking. Finally, a touch of indulgence comes from 2 tablespoons of heavy cream, ensuring the ultimate smooth, luxurious texture.
The Seasonal Touch: The Apple Filling
This is where the magic really happens, turning a great cheesecake into an autumn spectacular. The recipe calls specifically for 3 Granny Smith apples. This is a crucial distinction. We want the firmness and pronounced tartness of Granny Smiths because they hold their shape beautifully when cooked and provide a sharp, vibrant contrast to the sweet caramel and rich cheesecake. These apples are cooked down with 3 tablespoons of butter and ½ cup of brown sugar, which, as the graphic says, will help them caramelize beautifully. Warm spices come into play with 1 teaspoon of cinnamon and ¼ teaspoon of nutmeg. The vital brightness that cuts through all the sweetness comes from 1 tablespoon of lemon juice, and a final hint of aroma is added with 1 teaspoon of vanilla extract.
The Definitive Topping: The Crumble
What would an apple crumble be without its defining texture? This layer is the key to creating that authentic crumble experience. The ingredients are simple but effective, and the key is in the preparation. You will combine 1 cup of flour, ½ cup of brown sugar (for deep color and flavor), ½ teaspoon of cinnamon for spice, and—most importantly—½ cup of COLD butter. Using cold butter and cutting it in is what creates that signature pebbly, crumbly texture rather than a smooth paste. This texture will transform in the oven into a crisp, buttery topping that is the perfect contrast to the creamy cheesecake below.
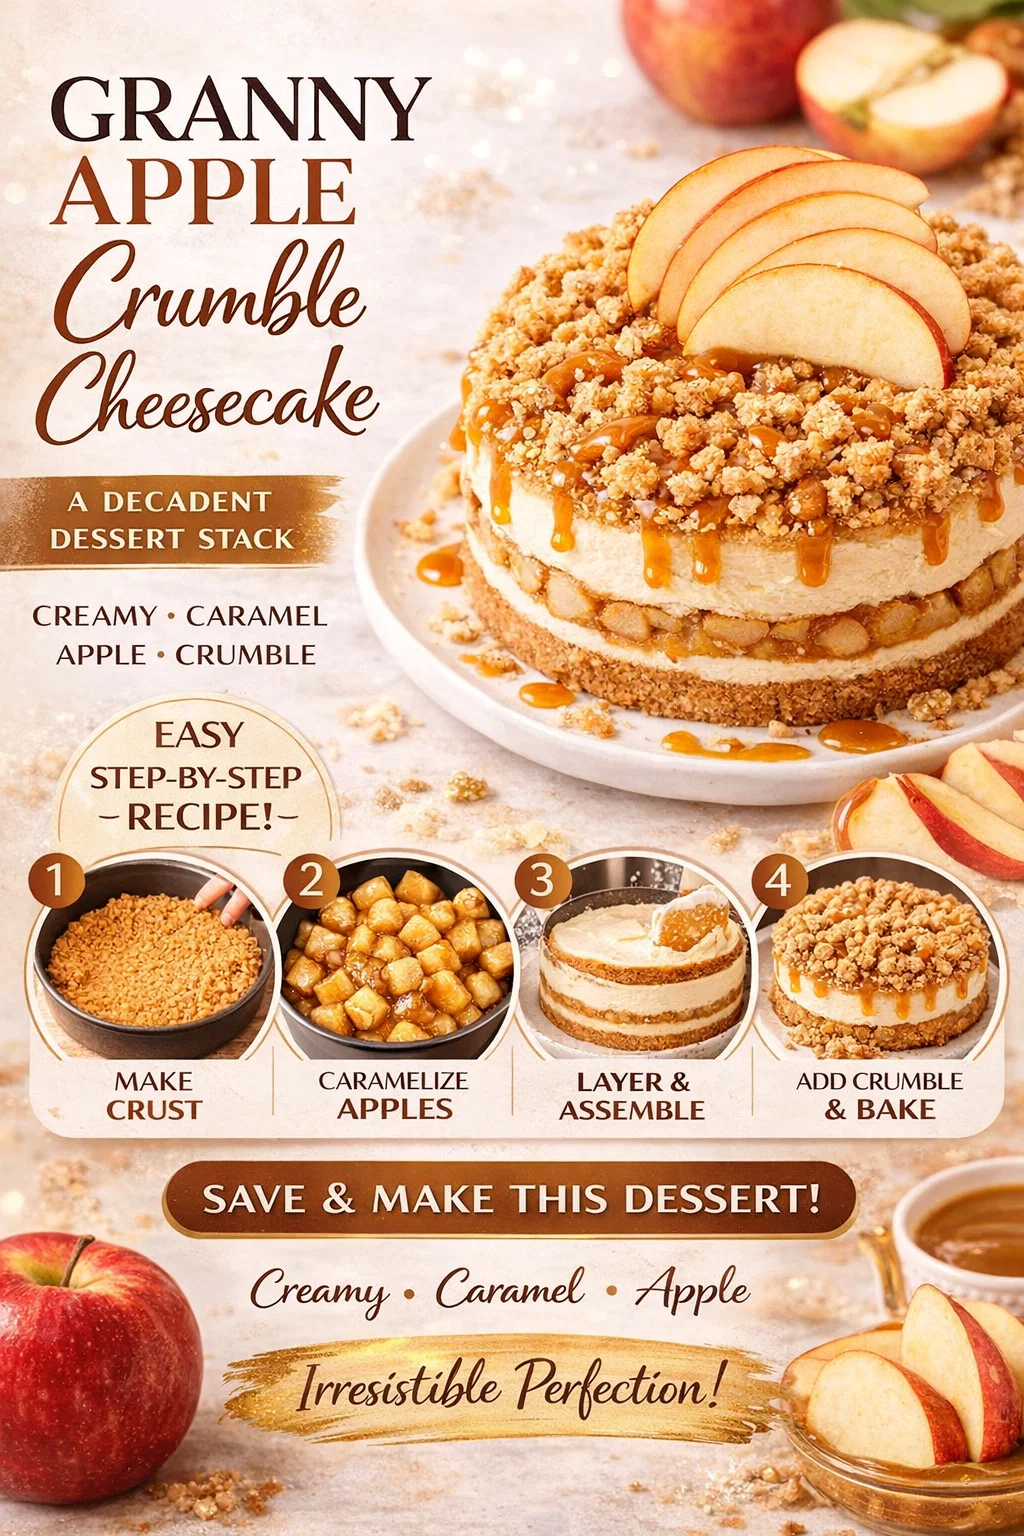
Your Visual Guide: Four Steps to Perfection
Sometimes a long list of instructions can be intimidating, but this graphic masterfully simplifies the process. What truly makes this image a valuable resource for bakers is the Easy Step-by-Step guide. It takes a complex-looking, multi-layered dessert and breaks it down into four manageable, visualized actions. If you can follow these four simple stages, you are well on your way to creating this show-stopper. Let’s walk through them, just as the graphic presents them.
Step 1: Make The Crust
The journey begins with the base. Image 1 shows a perfectly pressed, beautifully textured graham cracker mixture. Your goal here is to take all your crust ingredients—crumbs, butter, brown sugar, and cinnamon—and combine them until they resemble damp sand. Then, as seen in the photo, you will press this mixture firmly into the bottom and slightly up the sides of your prepared pan. This creates a compact, sturdy foundation that will bake up perfectly golden and hold the entire cheesecake together. The key is to pack it in evenly for a consistent bake and a secure base.
Step 2: Caramelize The Apples
This is where that deep, warm, autumnal flavor profile is truly built. Image 2 is an inviting close-up of chunky Granny Smith apple pieces, shimmering in a rich, golden-brown glaze. Following the ingredient list for the apple filling, you will combine the cubed apples, butter, brown sugar, spices, and lemon juice in a saucepan. The goal, as the guide states, is to caramelize them. This process doesn’t just cook the apples; it transforms the simple sugar and butter into a complex, sweet caramel and draws the moisture out of the apples, preventing them from making your cheesecake soggy. This resulting deeply flavored compote is the essential fruit core of your dessert stack.
Step 3: Layer & Fill
With your components prepared, it’s time to assemble. Image 3 beautifully illustrates the construction in progress. Here, you see the prepared cheesecake filling being carefully ladled onto the previously baked graham cracker crust and the cooked, cooled apple layer. This image perfectly reinforces that crucial “layer & fill” concept. It reminds you that this is a detailed assembly. You will create distinct strata of flavor and texture: crust first, then the caramelized apple filling, and finally, the luscious cheesecake mixture spread evenly over the top, ready for the final additions.
Step 4: Add Crumble & Bake
This is the grand finale. Image 4 is the most crucial, as it shows you exactly how the completed dessert should look before it hits the oven. Your cold-butter crumble topping is sprinkled generously and evenly over the top of the cheesecake layer, creating that distinctive pebbled surface. This visualization is essential, showing you that the crumble isn’t meant to completely obscure the top but to create a beautiful, textured finish. Then comes the instruction to “bake.” Following the timeline provided, you will bake until the crumble is golden and the cheesecake is just slightly jiggly in the center, signifying the perfect finish.
Timing Your Success: The Secret to the Perfect Texture
One of the most practical and useful aspects of this entire infographic is the explicit breakdown of the total time required. A gorgeous photo and an easy step-by-step guide are invaluable, but for any baker, time management is key. This section removes the guesswork and helps you plan your day, ensuring your dessert is ready exactly when you need it to be, in its perfect state. Let’s look closely at these three crucial figures.
Prep: 25 Min. This is extremely encouraging! For a multi-layered, stunning dessert like this, you might expect hours of preparation. But this guide shows you that with organization and following the steps, you can have all four layers—the crust, the apples, the filling, and the crumble—prepared and ready for assembly in under half an hour. This small time investment upfront makes the whole process feel approachable.
Bake: 65 Min. This is the time your cheesecake will spend developing its structure and color in the oven. It is important to know this figure, as a slow, consistent bake is essential for preventing cracks in your cheesecake and ensuring the filling is velvety and cooked throughout. Seeing “65 min” upfront helps you plan your schedule and understand that while prep is fast, the final result takes patience.
Chill: 4+ Hrs. This is, arguably, the most important piece of information on the entire graphic. Why? Because the longest period of time isn’t spent baking; it’s spent waiting. This explicit instruction reminds you that the actual finishing of this cheesecake happens in the refrigerator. A cheesecake needs a substantial, multi-hour chill (hence the “+”) to fully set its texture and allow all the complex flavors to meld. This crucial note ensures that you won’t cut into your beautiful creation too early and will instead be rewarded with a firm, perfectly sliceable, and deeply flavored masterpiece.
From Recipe to Reality: Final Inspiration
The ultimate goal of this graphic is, of course, to inspire you to recreate this stunning dessert yourself, and it does so with incredible visual persuasion. The entire bottom third of the image is designed to move you from inspiration to action. From the stunning, full-color red apple at the bottom-left, reminding you of the fresh ingredient, to the charmingly rustic, hand-stenciled slogan—”Make It • Share It • Enjoy It!”—every element is geared toward encouraging you to take that next step. This graphic isn’t just about looking pretty; it’s a detailed, comprehensive roadmap designed to empower you to bring this luxurious autumn dream to life in your own home. It’s an irresistible invitation to bake.
Conclusion: Crafting Your Signature Dessert
In conclusion, this Sharrellz Granny Apple Crumble Cheesecake recipe is more than just a sweet treat; it is a definitive culinary experience that perfectly captures the heart and soul of autumn. By breaking down the complex layers and focusing on key ingredients like tart Granny Smith apples and a textured cold-butter crumble, this graphic provides you with all the tools you need for success. The beautifully organized, easy-to-follow step-by-step guide removes any mystery from the process, and the specific timing ensures your final creation will have that perfect, set texture. This is your chance to step away from the ordinary and bake a true masterpiece. So, gather your ingredients, follow these expert visuals, and get ready to experience the perfect autumn fusion.