How to Make DIY Rose Water at Home Easy 4-Step Natural Beauty Guide
Transforming fresh rose petals into a fragrant, skin-soothing elixir is one of the most rewarding DIY beauty projects you can undertake. There is something deeply satisfying about taking a handful of nature’s most beautiful flowers and turning them into a versatile toner, mist, or aromatherapy base. For centuries, rose water has been a staple in beauty rituals across the globe, from the ancient bathhouses of Persia to the modern vanity tables of skin care enthusiasts. It is more than just a pleasant scent; it is a powerhouse of antioxidants and anti-inflammatory properties that can revolutionize your daily self-care routine. The best part is that you do not need expensive equipment or a degree in chemistry to make it at home. With just a few roses and a bit of distilled water, you can create a high-quality product that is free from the synthetic fragrances and preservatives found in commercial bottles.
The Timeless Benefits of Natural Rose Water
Before we dive into the simmering pot, it is important to understand why this floral water deserves a permanent spot in your cabinet. Rose water acts as a natural pH balancer for the skin. Many of the cleansers and soaps we use can be quite alkaline, stripping the skin of its natural acidity. A quick spritz of homemade rose water helps bring your skin back to its happy place, reducing redness and irritation almost instantly. It is also incredibly hydrating. Unlike many alcohol-based toners that leave your face feeling tight and dry, rose water draws moisture into the skin, making it look plump and dewy.
Beyond the physical benefits, the scent of roses has a profound effect on the nervous system. Inhaling the soft, floral aroma can help lower cortisol levels and reduce feelings of anxiety. This makes it an excellent addition to your evening routine. Spraying a little on your pillow or using it as a facial mist after a long day of work can provide an immediate sense of calm. Because you are making this yourself, you have total control over the purity of the ingredients, ensuring that you are only putting the very best of nature onto your body.
Choosing the Right Roses for Your Infusion
The quality of your rose water starts with the quality of your petals. While it might be tempting to grab a bouquet from the local grocery store, you must be cautious. Most commercial roses are treated with heavy pesticides and chemicals to keep them looking perfect for transport. Since you will be applying this water to your skin, or perhaps even using it in culinary applications, you want organic roses. If you have a garden, your own home-grown roses are the absolute best choice. If not, look for food-grade dried rose petals or certified organic fresh flowers from a local farmer.
Which Varieties Smell the Best?
Not all roses are created equal when it comes to fragrance. If you want that classic, deep rose scent, look for Rosa damascena (Damask rose) or Rosa centifolia (Cabbage rose). These varieties have a high oil content, which is why they are the preferred choice for high-end perfumes and essential oils. However, any fragrant rose will work. Even the wild roses growing in the countryside can produce a lovely, delicate water with a slightly more herbal undertone.
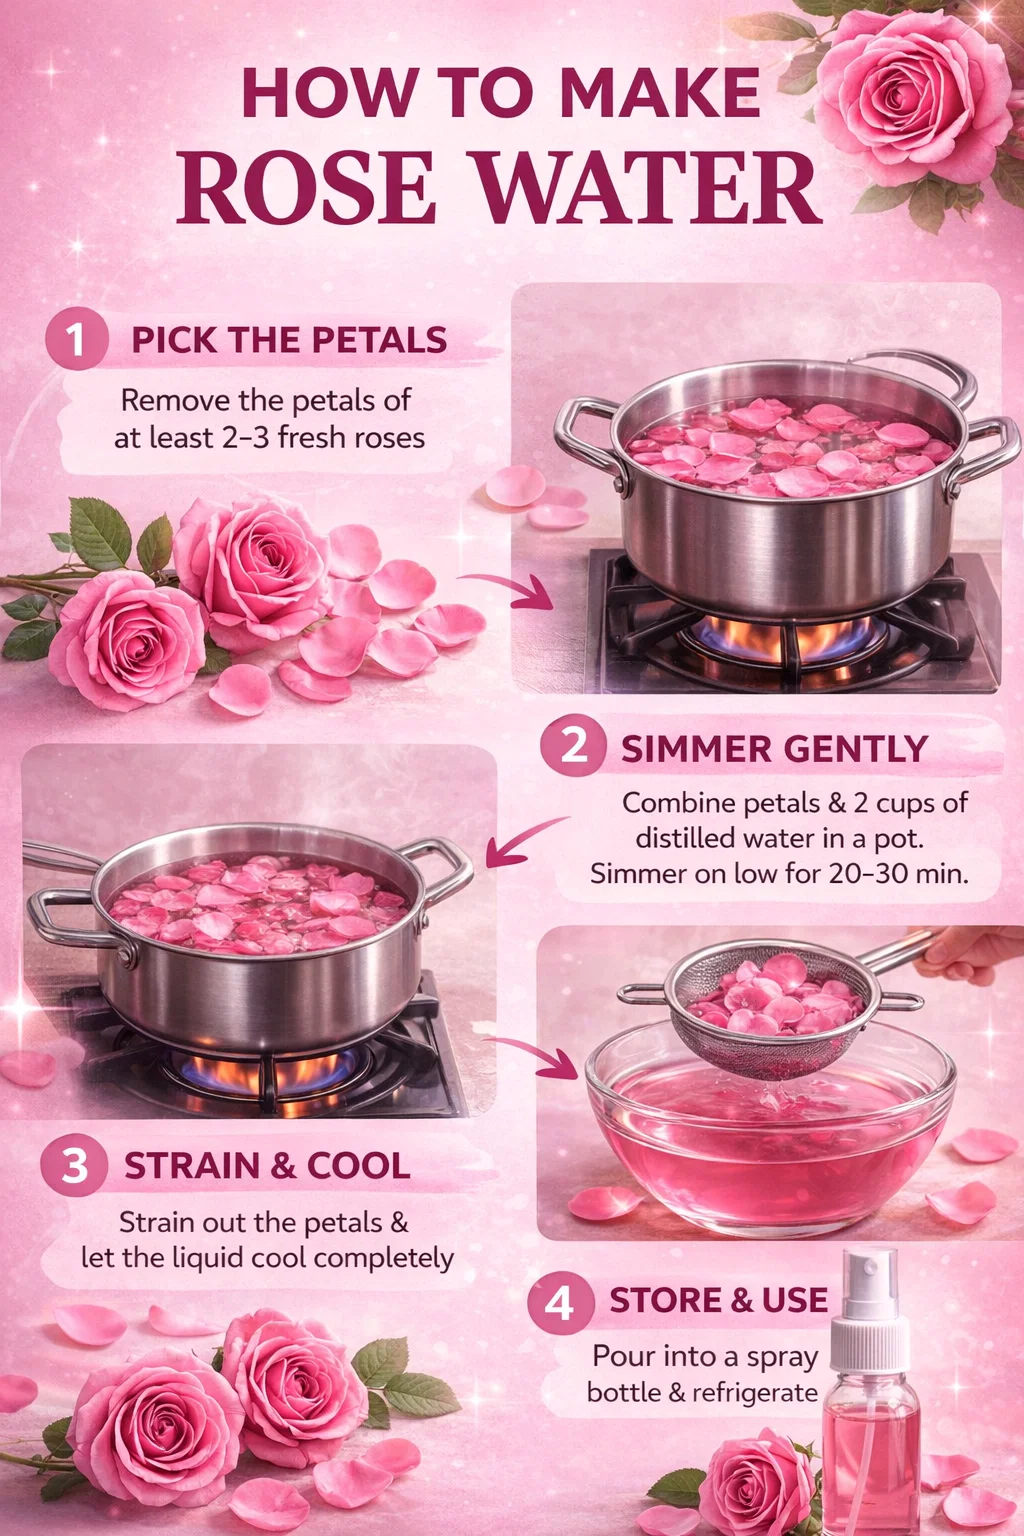
Step 1: Collecting and Preparing Your Petals
To begin, you will need the petals from about two to three large roses. If you are using fresh flowers, the best time to harvest them is in the early morning, just after the dew has evaporated but before the sun is at its peak. This is when the essential oils in the petals are most concentrated. Gently pull the petals away from the stem and the green base of the flower. You want to avoid getting any leaves or stems in your mixture, as these can add a bitter or “green” scent to the water rather than the pure floral notes you are looking for.
Once you have your petals, give them a quick rinse in cool water. This step is crucial for removing any tiny insects, dust, or dirt that might be hiding in the folds of the flowers. Be gentle during this process; you do not want to bruise the petals or wash away those precious oils. Pat them dry very lightly with a clean towel or let them air dry for a few minutes before moving on to the next step.
Step 2: The Simmering Process
Place your clean petals into a small to medium-sized pot. Now, add about two cups of distilled water. It is very important to use distilled water rather than tap water. Tap water contains minerals and sometimes bacteria that can cause your rose water to spoil quickly. Distilled water provides a neutral base that allows the essence of the rose to shine through while extending the shelf life of the final product.
Finding the Perfect Temperature
Turn your stove to a low heat setting. You are not looking for a rolling boil. If the water gets too hot, it can actually “cook” the petals and destroy the delicate aromatic compounds and vitamins. You want a very gentle simmer. As the water warms up, you will notice the petals beginning to lose their vibrant color. Do not be alarmed; this is exactly what is supposed to happen! The color and the nutrients are being transferred from the physical petals into the liquid. Keep the pot covered with a lid to prevent the steam from escaping, as that steam contains the very essence you are trying to capture.
Step 3: Cooling and Straining
After about 20 to 30 minutes of simmering, the petals should appear pale, almost translucent or white. At this point, turn off the heat and let the pot sit on the stove with the lid still on. Allowing it to cool down slowly helps the infusion become even stronger. Once the liquid has reached room temperature, it is time to strain. Place a fine-mesh strainer over a clean glass bowl and carefully pour the contents of the pot through it.
Use the back of a spoon to gently press down on the soggy petals in the strainer. This ensures you get every last drop of the concentrated rose essence. You will be left with a beautiful, pink or amber-tinted liquid that smells like a summer garden. The used petals can be composted, as they have given up all their magic to the water.
Step 4: Proper Storage and Preservation
Transfer your fresh rose water into a sterilized glass jar or a glass spray bottle. Glass is much better than plastic for storage because it does not leach chemicals and it helps maintain the purity of the scent. To keep your rose water fresh for as long as possible, you must store it in the refrigerator. The cool temperature slows down the growth of bacteria and makes the water feel incredibly refreshing when you spray it on your face.
- Shelf Life: Homemade rose water typically lasts for about one to two weeks in the fridge.
- Visual Check: If the liquid becomes cloudy or the scent changes, it is time to discard it and make a fresh batch.
- Pro Tip: You can freeze rose water in ice cube trays! These floral ice cubes are amazing for rubbing on the face in the morning to reduce puffiness and wake up the skin.
Creative Ways to Use Your Homemade Rose Water
Now that you have a bottle of this liquid gold, how should you use it? The possibilities are endless. As a facial toner, simply soak a cotton pad and swipe it over your skin after cleansing. It helps remove any lingering impurities while prepping your skin to better absorb your moisturizer. You can also keep it in a small spray bottle in your bag for a midday pick-me-up. A quick misting over your makeup can give you a fresh, dewy glow and help you feel more alert during a long afternoon at the office.
Hair Care and Beyond
Many people forget that rose water is excellent for hair as well. If you struggle with a dry or itchy scalp, try massaging a little rose water into your roots after washing. It can help soothe irritation and leave your hair smelling divine. You can also add it to your bath water for a luxurious, spa-like experience at home. Combine it with some Epsom salts and a few drops of jojoba oil for a soak that leaves your skin feeling silky smooth and your mind feeling completely at peace.
A Spiritual and Ritualistic Tool
For those interested in the more mystical side of wellness, rose water has long been used in spiritual rituals. It is often associated with love, protection, and emotional healing. Some people use it to “cleanse” their space by misting it around a room to clear out negative energy and invite in feelings of compassion and harmony. Whether you view it through a scientific lens of skin care or a spiritual lens of ritual, there is no denying the positive energy that roses bring into a home.
Conclusion: The Joy of Slow Beauty
In a world where we are constantly encouraged to buy the latest high-tech beauty gadgets and expensive synthetic serums, there is something revolutionary about returning to the basics. Making your own rose water is an act of slow beauty. It requires you to be present, to use your senses, and to appreciate the simple gifts that the earth provides. It connects you to a long lineage of people who have looked at a blooming rose and seen not just a flower, but a source of health and vitality.
By following these four simple steps, you have created a product that is environmentally friendly, incredibly effective, and uniquely yours. Each batch might smell a little different depending on the season and the flowers you choose, and that is the beauty of it. So, the next time you see a rose bush in full bloom, remember that you have the power to capture that fleeting beauty in a bottle. Your skin, your hair, and your spirit will thank you for it. Happy crafting!
Would you like me to generate a different version of this post with more focus on the history of rose water or perhaps its culinary uses?