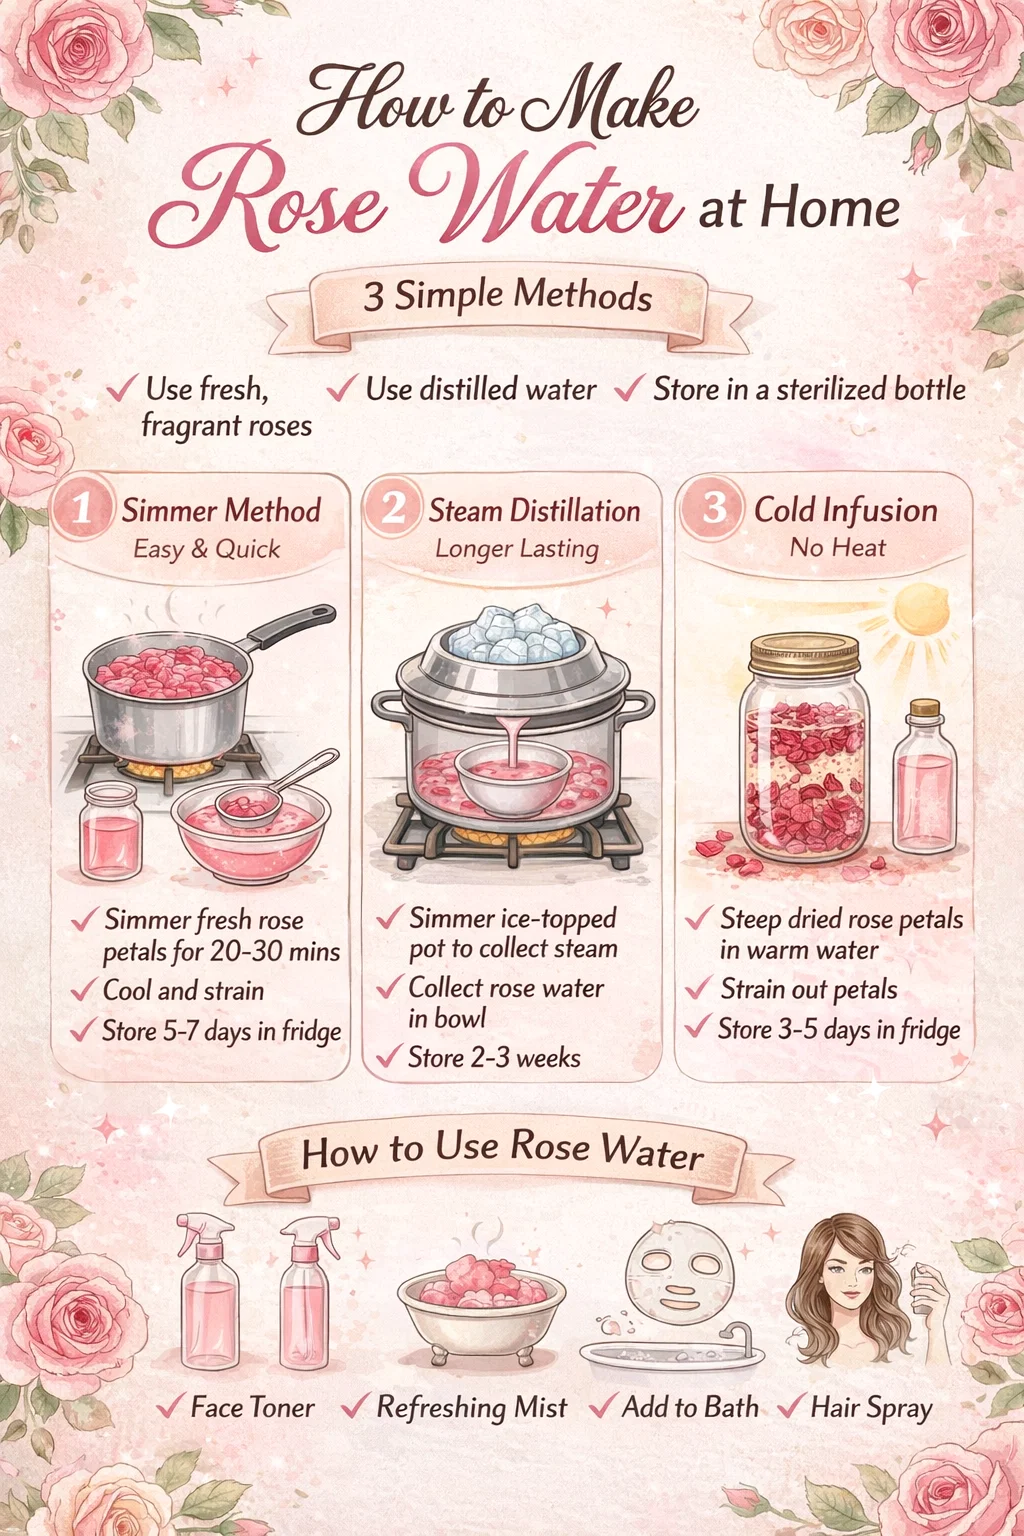
How to Make Rose Water at Home 3 Easy DIY Methods for Natural Skincare
There is something undeniably romantic and timeless about the scent of a fresh rose. For centuries, this “Queen of Flowers” has been prized not just for its beauty, but for its profound healing and beautifying properties. If you have ever spritzed a high-end rose water toner on your face, you know that instant feeling of hydration and calm. But did you know that the most potent, chemical-free rose water can actually be made right in your own kitchen? Transitioning from store-bought beauty products to DIY herbalism is a rewarding journey that connects you to nature, and learning how to make rose water is the perfect entry point. In this guide, we will explore the deep benefits of this floral elixir and walk through three distinct methods to create your own liquid gold at home.
The Magic of Rose Water for Your Skin and Soul
Before we dive into the simmering pots and glass jars, it is important to understand why rose water has remained a staple in vanity cabinets from ancient Persia to modern-day spas. Rose water is a natural hydrator. Unlike many commercial toners that rely on alcohol to “tighten” pores, rose water balances the skin pH while infusing it with moisture. It is also packed with anti-inflammatory properties, making it a godsend for those struggling with redness, rosacea, or sensitive skin irritation.
Beyond the physical benefits, the aromatherapy aspect of roses cannot be ignored. The scent of roses is scientifically linked to stress reduction and mood enhancement. When you incorporate homemade rose water into your daily routine, you are not just performing a skincare task; you are engaging in a ritual of self-care that calms the nervous system and invites a sense of luxury into the mundane. Whether you use it to set your makeup, soothe a sunburn, or simply refresh your hair after a long day, the versatility of this floral water is unmatched.
Essential Tips for the Best DIY Rose Water
To create a high-quality product that is safe for your skin, you need to start with the right foundation. Not all roses are created equal, especially when it comes to topical application. Here are the golden rules to follow before you start any of the extraction methods.
Choose Fragrant, Organic Roses
The quality of your rose water is directly tied to the scent and purity of the petals. If possible, use roses from your own garden where you know no pesticides have been used. If you are buying them, look for “food grade” or “organic” labels. Standard florist roses are often treated with heavy chemicals and preservatives to keep them looking fresh in the vase, and you definitely do not want those toxins steeping into your skincare. Varieties like Rosa Damascena or Rosa Centifolia are the gold standards for their high oil content and incredible fragrance.
The Importance of Distilled Water
While tap water might be convenient, it contains minerals and sometimes bacteria that can cause your rose water to spoil quickly. Using distilled water ensures a pure environment for the rose essence and helps extend the shelf life of your finished product. If you are making a large batch, this small step makes a significant difference in clarity and longevity.
Cleanliness and Sterilization
Since we are not adding synthetic preservatives, your rose water is susceptible to mold if handled improperly. Always wash your rose petals thoroughly in cool water to remove any lingering dust or tiny insects. Additionally, ensure that your glass storage bottles are sterilized in boiling water before use. A clean environment is the secret to a professional-grade DIY product.
Method 1: The Simmering Method (Easy and Quick)
If you are new to making floral waters and want results fast, the simmering method is your best friend. This process creates a beautifully colored, fragrant water that is perfect for immediate use in baths or as a refreshing facial mist.
What You Will Need:
2 cups of fresh rose petals
Distilled water (just enough to cover the petals)
A small saucepan with a lid
A fine-mesh strainer
A sterilized glass jar
Step-by-Step Instructions:
- Rinse: Gently rinse your 2 cups of fresh petals to ensure they are clean.
- Combine: Place the petals in your saucepan and pour in enough distilled water to just barely cover them. Adding too much water will dilute the final scent.
- Simmer: Turn the heat to low. It is crucial not to let the water reach a rolling boil, as high heat can destroy the delicate volatile oils. Cover with a lid and let it simmer for about 20 to 30 minutes.
- Watch the Color: You will know it is ready when the petals lose their vibrant color and become pale or translucent, and the water takes on a deep rose hue.
- Cool and Strain: Turn off the heat and let the mixture cool completely with the lid on. Once cool, strain the liquid into your sterilized jar and discard the petals.
Storage Tip: This method produces a water that lasts about 5 to 7 days in the refrigerator. Because it contains plant particles, it is the most perishable of the three methods.
Method 2: The Steam Distillation Method (Stronger and Lasts Longer)
This is the “pro” way to make rose water. Steam distillation is how essential oils and true floral hydrosols are made. This method produces a clear, highly concentrated rose water that has a much longer shelf life because the water never actually touches the petals; only the steam does.
What You Will Need:
A large pot with a lid
A small heat-resistant glass bowl (to go inside the pot)
A bag of ice cubes
3 to 4 cups of fresh rose petals
Distilled water
Step-by-Step Instructions:
- Set Up the “Still”: Place a small brick or an upturned ceramic bowl in the center of your large pot. Place your empty glass collection bowl on top of the brick.
- Add Petals and Water: Scatter your rose petals in the space between the brick and the sides of the pot. Pour distilled water over the petals until it reaches the top of the brick (but do not get water inside the collection bowl).
- The Upside-Down Lid: Place the lid of the pot on upside down. This creates a concave shape that will direct the condensation toward the center.
- The Ice Factor: Turn the heat to medium-low. Place a generous amount of ice on top of the inverted lid. As the steam rises from the heated petals, it hits the cold lid, condenses into droplets, and falls directly into your center bowl.
- Collect: Continue this process for about 30 to 45 minutes, replacing the ice as it melts. The clear liquid in your center bowl is pure, distilled rose water.
Storage Tip: Distilled rose water is very stable and can last 2 to 3 weeks, or even longer if kept in a cool, dark place.
Method 3: The Cold Infusion Method (No Heat, Super Gentle)
Heat can sometimes change the chemical profile of a plant. If you want the most “raw” version of rose water, or if you only have access to dried rose petals, the cold infusion is a wonderful, low-intervention choice. This is the gentlest way to extract the essence of the flower.
What You Will Need:
1 cup of dried rose petals
Warm (not boiling) distilled water
A large glass mason jar
Step-by-Step Instructions:
- Prepare the Jar: Place 1 cup of dried petals into your sterilized mason jar.
- Add Water: Fill the jar with warm distilled water. The warmth helps “wake up” the dried botanicals without cooking them.
- The Long Steep: Seal the jar tightly and place it in a sunny windowsill (for a “solar infusion”) or a cool dark cupboard. Let it steep for 12 to 24 hours. Give it a gentle shake every few hours if you can.
- Strain: Use a cheesecloth or fine strainer to separate the liquid from the petals. Squeeze the petals hard to get every last drop of essence.
Storage Tip: Cold-infused rose water is best used within 3 to 5 days and should always be kept in the fridge.
Creative Ways to Use Your Homemade Rose Water
Now that you have a beautiful bottle of rose water, how do you use it? The possibilities go far beyond just a simple splash on the face. Here are some of our favorite ways to integrate this DIY treasure into your lifestyle.
As a Refreshing Facial Mist
Keep your rose water in a small spray bottle. During the hot summer months or after a workout, a quick mist over your face provides instant cooling and hydration. It is also a fantastic way to set your makeup, giving your skin a dewy, natural finish rather than a powdery look.
Boost Your Face Masks
If you use clay masks, replace the tap water in the recipe with your homemade rose water. The rose water will counteract the drying effects of the clay, leaving your skin feeling soft and supple rather than tight and stripped.
Hair Health and Shine
Rose water is an excellent hair tonic. After your usual shampoo and conditioning routine, use rose water as a final rinse. It helps to smooth the hair cuticle, add shine, and leaves behind a subtle, heavenly scent that lasts all day.
The Ultimate Relaxing Bath
Pour a cup of your “Simmer Method” rose water into a warm bath along with some Epsom salts. The combination of magnesium and rose essence creates a spa-like experience at home that eases muscle tension and quiets the mind before bed.
Conclusion: A Petal-Powered Beauty Routine
Making your own rose water is more than just a DIY project; it is a step toward a more intentional and natural lifestyle. By taking the time to select the right petals and choosing the method that fits your schedule, you are creating a product that is uniquely yours and completely free from the mysterious “fragrance” labels found in commercial bottles. Whether you prefer the speed of the simmer, the purity of the distillation, or the patience of the cold infusion, your skin will surely thank you for the extra love. So, the next time you see a bush of fragrant roses, remember that within those petals lies the secret to a glowing, refreshed, and peaceful version of yourself. Happy brewing!
Would you like me to help you create a specific skincare routine using your new rose water or perhaps a label design for your bottles?