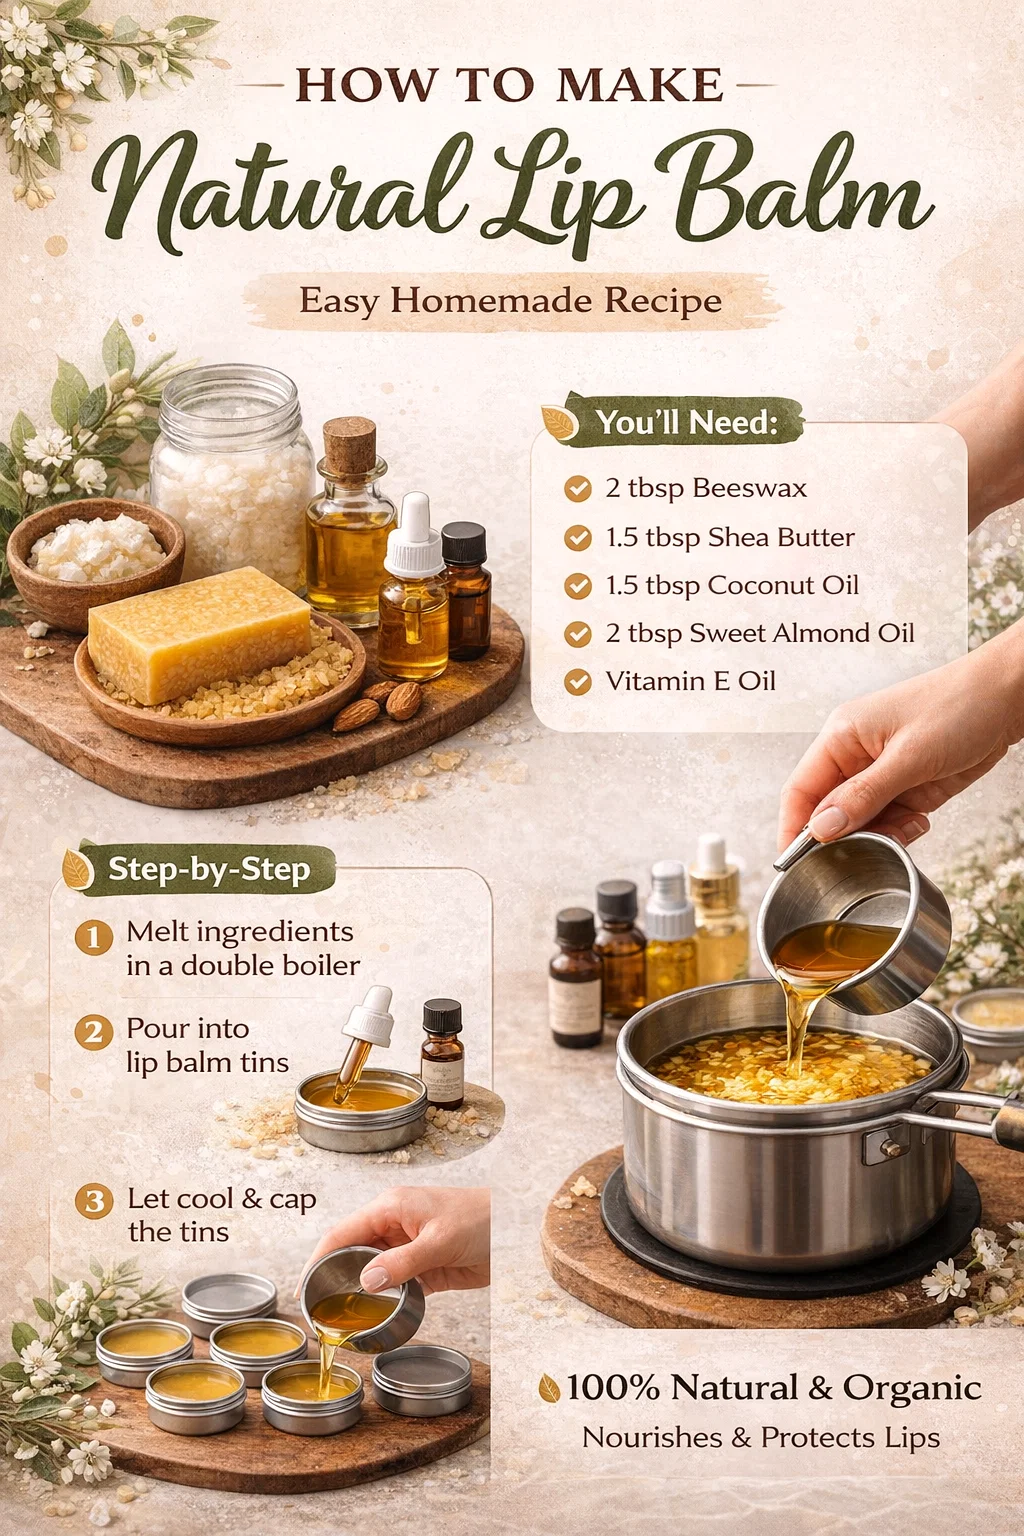
DIY Natural Organic Lip Balm Recipe Easy 4-Step Homemade Lip Care Guide
There is something incredibly satisfying about creating your own beauty products from scratch. Not only do you get to control every single ingredient that touches your skin, but you also tap into a tradition of self sufficiency that feels both grounding and luxurious. If you have ever looked at the back of a store bought lip balm tube and found yourself squinting at a long list of unpronounceable chemicals, you are not alone. This growing awareness of what we put on our bodies has sparked a massive interest in organic, homemade alternatives. Today, we are diving deep into the art of making a natural lip balm that is as effective as it is pure.
The Magic of Natural Lip Care
Our lips are one of the most sensitive parts of our body. Unlike the rest of our skin, the skin on our lips is extremely thin and lacks oil glands. This makes them particularly prone to dryness, cracking, and irritation from environmental factors like wind, sun, and cold air. While many commercial balms offer temporary relief, they often contain petroleum based waxes or synthetic fragrances that can actually lead to a cycle of dependency, drying out your lips further in the long run.
Switching to a 100 percent natural and organic recipe changes the game. By using plant based fats and beeswax, you are providing your skin with actual nutrients. These ingredients do not just sit on top of the skin; they help to heal and protect the delicate barrier of your lips. This specific recipe is designed to be a powerhouse of hydration, combining the structural integrity of beeswax with the deep moisturizing properties of shea butter and coconut oil.
Understanding Your Ingredients
To make the perfect lip balm, it helps to understand what each component brings to the table. This is not just a random mixture; it is a carefully balanced formula designed for the perfect texture and maximum skin benefit.
Beeswax: The Protective Shield
Beeswax is the foundation of any good homemade balm. It acts as a natural emulsifier and provides the structural firmness needed to keep the balm solid at room temperature. More importantly, beeswax is a humectant, meaning it attracts water to the skin. It creates a breathable barrier that locks moisture in while protecting your lips from harsh elements without clogging pores.
Shea Butter: The Deep Moisturizer
Shea butter is a fatty substance extracted from the nuts of the shea tree. It is rich in vitamins A and E, along with essential fatty acids. In this recipe, shea butter provides the creamy consistency that makes the balm glide on smoothly. It is known for its anti inflammatory properties, making it an excellent choice for healing severely chapped or windburned lips.
Coconut Oil: The Fast Absorbing Base
Coconut oil is a staple in natural beauty for a reason. It is incredibly moisturizing and absorbs quickly into the skin. It contains lauric acid, which has antimicrobial properties, helping to keep your lip balm fresh and your lips healthy. When paired with heavier waxes, coconut oil ensures the product does not feel too heavy or waxy.
Sweet Almond Oil and Vitamin E
Sweet almond oil is a light, hypoallergenic oil that is great for sensitive skin. It helps to keep the mixture fluid enough to pour and adds a dose of Vitamin D. Adding an extra boost of pure Vitamin E oil acts as both a skin healer and a natural preservative, helping to extend the shelf life of your homemade creation by preventing the oils from going rancid.
The Step by Step Process
The beauty of this recipe lies in its simplicity. You do not need a laboratory to create high quality skincare. All you need is a bit of patience and a few basic kitchen tools.
Step 1: Preparing Your Double Boiler
The most important rule of making natural skincare is to avoid direct heat. If you place your oils and wax directly over a flame, you risk burning the ingredients and losing their beneficial properties. Instead, use a double boiler. If you do not have a professional one, simply place a heat safe glass bowl or a smaller stainless steel pot inside a larger pot filled with a few inches of simmering water. This ensures a gentle, even melt.
Step 2: Melting the Foundation
Start by adding your 2 tablespoons of beeswax, 1.5 tablespoons of shea butter, and 1.5 tablespoons of coconut oil into your double boiler. As the water simmers below, the ingredients will slowly begin to liquefy. Use a clean glass stir rod or a stainless steel spoon to gently mix them. Once the mixture is completely clear and liquid, remove it from the heat.
Step 3: Incorporating the Liquid Oils
Wait just a minute for the temperature to drop slightly, then stir in your 2 tablespoons of sweet almond oil and 1 tablespoon of Vitamin E oil. Adding these at the end helps preserve the integrity of the more delicate oils. If you want to add essential oils for scent, such as peppermint or lavender, now is the time to add a few drops. Be sure to stir thoroughly so the mixture is completely uniform.
Step 4: Pouring and Setting
Working quickly before the wax begins to harden, pour the liquid mixture into small lip balm tins or tubes. It is helpful to have your containers lined up and ready to go on a flat surface. Fill them almost to the brim. You will notice a small dip form in the center as they cool; this is normal. Leave them undisturbed for at least an hour. Once they are completely solid and cool to the touch, cap them and store them in a cool, dry place.
Tips for Success and Troubleshooting
While the process is straightforward, a few professional tips can help you achieve that store bought finish with your homemade product. If you find your balm is too soft, you can melt it back down and add a tiny bit more beeswax. Conversely, if it feels too hard or difficult to apply, melt it again and add a teaspoon of coconut oil.
Cleanliness is also key. Ensure all your tools and containers are sterilized with rubbing alcohol before you begin. Since this recipe does not contain water, it has a naturally long shelf life, but keeping things sterile will ensure it stays fresh for six months to a year. Always use dry fingers or a clean applicator when using the balm to prevent introducing bacteria into the tin.
The Benefits of Going Organic
When you choose to follow an organic recipe like this one, you are making a choice for your health and the environment. Organic ingredients are grown without synthetic pesticides or fertilizers, which means fewer toxins in the soil and fewer toxins on your skin. Furthermore, by making your own products, you are significantly reducing plastic waste. You can wash and reuse your metal tins or glass jars indefinitely, moving one step closer to a zero waste lifestyle.
This lip balm also makes for a thoughtful, handcrafted gift. There is a unique charm in giving something you made with your own hands. You can easily customize the recipe by adding natural micas for a bit of tint or using different essential oil blends to suit the season. A citrus blend is refreshing for summer, while a vanilla and cinnamon blend feels cozy for the winter months.
Conclusion
Creating your own natural lip balm is a rewarding journey into the world of DIY beauty. It transforms a mundane daily routine into a moment of self care, knowing that you are nourishing your body with the very best that nature has to offer. With just a handful of ingredients and four simple steps, you can produce a high quality product that outperforms expensive commercial brands. Whether you are looking to protect your lips from the elements or searching for a more sustainable way to live, this organic recipe is the perfect place to start. So, gather your ingredients, clear your counter, and enjoy the process of crafting something beautiful and beneficial for yourself and your loved ones.