Easy 3-Ingredient Chocolate Covered Bananas Recipe Healthy Frozen Dessert Ideas
There is something undeniably nostalgic and comforting about the combination of ripe bananas and rich chocolate. It is a flavor profile that transcends generations, appearing in everything from high end bistro desserts to simple lunchbox snacks. When you take that classic pairing and freeze it, you create a treat that is both refreshing and indulgent. This guide explores the art of making the perfect chocolate covered banana, a recipe that is as much about the process and customization as it is about the final delicious bite.
The Evolution of a Classic Healthy Dessert
The concept of freezing fruit and dipping it in chocolate is not new, but it has seen a massive resurgence in recent years as more people look for ways to satisfy their sweet tooth without reaching for highly processed snacks. Unlike store bought ice cream bars that are often loaded with artificial stabilizers and excessive corn syrup, a chocolate covered banana relies on the natural creaminess of the fruit. When frozen, a banana develops a texture remarkably similar to custard or soft serve ice cream, making it the ideal base for a chocolate shell.
Historically, these treats were staples at county fairs and boardwalks, often served whole on a stick and dipped in a thick layer of milk chocolate. Today, the trend has shifted toward a more refined approach. By using high quality dark chocolate, organic coconut oil, and an array of sophisticated toppings like sea salt or crushed pistachios, you can elevate this simple snack into a premium café dessert. It is a testament to the idea that you do not need a long list of ingredients to create something truly spectacular.
Essential Ingredients for Success
To achieve the best results, the quality of your ingredients matters significantly. Since there are so few components to this recipe, each one has a chance to shine. Here is a breakdown of what you will need and why each part is important.
Choosing the Right Bananas
The ripeness of your bananas will dictate the flavor and texture of your finished treat. You want bananas that are yellow with just a few brown speckles. If the bananas are too green, they will be starchy and lack the necessary sweetness. If they are overripe and mushy, they will not hold their shape on the stick and may become too watery when frozen. Look for firm bananas that are easily peelable but still have some structural integrity.
The Chocolate Component
While you can use standard chocolate chips, a high quality bar of chocolate often melts more smoothly and provides a better mouthfeel. Dark chocolate with at least 60 percent cocoa content is a popular choice because it provides a sophisticated bitterness that balances the intense sweetness of the frozen banana. However, milk chocolate is excellent for a more traditional, kid friendly version, and white chocolate can be used for a decorative drizzle or a sweeter profile.
The Role of Coconut Oil
Adding a tablespoon of coconut oil to your melted chocolate is a game changer. This creates what is known as a magic shell effect. Because coconut oil has a low melting point but hardens quickly when chilled, it helps the chocolate coating set into a crisp, snappy shell as soon as it hits the cold banana. It also adds a subtle hint of tropical flavor and a beautiful glossy finish to the final product.
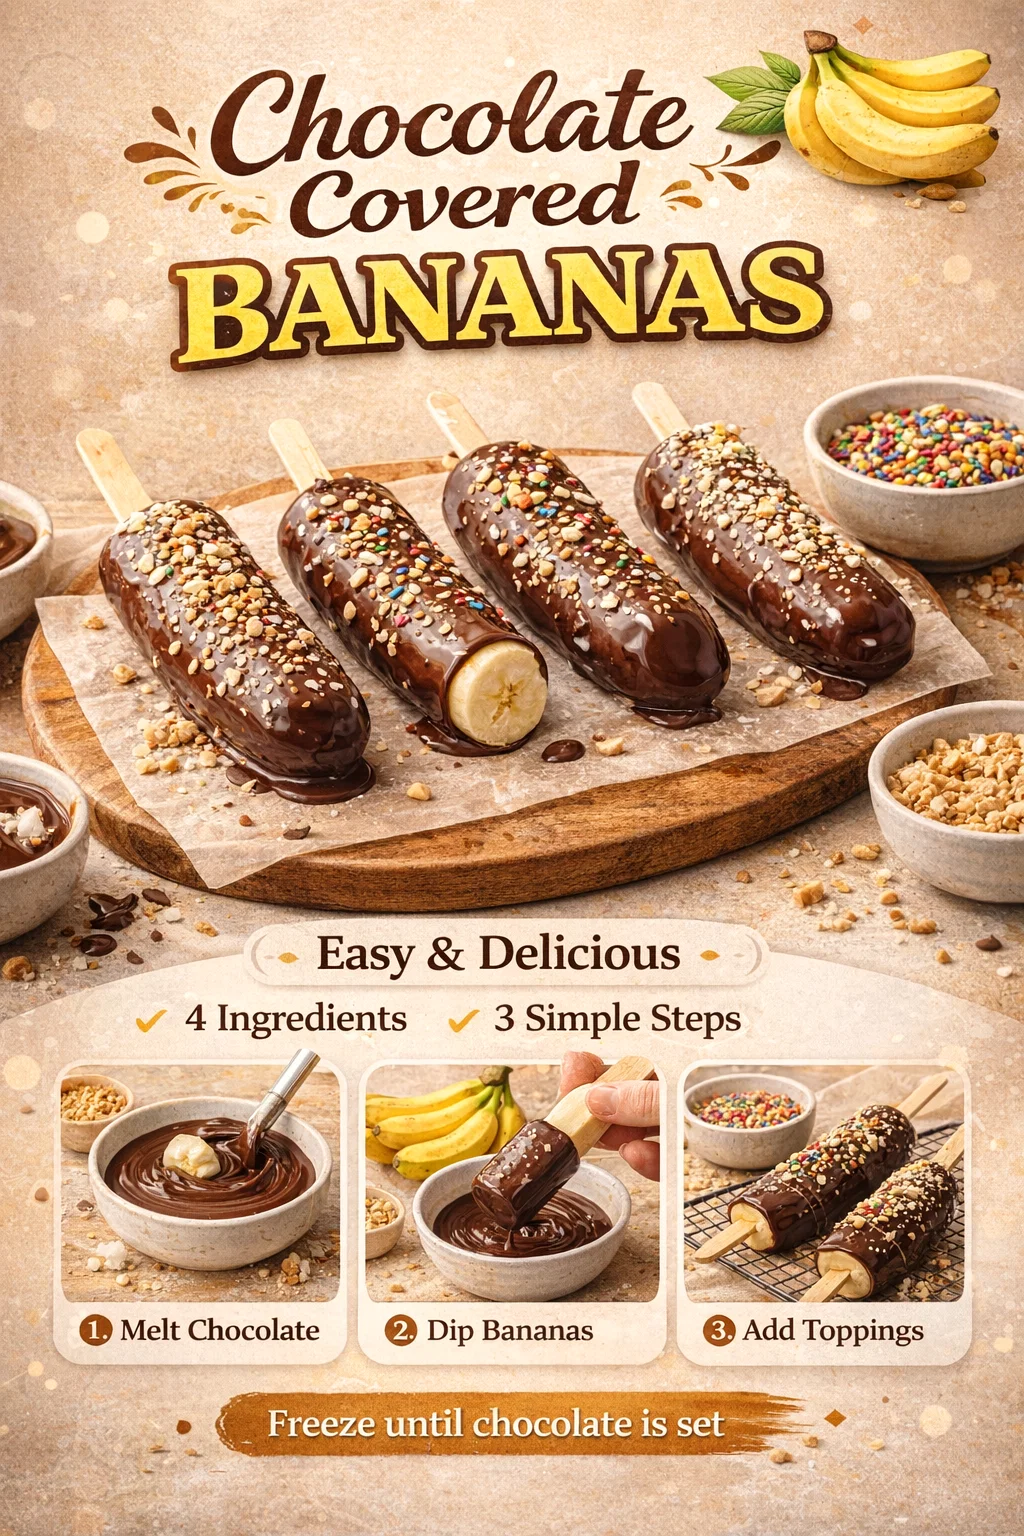
Step by Step Guide to Perfect Dipping
Preparing these treats is a straightforward process, but following a few specific steps will ensure that your coating is even and your toppings stay in place. Preparation is key to avoiding a sticky mess in the kitchen.
- Prep the fruit: Peel your bananas and cut them in half. Inserting a wooden popsicle stick or a sturdy bamboo skewer into the cut end provides a handle for dipping and eating.
- The Pre Freeze: One of the most important tips is to freeze the banana halves for at least 20 to 30 minutes before dipping. This ensures the fruit is cold enough to make the chocolate harden instantly, preventing the chocolate from sliding off.
- Melting the Chocolate: Use a double boiler or a microwave in 30 second bursts to melt your chocolate and coconut oil together. Stir constantly until the mixture is silky smooth. Transfer the chocolate to a tall, narrow glass or jar. This makes it much easier to submerge the entire banana in one go.
- The Dip and Garnish: Submerge the chilled banana into the chocolate, pull it out, and let the excess drip off for a few seconds. While the chocolate is still wet, quickly sprinkle on your nuts, sprinkles, or coconut. You only have a few seconds before the shell sets!
Creative Topping Ideas to Elevate Your Snack
The beauty of this recipe lies in its versatility. While the image shows classic sprinkles and crushed nuts, the possibilities for customization are endless. You can tailor your toppings to suit a specific holiday, a party theme, or simply your personal cravings.
The Crunchy and Salty Route
For those who love a sweet and salty combination, try topping your chocolate bananas with crushed pretzels, smoked sea salt, or roasted peanuts. The saltiness cuts through the richness of the chocolate and enhances the natural sugars in the banana. Toasted almond slivers or crushed hazelnuts also provide a wonderful earthy crunch that mimics expensive gourmet truffles.
Sweet and Fruity Variations
If you want to lean into the fruity flavors, consider rolling your dipped bananas in freeze dried raspberry or strawberry powder. This adds a bright, tart contrast to the dark chocolate. Shredded coconut is another classic choice that pairs perfectly with the coconut oil used in the chocolate coating, giving the treat a distinct Caribbean flair.
Indulgent and Fun Additions
For a dessert that feels like a party, go for crushed graham crackers and a drizzle of marshmallow fluff to create a Smores inspired banana. Crushed Oreo cookies, mini chocolate chips, or even a dusting of cocoa powder can turn a simple fruit snack into a decadent masterpiece. If you are serving these at a kids birthday party, a rainbow of different colored sprinkles is always a guaranteed hit.
Health Benefits of Frozen Banana Treats
It is rare to find a dessert that satisfies a sugar craving while also providing significant nutritional value. Bananas are a powerhouse of potassium, which is essential for heart health and muscle function. They also provide a good dose of Vitamin B6 and Vitamin C. By using dark chocolate, you are also incorporating antioxidants and flavanols into your snack, which are known to support brain health and reduce inflammation.
When compared to traditional ice cream or candy bars, these chocolate covered bananas are significantly lower in calories and contain no hidden preservatives. They are naturally gluten free and can easily be made vegan by choosing dairy free chocolate. This makes them an inclusive dessert option for guests with various dietary restrictions.
Common Mistakes to Avoid
While this recipe is simple, there are a few pitfalls that can result in a less than perfect batch. Being aware of these common mistakes will help you achieve professional results every time.
Using Wet Bananas
Moisture is the enemy of chocolate. If your bananas have condensation on them or are slightly damp from being handled, the chocolate will not adhere properly and may seize up. Ensure the bananas are dry before you begin the dipping process.
Overheating the Chocolate
Chocolate is delicate. If you heat it too quickly or at too high a temperature, it will lose its shine and become grainy or scorched. Always melt chocolate slowly and stir frequently to distribute the heat evenly.
Forgetting the Toppings
Because the chocolate sets so quickly on the frozen fruit, you cannot wait until you have dipped all the bananas to start adding toppings. You must dip one, garnish it immediately, and then move on to the next. If the chocolate hardens, your sprinkles and nuts will simply bounce off and end up on the floor.
Storage and Serving Suggestions
Once your bananas are fully coated and decorated, place them on a tray lined with parchment paper and return them to the freezer for at least two hours. This allows the banana to reach the perfect frozen consistency. For long term storage, once they are completely frozen, you can transfer them to an airtight container or a freezer bag. They will stay fresh and delicious for up to two weeks.
When it is time to serve, you can enjoy them straight from the freezer for a firm, popsicle like experience. Alternatively, let them sit at room temperature for about five minutes. This softens the banana just enough to create a creamy, melt in your mouth texture while the chocolate shell remains crisp and snappy. For a plated dessert, serve them alongside a dollop of whipped cream and a few fresh berries for a beautiful presentation.
Bringing the Café Experience Home
Creating these chocolate covered bananas is a wonderful way to bring a bit of café culture into your own kitchen. It is an activity that is simple enough for children to help with, yet the results are sophisticated enough to serve at a dinner party. It encourages creativity and allows you to experiment with flavors and textures in a way that is low stress and highly rewarding.
In a world where we are often rushed and reliant on pre packaged foods, taking twenty minutes to prepare a batch of fresh, whole food treats is a small act of self care. It reminds us that the best flavors often come from the simplest ingredients. Whether you follow the recipe exactly or forge your own path with exotic toppings and different types of chocolate, you are sure to end up with a snack that is as beautiful to look at as it is to eat.
Conclusion
The chocolate covered banana is more than just a trend; it is a timeless dessert that perfectly balances nutrition and indulgence. By mastering the simple technique of melting chocolate with coconut oil and prepping your fruit correctly, you unlock a world of snack possibilities. From the satisfying snap of the chocolate shell to the creamy, cold center of the banana, every bite is a celebration of simple culinary joy. So, the next time you see a bunch of bananas sitting on your counter, don’t let them go to waste. Grab some chocolate, fire up the stove, and create a batch of these delightful frozen treats. Save this guide for your next kitchen adventure and enjoy the process of making something truly special.