How to Render Beef Tallow DIY Guide for Skincare, Soap Healthy Cooking
Stepping into the world of traditional food preparation and natural living often feels like rediscovering a lost art. One of the most versatile and rewarding projects you can undertake in your own kitchen is learning how to render beef tallow. For generations, this golden fat was a staple in every household, prized for its incredible stability in cooking and its deep nourishing properties for the skin. Today, as more people move toward sustainable, nose to tail living and seek out clean, ancestral alternatives to processed seed oils and synthetic skincare, tallow is making a massive comeback. Rendering your own tallow at home is surprisingly simple, deeply economical, and provides you with a high quality ingredient that serves a multitude of purposes from the kitchen to the bathroom cabinet.
What Exactly is Beef Tallow and Why Should You Render It
At its simplest, beef tallow is rendered fat from cattle. Specifically, it is the result of slowly melting down raw beef fat (often called suet when it comes from the area around the kidneys) to separate the pure oils from any connective tissue, water, or impurities. Once cooled, tallow is solid at room temperature and possesses a beautiful creamy white color and a mild, slightly nutty aroma.
The benefits of having a jar of homemade tallow on hand are nearly endless. In the kitchen, it boasts a high smoke point, making it one of the safest and most delicious fats for frying, roasting, and sautéing. Unlike many vegetable oils that oxidize and become unstable at high temperatures, tallow remains chemically stable. Beyond the stove, tallow is biologically compatible with human skin cells. It is packed with vitamins A, D, E, and K, as well as anti-inflammatory fatty acids, making it a powerhouse ingredient for DIY balms, soaps, and moisturizers.
Selecting the Best Fat for High Quality Results
The quality of your finished tallow depends entirely on the quality of the raw fat you start with. If you want the most nutrient dense and clean smelling product, it is highly recommended to source grass fed and grass finished beef fat. Fat is where animals store nutrients, but it is also where they store toxins. Choosing fat from cows raised on open pastures without the use of synthetic hormones or routine antibiotics ensures that your tallow is as pure as possible.
Understanding the Difference Between Suet and Trim Fat
When you talk to a local butcher or a farmer, you might hear the terms suet and trim. Suet is the hard, crumbly fat found around the kidneys and loins. This is considered the gold standard for rendering because it produces a very hard, white tallow with the highest concentration of nutrients. It is particularly excellent for skincare and candle making. Trim fat, on the other hand, comes from other parts of the animal. While it still renders into great tallow for cooking, it might be slightly softer and have a more pronounced beefy scent than pure suet.
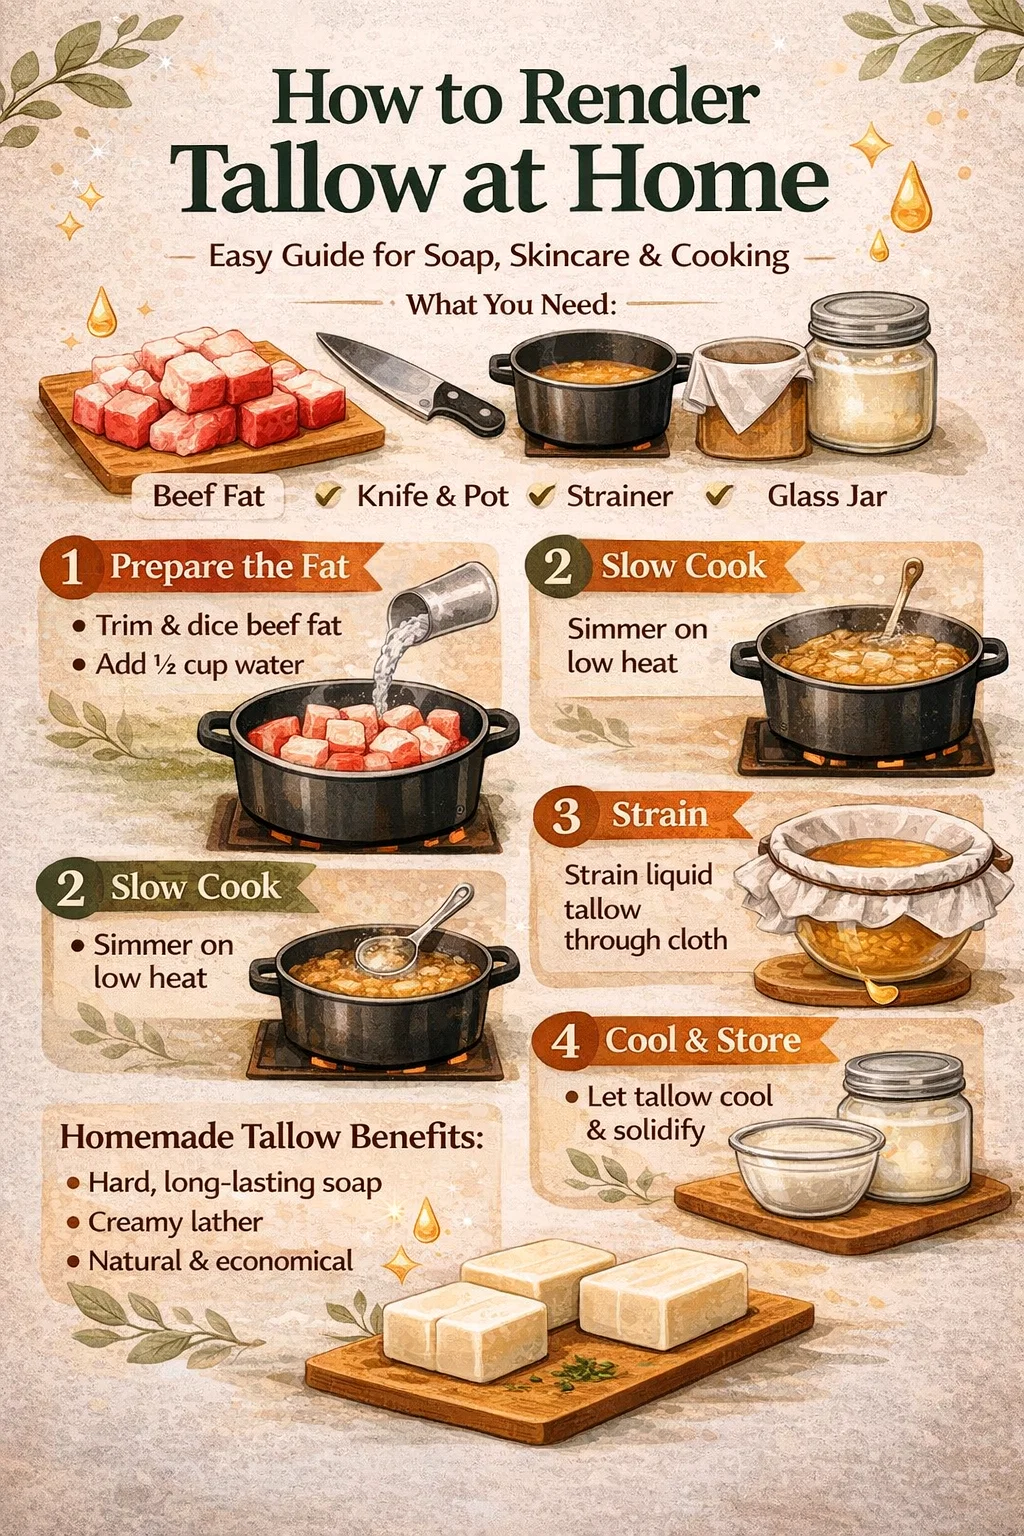
A Step by Step Guide to Rendering Tallow at Home
The process of rendering is essentially a game of patience. You want to apply enough heat to melt the fat but not so much that you burn it. Following a slow and steady approach ensures your tallow stays light in color and mild in flavor.
Step 1: Preparation and Cutting
Before you begin the heat process, you must prepare the raw fat. If your fat is still in large chunks, it will take a very long time to melt down. Start by trimming away any bits of meat, blood, or gristle still attached to the fat. These impurities are what can cause tallow to spoil or smell “funky,” so getting it as clean as possible is key. Once trimmed, chop the fat into very small cubes. For even better results, some people prefer to pulse the chilled fat in a food processor until it reaches a ground consistency. The more surface area you create, the faster and more evenly the fat will render.
Step 2: Choosing Your Heat Source
You can render tallow in a heavy bottomed pot on the stove, in a slow cooker, or even in the oven. The slow cooker is a fan favorite because it maintains a consistent low temperature without much supervision. Place your prepared fat into the pot and add about half a cup of filtered water. The water acts as a buffer, preventing the fat from searing or burning at the bottom of the pot before it starts to melt. As the rendering progresses, the water will eventually evaporate.
Step 3: The Slow Simmer
Turn your heat to the lowest possible setting. You should see small bubbles forming, but it should never reach a rolling boil. Stir the fat occasionally to ensure nothing is sticking. As the hours pass, you will notice the solid white chunks turning into a clear, golden liquid. The remaining bits of connective tissue, known as cracklings, will begin to brown and sink or float. This process typically takes anywhere from 4 to 8 hours depending on the quantity of fat you are processing.
The Purification Process: Staining and Cleaning
Once the liquid is clear and the solids have given up all their oil, it is time to strain. This is perhaps the most important step for ensuring the shelf stability of your tallow. Any tiny bit of food particle left in the fat can lead to mold over time.
Filtering Out the Solids
Set up a large glass bowl or a clean pot and place a fine mesh strainer over it. Line the strainer with several layers of cheesecloth or a clean lint free flour sack towel. Carefully pour the hot liquid through the cloth. The cloth will catch the browned cracklings and any sediment, leaving you with a beautiful, transparent golden oil. Do not squeeze the cloth too hard, as you might force tiny impurities through the fibers.
The Optional Wet Purifying Method
If you intend to use your tallow for skincare and want it to be completely odorless, you can perform a second purification step using water and salt. Mix your liquid tallow with an equal amount of hot water and a tablespoon of sea salt. Stir well and let it sit in the fridge until the tallow solidifies into a hard cake on top. Pop the cake out, scrape off any “shmoo” from the bottom side, and discard the dirty water. Re melt the tallow one last time to evaporate any remaining moisture. This results in an incredibly pure, snowy white tallow.
Sustainable Storage for Longevity
Beef tallow is remarkably stable, but proper storage will keep it fresh for much longer. Pour your finished, liquid tallow into clean, dry glass jars. Wide mouth mason jars are perfect for this as they make it easy to scoop the tallow out once it hardens. Allow the jars to sit at room temperature until the tallow turns from gold to solid white.
For daily use in cooking, you can keep a small jar on the counter. For long term storage, tallow stays fresh in the refrigerator for up to a year, and it can be frozen almost indefinitely. Always use a clean spoon or spatula when scooping from the jar to prevent introducing bacteria or moisture into your supply.
Transforming Your Tallow into Natural Skincare
One of the most exciting ways to use your homemade tallow is as a base for skincare. Because tallow mimics the oils found naturally in our skin, it absorbs deeply without leaving a greasy residue. It is especially beneficial for those with dry skin, eczema, or sensitive complexions.
Creating a Simple Tallow Balm
To make a spreadable body butter, gently melt your tallow and mix it with a small amount of liquid carrier oil, such as olive oil or jojoba oil. A common ratio is about 80 percent tallow to 20 percent oil. Once it begins to cool and look slightly opaque, you can whip it with a hand mixer until it reaches a light, fluffy consistency. This “whipped tallow” is luxurious to apply and serves as an excellent head to toe moisturizer.
Tallow in Traditional Soap Making
Tallow has been a primary ingredient in soap making for centuries. It produces a hard, long lasting bar with a creamy, stable lather. Unlike soaps made purely from vegetable oils, tallow soap does not get mushy easily in the shower. It provides a gentle cleanse that doesn’t strip the skin of its natural moisture, making it a favorite for those who prefer artisan, chemical free hygiene products.
Culinary Magic: Cooking with Tallow
If you have never tasted potatoes roasted in beef tallow, you are in for a treat. Tallow adds a subtle depth of flavor that vegetable oils simply cannot match. Because of its high smoke point (around 400 degrees Fahrenheit or 200 degrees Celsius), it is the perfect choice for high heat applications.
- Searing Steaks: Achieve a perfect crust on your meat by using a spoonful of tallow in a cast iron skillet.
- Deep Frying: Tallow was the original secret ingredient for the world’s best french fries, providing a crispiness that is second to none.
- Pastry Crusts: You can even use chilled tallow in place of lard or butter for savory pie crusts and biscuits, resulting in a wonderfully flaky texture.
Embracing the Traditional Lifestyle
Rendering your own beef tallow is more than just a kitchen task; it is a step toward self sufficiency and mindful consumption. It teaches us to value every part of the resources we use and reduces our reliance on industrially processed products. Whether you are looking to improve your health by removing inflammatory oils from your diet, or you want to simplify your beauty routine with ingredients you can actually pronounce, tallow is a versatile solution.
The process of watching raw fat transform into a clean, useful substance is deeply satisfying. It connects us to the wisdom of our ancestors who understood the value of these natural fats. Once you start keeping a jar of homemade tallow in your pantry, you will likely wonder how you ever got along without it. It is a simple, beautiful, and practical addition to any modern home.