How to Clean a Washing Machine Easy Step-by-Step Cleaning Routine
A clean washing machine is the secret to fresher laundry, better-smelling clothes, and a more pleasant laundry routine. Over time, detergent residue, fabric softener, lint, hair, and moisture can build up inside your washer, creating unpleasant odors and leaving your machine less than fresh. The good news is that learning how to clean a washing machine is simple, and you do not need an expensive collection of cleaning products to get started.
With a few practical steps, you can clean the detergent drawer, wipe the rubber door seal, refresh the drum, remove debris from the filter, and allow your machine to dry properly between washes. Whether you use your washer every day or only a few times a week, a regular washing machine cleaning routine can help keep it in good condition and make laundry day more enjoyable.
Key Takeaways
- Clean the detergent drawer regularly to remove sticky residue and buildup.
- Wipe the rubber door seal to remove trapped moisture, lint, and dirt.
- Run a suitable drum-cleaning cycle according to your washing machine manual.
- Clean the filter as recommended to remove lint, hair, and small objects.
- Leave the door and detergent drawer open when practical to encourage drying.
- Follow a simple monthly cleaning checklist to keep maintenance manageable.
Why You Should Clean Your Washing Machine Regularly
Your washing machine handles dirty clothes, sweaty workout gear, towels, bedding, and everyday laundry. Even though water and detergent move through the machine during each wash, they do not necessarily remove every trace of residue or debris.
Detergent and fabric softener can accumulate in the dispenser and other accessible areas. Moisture may remain around the door seal, while lint and hair can collect in the filter. If the washer stays closed while damp, musty smells may develop over time.
Regular maintenance helps address these problems before they become difficult to manage. It also gives you an opportunity to notice unusual residue, standing water, damaged seals, or other signs that your washing machine may need attention.
Signs Your Washing Machine Needs Cleaning
Not sure whether your washer needs a refresh? Look for these common signs:
- A musty or sour smell when you open the door.
- Sticky detergent residue inside the dispenser drawer.
- Visible dirt, lint, or dark marks around the rubber seal.
- Residue or unpleasant odors inside the drum.
- Lint, hair, or debris collecting near the filter area.
- Clothes that smell less fresh than expected after washing.
Important: A clean drum does not automatically mean the entire washer is clean. The detergent drawer, door seal, filter, and areas that retain moisture also need attention. A complete maintenance routine covers these separate parts.
What You Need to Clean a Washing Machine
Before getting started, gather a few simple supplies. You may already have most of them at home, making this an easy addition to your regular home cleaning schedule.
- Soft microfiber cloths or clean, lint-free towels.
- A soft cleaning brush or an old toothbrush reserved for cleaning.
- Warm water.
- A small bowl or container for rinsing removable parts.
- White vinegar or a washing machine cleaner, only where compatible with your appliance instructions.
- Baking soda for suitable deodorizing tasks, if recommended for the intended use.
- A shallow tray and absorbent towels for cleaning an accessible drain filter.
You do not need to use every ingredient in the list. A suitable commercial washing machine cleaner is often the simplest option for the drum, while warm water and a soft cloth are sufficient for many exterior surfaces and accessible parts.
Safety tip: Always check your washing machine manual before using vinegar, baking soda, or other cleaning agents. Some manufacturers advise against certain substances because they may affect seals, hoses, finishes, or other components. Never mix cleaning products, especially bleach with vinegar or ammonia.
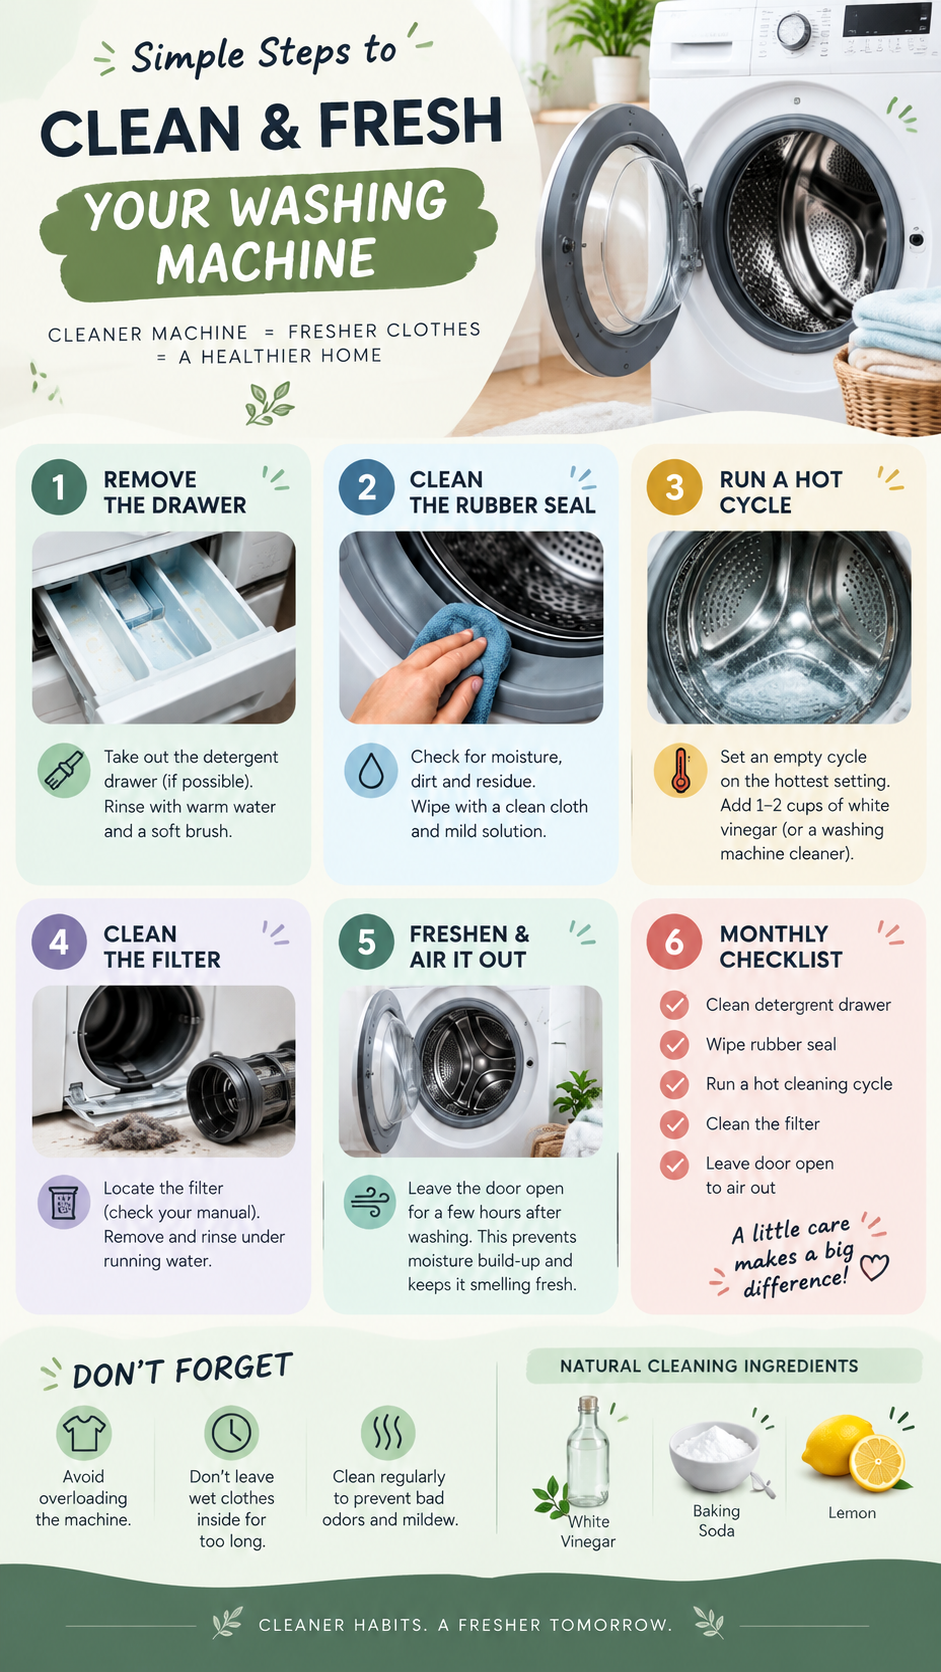
Step 1: Clean the Detergent Drawer
The detergent drawer is one of the easiest places to start when cleaning a washing machine. Liquid detergent, powdered detergent, and fabric softener can leave behind residue, especially when the drawer is not rinsed regularly.
Fortunately, cleaning this area usually takes only a few minutes.
How to Remove Detergent Buildup
- Check the manual. Find out whether your detergent drawer is removable and how to release it safely.
- Take out the drawer. If it is designed to be removed, slide it out and release any designated locking tab.
- Rinse with warm water. Rinse away loose detergent and fabric softener residue.
- Scrub gently. Use a soft brush to reach corners, narrow compartments, and stubborn deposits.
- Clean the drawer housing. Wipe accessible surfaces inside the opening with a damp cloth without flooding electrical or mechanical areas.
- Dry and replace. Let the drawer dry thoroughly before putting it back in place.
Pay particular attention to the small sections used for detergent, fabric softener, and any prewash product. These compartments can retain sticky residue that is easy to overlook during everyday laundry.
How to Keep the Drawer Cleaner Longer
Use the amount of detergent recommended for your machine, load size, and water conditions. More detergent does not necessarily produce cleaner clothes, and excess product can leave residue behind.
After laundry day, consider leaving the drawer slightly open when practical so moisture can escape. Wipe away fresh spills before they dry into stubborn deposits.
Step 2: Wipe the Rubber Door Seal
Front-loading washing machines have a flexible rubber seal around the door. Its folds help contain water during a wash, but they can also trap moisture, lint, hair, and small bits of debris.
Because the seal is not always fully exposed, it is worth checking it carefully during your washing machine cleaning routine.
The Best Way to Clean the Rubber Seal
- Make sure the washing machine is switched off.
- Open the door and gently inspect the folds of the rubber gasket.
- Remove loose lint, hair, and other visible debris by hand.
- Dampen a clean microfiber cloth with water.
- Carefully wipe inside the accessible folds, paying attention to areas with visible residue.
- For stubborn buildup, use a cleaner approved by the manufacturer and follow its directions.
- Finish by wiping the seal with a clean cloth and drying it thoroughly.
Do not pull, stretch, or scrub the rubber aggressively. Sharp tools and abrasive cleaning pads can damage the seal, potentially leading to leaks or costly repairs.
Prevent Moisture and Musty Smells
Once the seal is clean, make drying part of your routine. A quick wipe after a wash can help remove lingering moisture before it has time to accumulate.
Leave the door open when it is safe to do so, especially if the machine will not be used again immediately. If you have young children or pets, make sure the open door does not create a safety hazard.
Step 3: Clean the Washing Machine Drum
The drum is the main area where clothes are washed, but it can still develop unpleasant odors and residue over time. Running a suitable cleaning cycle helps maintain the inside of your washer without the need to scrub the entire drum manually.
How to Run a Drum Cleaning Cycle
- Empty the washer. Remove all clothing, towels, and other laundry.
- Check the available cycle. Look for a setting called Drum Clean, Tub Clean, Washer Clean, or a similar name.
- Add the appropriate cleaner. Use a washing machine cleaning product according to its label and your appliance manual.
- Start the cycle. Follow the manufacturer’s instructions for the recommended cycle and temperature.
- Inspect the interior. When the cycle finishes, check for remaining residue and wipe accessible surfaces if needed.
- Allow the machine to dry. Leave the door open when practical to help moisture escape.
If your washing machine does not have a dedicated cleaning cycle, consult its manual for an appropriate alternative. Avoid selecting an arbitrary hot cycle without checking whether it is suitable for your model.
Some maintenance guides recommend white vinegar as a household cleaning ingredient. However, it is not suitable for every washer, and repeated use may affect certain materials. Use it only if your manufacturer permits it. Never combine vinegar with bleach or other cleaners.
How Often Should You Clean the Drum?
A monthly drum-cleaning routine is a useful starting point for many households, but the ideal frequency depends on how often you do laundry, the type of loads you wash, and your manufacturer’s recommendations.
If you regularly wash muddy clothes, pet bedding, workout gear, or heavily soiled items, you may need to inspect the machine more frequently. Always follow the maintenance schedule provided for your model.
Why This Matters
Cleaning the drum is only one part of washer maintenance. A fresh-smelling machine also needs a clean dispenser, a debris-free seal, appropriate filter care, and enough ventilation to dry between washes. Combining these habits makes your cleaning routine more effective than relying on one cleaning cycle alone.
Step 4: Clean the Washing Machine Filter
The washing machine filter helps catch lint, hair, and small objects that may enter the drainage system. Depending on the model, it may be located behind a small access panel near the bottom of the appliance.
Not every washing machine has a user-accessible filter, and filter designs vary. Check your manual to locate the correct component and learn whether routine removal is recommended.
How to Clean an Accessible Filter
- Switch off the machine. Disconnect the power before carrying out maintenance that requires opening an access panel.
- Prepare for water. Place absorbent towels and a shallow container beneath the filter access area.
- Check the instructions. Some models have a drain hose or another procedure for releasing trapped water before the filter is removed.
- Remove the filter carefully. Follow the manufacturer’s instructions and open it slowly, allowing any remaining water to drain into your container.
- Remove debris. Clear away visible lint, hair, and small objects such as coins or buttons.
- Rinse if permitted. Clean the filter under running water if the manual allows it.
- Reinstall securely. Replace the filter and close the access panel according to the instructions.
Important safety reminder: Water inside the washer may be hot, particularly after a hot cycle. Let the machine cool before opening the filter, and never force a stuck component. Incorrectly reinstalling the filter can cause leaks. If your manual does not describe user-accessible filter maintenance, contact the manufacturer or a qualified technician.
How Often Should You Clean the Filter?
The recommended schedule depends on your washer model and how frequently it is used. Some machines require more frequent inspection than others. A general reminder to check it every one to two months can help, but your manual should take priority.
If the machine drains slowly, displays a drainage error, or leaves water in the drum, check the troubleshooting instructions. A blocked filter is one possible cause, but drainage problems may also indicate a kinked hose or a mechanical issue.
Step 5: Freshen the Washer and Let It Air Out
One of the easiest ways to maintain a fresh washing machine is to allow it to dry between loads. Closing the door immediately after washing can trap humidity, particularly in a laundry room with limited ventilation.
Air circulation helps moisture escape from the drum and other accessible areas. It is a simple habit that requires almost no extra time.
Easy Habits for a Fresher Washer
- Remove clean laundry promptly after each cycle.
- Wipe visible water from the door seal when needed.
- Leave the washer door open or slightly ajar when safe and practical.
- Keep the detergent drawer open slightly to help it dry, if the design allows it.
- Use the recommended amount of detergent for your laundry load.
- Avoid leaving damp towels or clothing inside the drum for long periods.
- Keep the surrounding laundry area reasonably clean and ventilated.
You may come across advice suggesting that a bowl of baking soda should be placed inside the washer to absorb odors. It is generally more useful to focus on removing the source of moisture and residue. If you choose to use baking soda for a cleaning task, confirm that the intended use is compatible with your appliance instructions, and never leave a loose bowl inside the machine during operation.
How to Clean the Washing Machine Exterior
Once the main components are clean, give the outside of the washer a quick refresh. Dust, detergent splashes, fingerprints, and small spills can make an otherwise clean appliance look untidy.
Simple Exterior Cleaning Steps
- Switch off the washer before cleaning around its controls.
- Use a soft cloth lightly dampened with water or a manufacturer-approved cleaner.
- Wipe the top, front, sides that are safely accessible, and control panel without soaking them.
- Remove detergent splashes before they dry.
- Dry the surfaces with a clean microfiber cloth.
Avoid abrasive pads, harsh solvents, and excessive water around electronic controls. Always check the manual before using a cleaning product on painted, stainless steel, or coated surfaces.
Natural Washing Machine Cleaning Ingredients
Many people prefer simple household cleaning ingredients because they are easy to find and convenient to store. White vinegar, baking soda, and lemon are often mentioned in home cleaning routines, but they are not interchangeable, and natural does not automatically mean suitable for every appliance.
White Vinegar
White vinegar is acidic and can help loosen certain types of mineral deposits on compatible surfaces. However, some washing machine manufacturers advise against using it inside their appliances because repeated exposure may affect particular seals or components. Check your manual before using vinegar in a drum-cleaning cycle.
Baking Soda
Baking soda is commonly used for household cleaning and can help with some odors on suitable surfaces. Avoid assuming that adding it to the drum will solve every odor problem. Follow your washer’s instructions and choose a cleaner intended for the specific maintenance task.
Lemon
Lemon juice is acidic and is sometimes promoted as a natural cleaning ingredient. It is not necessary for routine washing machine maintenance, and its acidity may be unsuitable for certain finishes or components. Use an approved product when cleaning appliance parts rather than applying lemon juice indiscriminately.
The safest approach: Use a washing machine cleaner designed for your appliance whenever the manual recommends one. Keep household ingredients separate from commercial cleaning products, and never mix cleaning agents to create a stronger solution.
Your Monthly Washing Machine Cleaning Checklist
A checklist makes it easier to remember each maintenance task without turning laundry day into a major project. Save the following routine or add it to your regular home cleaning schedule.
Monthly Maintenance Checklist
- ☐ Remove and clean the detergent drawer.
- ☐ Wipe the rubber door seal and accessible folds.
- ☐ Run the recommended drum-cleaning cycle.
- ☐ Inspect and clean the filter if required by the manual.
- ☐ Wipe the washer exterior and control area.
- ☐ Leave the door and dispenser open when practical to encourage drying.
Remember that the tasks do not all need to happen on the same day. Wiping the seal and allowing the machine to air out are useful after-wash habits, while filter maintenance should follow the manufacturer’s recommended schedule.
Common Washing Machine Cleaning Mistakes to Avoid
A few well-intentioned habits can make cleaning less effective or even damage your appliance. Keep these common mistakes in mind as you maintain your washer.
Using Too Much Detergent
Excess detergent can contribute to residue and may leave your machine needing more frequent cleaning. Measure the amount recommended for your load and detergent type rather than adding extra automatically.
Ignoring the Rubber Seal
Cleaning only the drum leaves other moisture-prone areas untouched. Make a quick inspection of the seal part of your routine, especially if you use a front-loading washer.
Closing the Door While the Machine Is Damp
Keeping the washer tightly closed immediately after use may slow drying. When safe, leave the door open enough to allow air circulation and wipe away standing moisture.
Mixing Cleaning Products
Combining household cleaners can create hazardous reactions. Never mix bleach with vinegar, ammonia, or other cleaning products. Use one approved product at a time and follow the label instructions.
Forgetting the Filter
Lint, hair, and small objects may collect in the filter of models that have a user-accessible component. Follow the manufacturer’s maintenance schedule and take precautions against trapped water before opening it.
Frequently Asked Questions About Washing Machine Cleaning
How Often Should I Clean My Washing Machine?
A monthly drum-cleaning cycle is a reasonable starting point for many households, but always follow the schedule recommended for your model. The detergent drawer and rubber seal may need attention more frequently, while filter maintenance depends on the machine’s design and usage.
Can I Use Vinegar to Clean My Washing Machine?
Only if your washing machine manufacturer permits it. Although vinegar is a popular household cleaning ingredient, its acidity may affect certain materials over repeated use. A washer-specific cleaner is often the safer option when recommended by the manufacturer.
Why Does My Washing Machine Still Smell After Cleaning?
Lingering odors can come from residue around the door seal, a dirty dispenser, trapped debris, a drainage issue, or moisture that has not dried properly. Inspect accessible areas and repeat appropriate maintenance steps. If the smell persists, consult the troubleshooting guidance for your model or contact a qualified technician.
Should I Clean the Washing Machine With Clothes Inside?
No. A dedicated cleaning cycle should generally be run with an empty drum unless the manufacturer specifically instructs otherwise. Remove clothing and other items before adding an approved washer cleaner.
Is It Necessary to Leave the Washing Machine Door Open?
Leaving the door open or slightly ajar after use can help moisture escape and encourage drying. Do this when it is safe, and consider household risks involving children and pets. If the door cannot remain open, wipe the seal and accessible wet surfaces after washing.
What Should I Do if Water Remains in the Drum?
Check your washer’s troubleshooting instructions and inspect the drain hose for visible kinks if it is safe to do so. A clogged filter can be one possible cause, but persistent drainage problems may require professional attention. Do not force open the door or dismantle components that are not intended for user maintenance.
Quick Points: A Fresher Washing Machine at a Glance
- Clean the drawer: Remove detergent residue and rinse removable compartments.
- Wipe the seal: Clear lint, hair, and trapped moisture from accessible folds.
- Refresh the drum: Run the cleaning cycle recommended for your machine.
- Check the filter: Remove debris according to your manufacturer’s instructions.
- Let it breathe: Remove wet laundry promptly and allow the washer to dry between loads.
Conclusion: Make Washing Machine Cleaning an Easy Habit
Learning how to clean a washing machine does not have to mean spending an entire afternoon scrubbing. A simple routine that covers the detergent drawer, rubber door seal, drum, filter, and exterior can help keep your appliance fresher and make everyday laundry more pleasant.
Start with the areas that need the most attention, use cleaning products approved for your machine, and follow the recommended maintenance schedule. Remember that allowing the washer to dry between loads is just as important as removing visible dirt and residue.
You do not need to do everything at once. Wipe the seal after a wash, leave the door open when practical, and set a reminder for your regular drum-cleaning cycle. Small habits can make appliance maintenance feel much more manageable.
Ready for a fresher laundry routine? Save this washing machine cleaning checklist and revisit it on your next cleaning day. With consistent care, you can enjoy a cleaner washer, fresher-smelling laundry, and a more organized home.
Tags
Washing Machine Cleaning
Laundry Tips
Home Cleaning
Cleaning Routine
Laundry Room Tips
Cleaning Checklist
Fresh Laundry
Washer Maintenance