Build a DIY 50 Garden Arch Easy 4-Step Cattle Panel Trellis for Vertical Veggies
Are you looking to revolutionize your gardening game, maximize your growing space, and add an absolutely stunning, romantic feature to your backyard? Look no further than the humble yet versatile garden arch. For just fifty dollars, and following a straightforward process, you can transform your garden into a productive and beautiful oasis with a custom-built cattle panel trellis. It’s a project that delivers enormous value for a minimal investment, and the reward is not just the arch itself but the bountiful harvests it will help you create, growing up to one hundred pounds of vegetables right over your head. I am so excited to share this detailed guide with you, breaking down every step so you can create your own architectural and agricultural masterpiece.
The Magic of the $50 Garden Arch
The idea of a garden arch often brings to mind images of sprawling roses in an English cottage garden. While that is undeniably beautiful, the arch we are building is a multi-tasking workhorse designed for the serious (and even not-so-serious) vegetable grower. This specific design is incredibly popular for good reason: it’s sturdy, inexpensive, and exceptionally functional.
The core philosophy here is vertical gardening. For years, I struggled with sprawlers like squash and cucumbers. They would devour precious square footage on the ground, create a tangled mess that was hard to harvest, and often fall victim to pests or diseases due to poor airflow. By utilizing a cattle panel arch, you are essentially creating a vertical field. All that unused airspace in your yard becomes prime real estate for your plants to climb, spread their leaves, and soak up the sun. And as for you, the gardener? It makes harvesting a breeze. No more bending and straining to hunt for hidden cucumbers; you can simply walk through your lush green tunnel and pick your produce at eye level.
And let’s talk about that price point. Fifty dollars is a remarkably low cost for a structure that can support a massive amount of weight, last for many years, and provides so much utility. It’s an accessible project for gardeners of all budget levels, proving that you don’t need to spend a fortune to create an impactful and effective garden feature. The materials are simple, the tools are common, and the satisfaction of building it yourself is immeasurable.
Your DIY Garden Arch Build Guide: Step-by-Step Instructions
The construction process is designed to be simple and efficient. With a little bit of planning and maybe a helping hand for the trickiest part, you can have your new arch up and standing in an afternoon. Let’s walk through the steps together.
Step 1: Preparation and Accurate Measurements
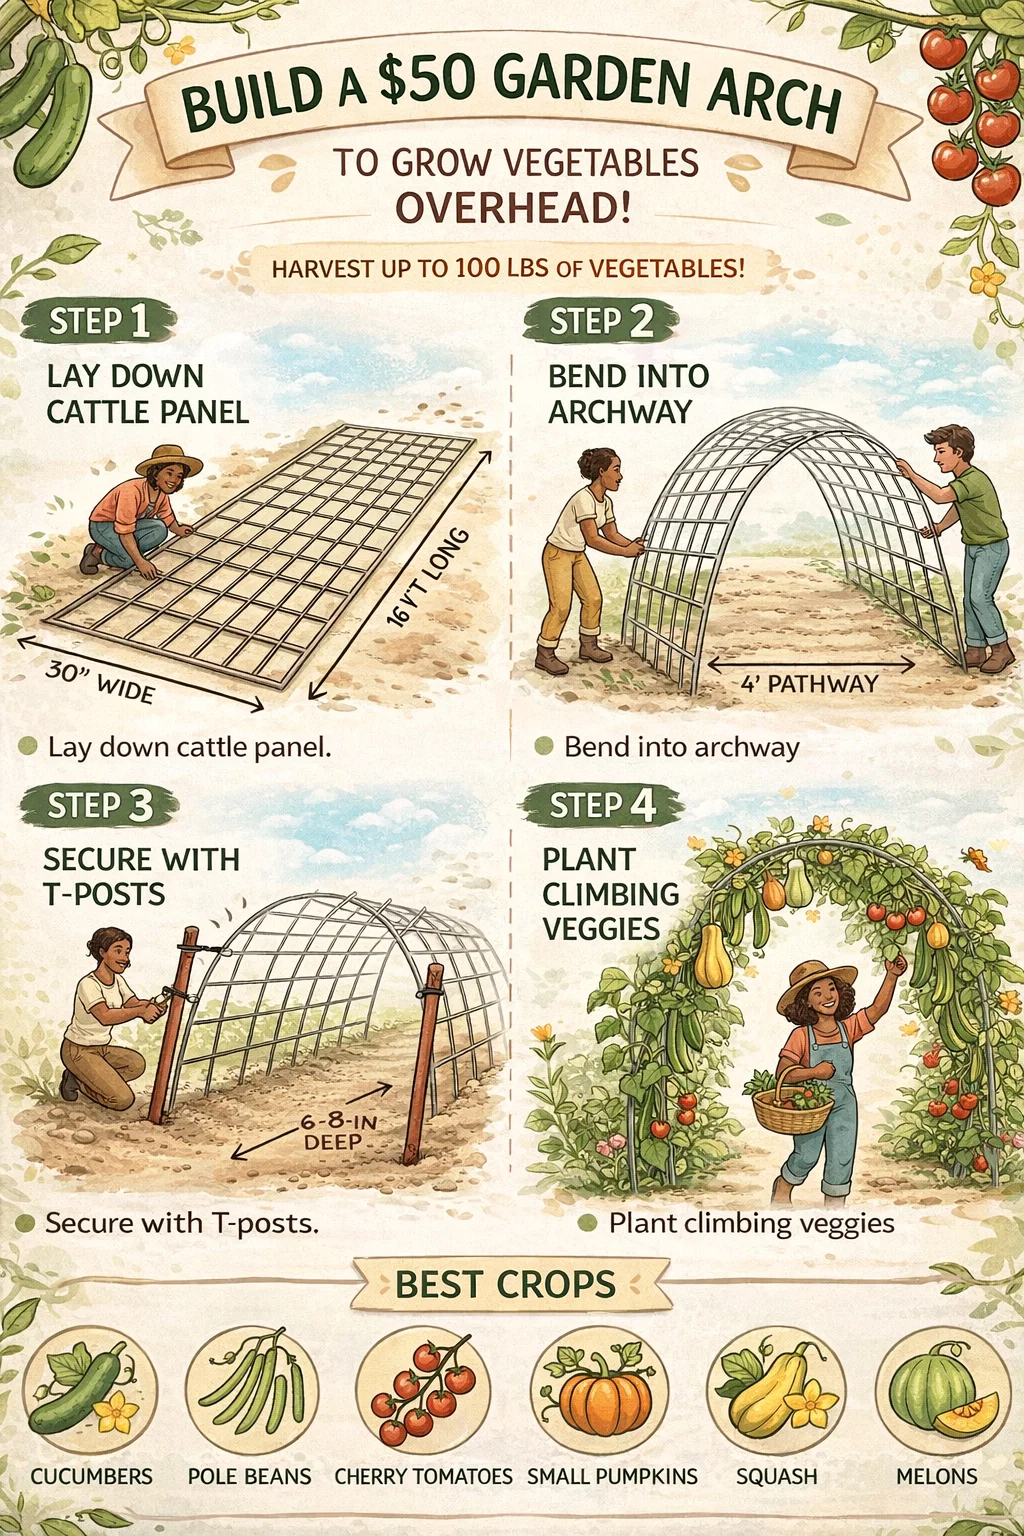
The first crucial step is preparation and accurate measuring. As shown in the illustration, this process starts with your cattle panel, typically a sixteen-foot length of wire fencing, laid flat on the ground. These panels are incredibly stiff and strong, which is what makes them perfect for this purpose.
Your goal here is twofold. First, ensure you have a clear workspace. A flat, open area is ideal for handling the large panel. Now is also the time to decide exactly where your arch will live in your garden. Think about sun exposure for your plants and how the arch will fit into your overall design.
Second, as our diligent illustrated gardener is doing, carefully measure your panel and your pathway width. The standard width for these panels is approximately thirty inches, or around two and a half feet. This will be the depth of your arch when complete, creating a cozy and walkable tunnel.
A smart tip is to pre-lay your pathway markers on the ground, separated by the proposed width of your pathway (the target distance between the two sides of the arched panel). This will help you visualize the final structure and ensure you have sufficient clearance for you, your tools, and your harvest basket.
Step 2: Forming the Perfect Arch Structure
Now comes the part where you see your new arch take shape! This is a dynamic and physically involved step that’s often much easier with a friend. You will be taking that long, stiff panel and bending it into the curved, arched form shown in the guide.
With one person at each end of the panel, you will simultaneously lift the ends, pushing them toward each other and allowing the middle to rise into a graceful curve. It requires a bit of strength and a careful, deliberate motion. Avoid making any sharp bends or kinks; the goal is a smooth, structural arc.
As you form the arch, you are aiming to match the base width to your pathway width, which is shown as four feet. This is the optimal distance that balances stability with plenty of walking space for you and growing space for your plants. It’s absolutely fantastic to see the structure rise from the ground in this step, instantly giving your garden a new sense of scale and potential.
Step 3: Securing and Anchoring for Stability
With your beautiful arch formed, the critical next step is to anchor it securely to the ground. This structure is designed to hold up to one hundred pounds of produce, so its foundation needs to be rock solid. You cannot just rest it on the earth; you must drive stakes deep into the soil.
For each end of the arch, drive strong wooden stakes or metal T-posts deeply into the ground. These posts should be positioned on the outside of the panel’s base. It is crucial to get them deep into the soil. The illustration recommends six to eight inches, which is a good minimum, but in areas with looser soil or strong winds, aiming for at least twelve to eighteen inches of burial will provide even greater peace of mind.
Once your stakes are firmly in place, it’s time for some clever, quick-fastening hardware: heavy-duty UV-resistant zip ties. Using multiple large zip ties per post, secure the wire grid of the panel tightly to each stake. Don’t be afraid to use plenty of ties; this is what prevents the arch from toppling in a strong wind or bowing under the weight of a heavy crop. For a super-strong connection, you can even use metal bailing wire or u-shaped fencing staples hammered into wooden posts. Make sure to anchor both ends on each side for a stable, durable result that you won’t have to worry about all season.
Step 4: The Best Crops for Your Vertical Space
This is where all your hard work truly pays off! The arch is built, it’s secure, and it’s time to decide what to grow. Choosing the right crops is essential, as some are perfectly suited to vertical growing and will reward you with an abundant harvest that’s a joy to pick.
- Cucumbers: These classic climbers are a perfect match for a trellis. Their vines naturally wind around the wire mesh, keeping the fruits clean, straight, and incredibly easy to find. Pickling, slicing, and even larger variety cucumbers will all thrive, and having them up off the ground drastically reduces issues with soil-borne diseases.
- Pole Beans: Unlike bush beans, pole beans are vigorous climbers that will quickly cover your arch, creating a beautiful green wall and ceiling. They are exceptionally productive, often yielding more over a longer season than their bush counterparts. Varieties like Kentucky Wonder, Blue Lake, and even stunning purple or yellow-podded types are fantastic choices. You’ll be picking long, straight beans right at eye level!
- Cherry Tomatoes: Many types of tomatoes are natural vining plants. Cherry tomatoes in particular love to grow up. Their flexible vines can be carefully woven and tied through the wire as they grow, and having the fruit accessible all over the arch is both beautiful and practical. Indeterminate varieties are best for this, as they will continue to grow and produce all season long.
- Small Pumpkins: The key word here is “small.” Think varieties like Jack Be Little, Wee-B-Little, or any pumpkin that produces fruit under two or three pounds. Their vines are strong enough to support the weight, and the sight of adorable mini-pumpkins hanging from your arch is absolutely magical, especially as autumn approaches.
- Squash: Similar to pumpkins, opt for smaller summer squash like zucchini or yellow crookneck, or smaller winter varieties like acorn or delicata. While their leaves can be large, their vines will climb, and lifting the fruit prevents rot and ground-pests. The massive orange blossoms also look stunning when the vine covers the arch.
- Small Melons: Vining melons like smaller watermelons (e.g., Sugar Baby), cantaloupe, and muskmelons are perfect for this setup. As with pumpkins and squash, their natural inclination to climb is a huge advantage. As the melons get bigger, you can support them with a clever little “sling” made from scrap cloth or pantyhose tied to the wire frame, preventing them from falling before they are ripe. This is the definition of high-production, high-enjoyment vertical gardening!
Your Thriving Vertical Garden Awaits
Building this cattle panel garden arch is about so much more than just construction; it is about building a better, more efficient, and more beautiful future for your garden. It represents a wonderful fusion of form and function. This inexpensive project not only creates a fantastic aesthetic feature that anchors your garden space but also unlocks the massive potential of vertical growing, allowing you to maximize your harvest, improve plant health, and create a truly engaging and enjoyable space for yourself and your family.
Imagine your future self: walking through this lush green canopy, surrounded by productive vines, and picking fresh, clean vegetables without ever having to bend over. It’s an attainable reality, and the journey begins with this fifty-dollar arch. So gather your materials, clear your space, maybe call a friend for a hand with Step 2, and get ready to experience the incredible joy of a thriving vertical garden. Your best garden ever is just one simple arch away.