Cold Process Soap Making Recipe Natural Homemade Soap Guide for Beginners
Making your own soap at home is a rewarding craft that combines creativity, natural ingredients, and the satisfaction of creating something useful with your own hands. Cold process soap making allows you to transform simple oils, water, and lye into beautiful handmade bars that can be customized with colors, fragrances, and skin-loving additions. Whether you are exploring DIY skincare or looking for a relaxing new hobby, learning the basics of homemade soap can open the door to endless creative possibilities.
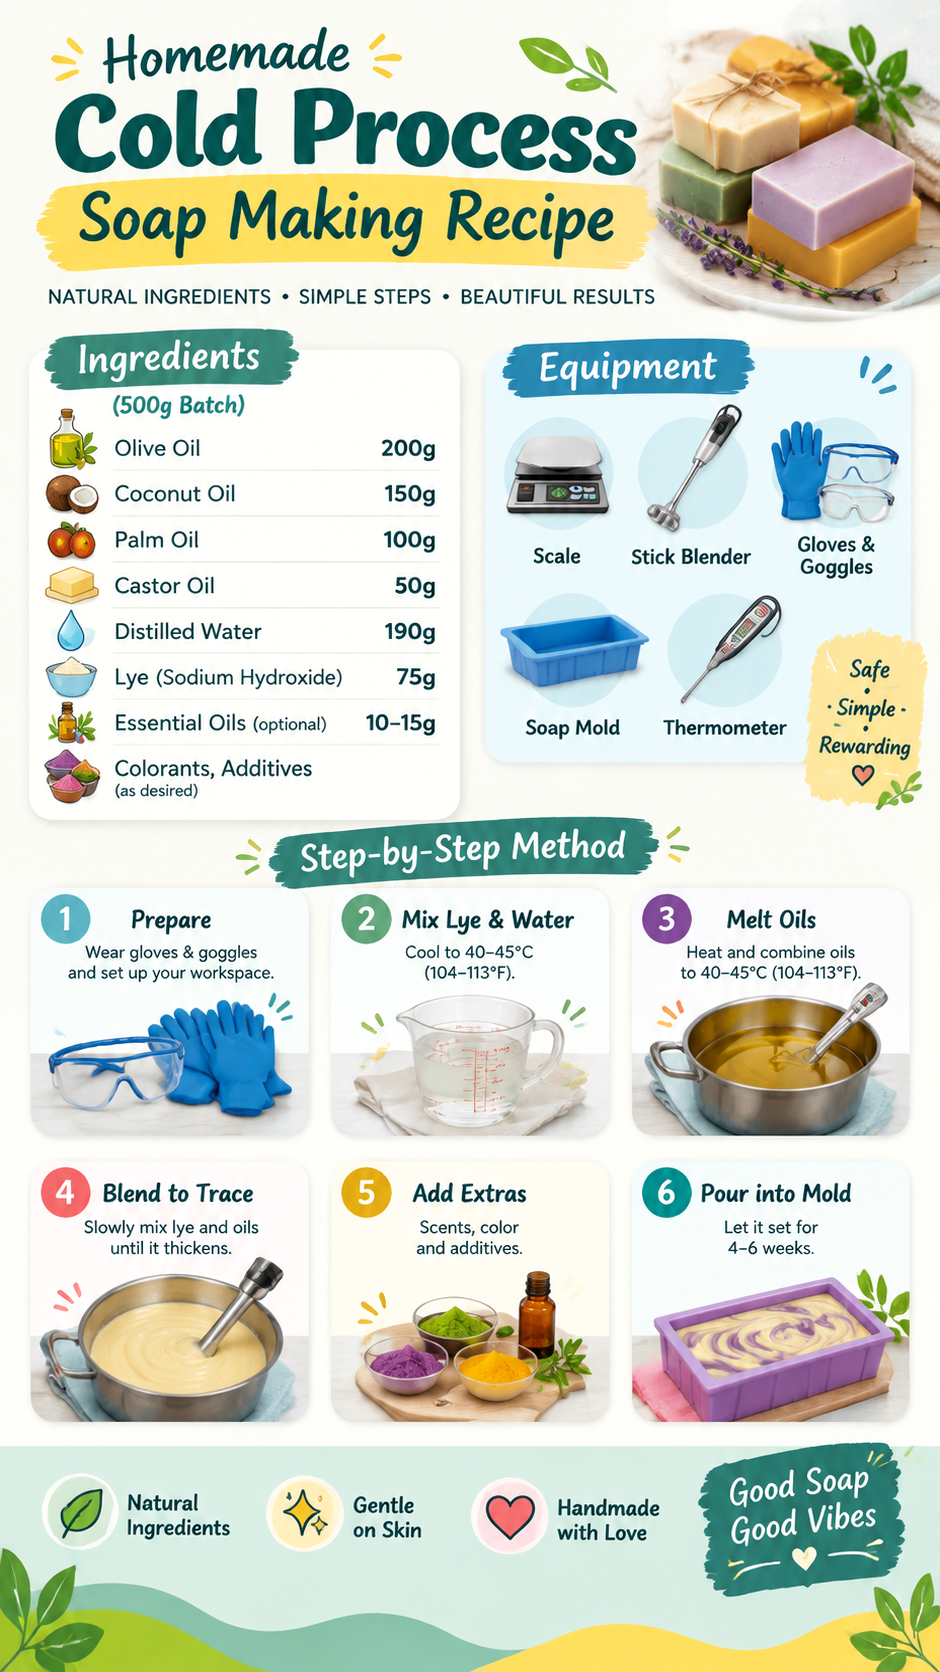
The cold process soap method shown in this guide focuses on carefully measuring ingredients, blending oils with a lye solution, and allowing the soap to cure naturally over time. This traditional technique is popular among soap makers because it helps preserve the natural qualities of oils while creating a firm, long-lasting bar.
Key Takeaways
- Cold process soap making creates customized handmade bars using oils and lye.
- Accurate measurements and safety practices are essential for successful results.
- Natural oils like olive, coconut, palm, and castor oil create balanced soap qualities.
- Essential oils, colors, and additives can personalize each soap batch.
- Proper curing time improves hardness, mildness, and longevity.
Understanding Cold Process Soap Making
Cold process soap making is a traditional technique where oils and a sodium hydroxide solution combine through a chemical reaction called saponification. During this process, the oils are converted into soap, leaving behind a gentle cleansing product that can be enjoyed after proper curing.
Unlike melt-and-pour soap methods, cold process soap gives makers complete control over the ingredients. You can choose your preferred oils, experiment with natural colors, add botanical ingredients, and create unique scents that match your personal style.
Important: Working with lye requires careful attention, but when measured correctly and handled safely, it is an important ingredient that allows oils to transform into high-quality handmade soap.
Essential Ingredients for Homemade Soap
A balanced cold process soap recipe typically combines several types of oils, each contributing different qualities to the finished bar. The combination shown in the recipe creates a blend designed to balance cleansing ability, hardness, conditioning properties, and lather.
Olive Oil for Conditioning
Olive oil is a popular ingredient in natural soap because it produces a mild and conditioning bar. It is often used in soap recipes designed for gentle cleansing because it contributes a smooth, creamy feel.
Coconut Oil for Cleansing and Lather
Coconut oil helps create bubbles and adds cleansing power to handmade soap. Because it can feel highly cleansing, soap makers often balance it with more conditioning oils to create a comfortable finished product.
Palm Oil and Castor Oil Benefits
Palm oil is commonly used to add firmness and stability to soap bars, while castor oil supports a richer, creamier lather. Together, these oils help improve the texture and overall performance of homemade soap.
Soap Making Equipment You Need
Before starting a cold process soap project, preparing the right tools makes the process smoother and safer. The basic equipment includes measuring tools, mixing containers, protective gear, and a mold for shaping the finished soap.
- A digital scale for accurate ingredient measurements
- A stick blender for reaching soap trace
- Heat-safe containers for mixing oils and lye solution
- Gloves and protective goggles for safety
- A soap mold for shaping the final bars
- A thermometer to monitor temperatures
Step-by-Step Cold Process Soap Method
Step 1: Prepare Your Workspace Safely
Safety should always come first when making soap. Wear gloves and protective eyewear, work in a well-ventilated area, and keep your tools organized before beginning.
Step 2: Mix the Lye Solution
Carefully combine sodium hydroxide with distilled water according to your recipe measurements. The mixture will heat up naturally, so allow it to cool before combining it with oils.
Step 3: Prepare and Combine Oils
Measure your oils accurately and melt any solid oils until everything is fully blended. Allow the oils and lye solution to reach similar temperatures before mixing.
Step 4: Blend Until Trace
Using a stick blender, mix the soap mixture until it thickens slightly and reaches trace. This stage means the oils and lye solution have properly combined.
Step 5: Add Scents and Decorative Elements
Once trace is reached, you can add essential oils, natural colorants, dried botanicals, or other soap-safe ingredients. This is where creativity becomes part of the process.
Step 6: Pour and Cure the Soap
Pour the soap batter into a mold and allow it to set. After removing it from the mold and cutting it into bars, the soap needs several weeks of curing time before use.
Customizing Your Handmade Soap
One of the biggest joys of DIY soap making is personalization. A basic recipe can become countless unique creations by changing fragrances, colors, and natural additions.
- Essential oils: Add natural fragrance with options like lavender, citrus, or herbal blends.
- Natural colors: Use mineral pigments or botanical powders for visual interest.
- Skin-friendly additives: Consider ingredients like oats, clays, or dried flowers.
- Creative designs: Experiment with layers, swirls, and decorative tops.
Expert Insight
Successful soap making is about balance. The best recipes combine different oils to create the desired hardness, cleansing level, moisture feel, and lather instead of relying on a single ingredient.
Common Beginner Mistakes to Avoid
New soap makers often learn through practice, but understanding common challenges can make the journey easier.
- Skipping accurate measurements
- Adding fragrance oils that are not soap-safe
- Using incorrect temperatures when combining ingredients
- Removing soap from molds too early
- Not allowing enough curing time
At a Glance: Cold Process Soap Benefits
- Creates personalized natural soap bars
- Allows control over ingredients
- Provides a creative handmade hobby
- Produces unique gifts for friends and family
Conclusion: Start Your Handmade Soap Journey
Cold process soap making is a creative and practical skill that allows you to create beautiful, customized soap from simple ingredients. With careful preparation, safe handling, and patience during the curing process, beginners can successfully enjoy the experience of crafting their own natural soap bars.
Whether you want to explore natural skincare, create handmade gifts, or simply enjoy a relaxing DIY activity, homemade soap offers endless opportunities for creativity. Gather your supplies, follow safe practices, and begin experimenting with your own cold process soap recipes.
Tags
Cold Process Soap
DIY Soap Making
Natural Skincare
Homemade Soap Recipe
Handmade Bath Products
Soap Craft Ideas