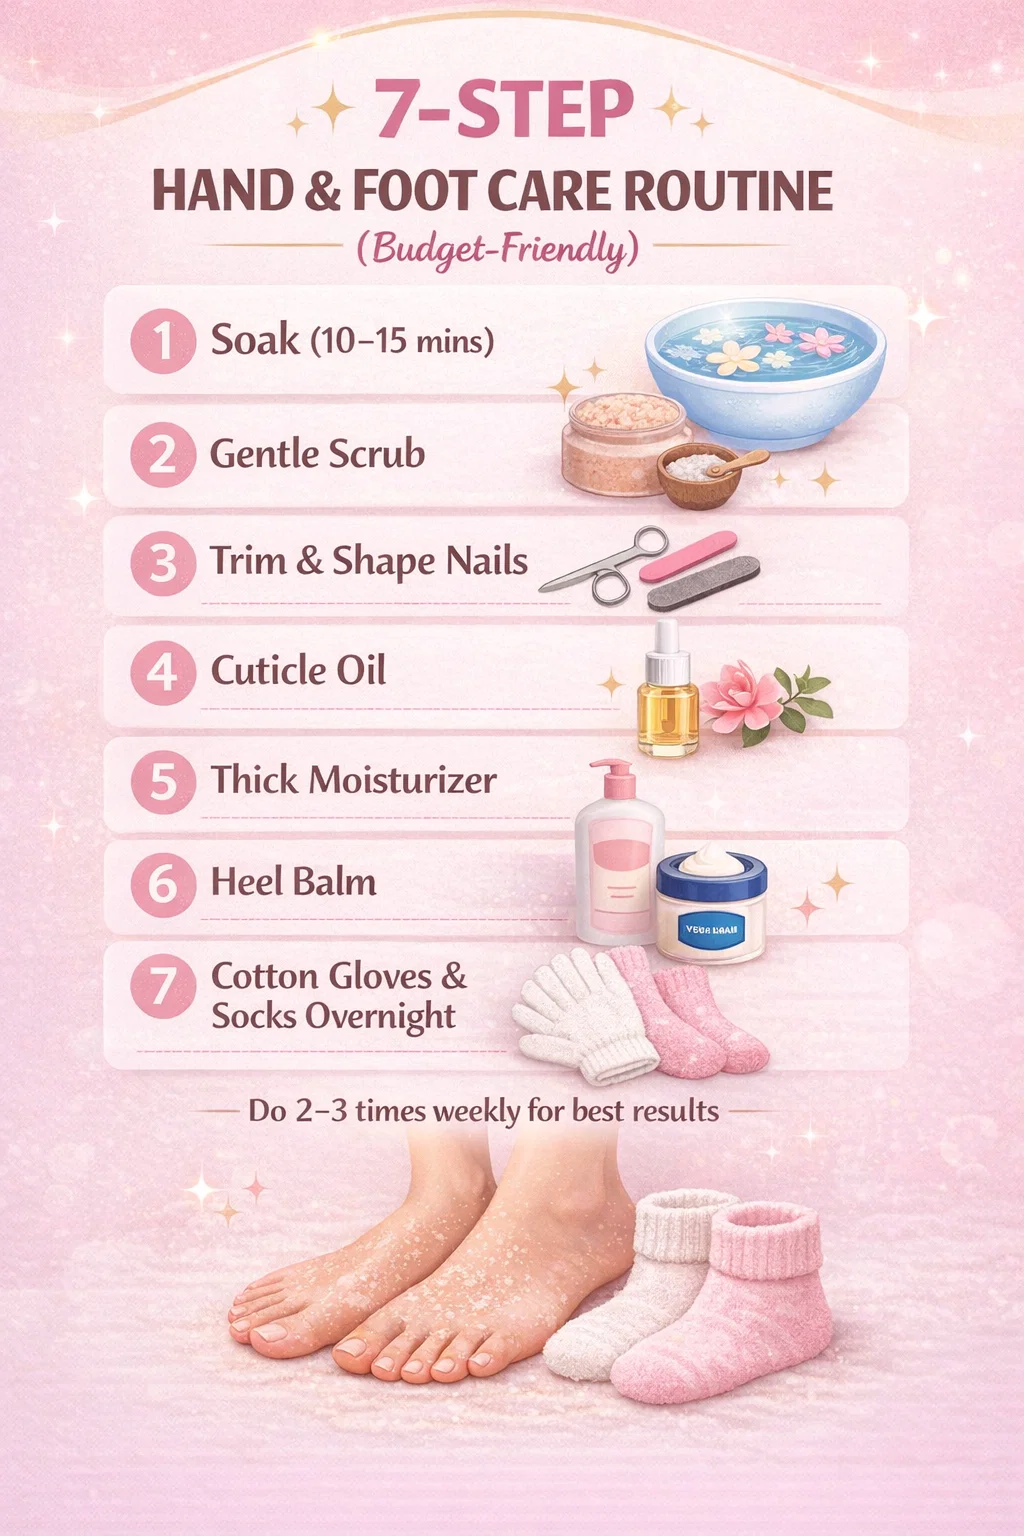
7-Step Hand Foot Care Routine Fix Dry Hands Cracked Heels At Home
We often spend hundreds of dollars on facial serums and high-end shampoos, yet our hands and feet—the hardest working parts of our bodies—are frequently relegated to the bottom of our self-care priority list. If you have ever felt the discomfort of snagging your socks on a rough heel or felt self-conscious about dry, ashy knuckles during a meeting, you are certainly not alone. The good news is that you do not need an expensive salon appointment to transform your skin. With a bit of consistency and the right sequence of steps, you can achieve professional results right in your own living room.
The infographic provided lays out a foolproof, budget-friendly 7-step routine that targets the specific anatomy of the hands and feet. Because the skin on our palms and soles is structurally different from the skin on our faces—lacking oil glands in some areas and being much thicker in others—it requires a specialized approach to hydration. Let’s dive deep into why this routine works and how you can optimize each step for the softest skin of your life.
Step 1: The Power of the Initial Soak
Everything starts with the soak. This is more than just a relaxing moment; it is a functional necessity. Spending 10 to 15 minutes with your hands and feet submerged in warm water serves to soften the keratinized protein layers of the skin. This makes the subsequent steps, like exfoliation and nail trimming, significantly more effective and much safer.
How to Level Up Your Soak
While plain warm water works, you can easily turn this into a therapeutic treatment by adding common household items. For tired feet, consider adding a half-cup of Epsom salts to help reduce inflammation and soothe aching muscles. If you are dealing with particularly dry skin, a few drops of olive oil or almond oil in the basin can provide an initial layer of emollient protection. For a sensory experience, tossing in a few rose petals or lavender sprigs not only looks beautiful but provides aromatherapy benefits that lower your cortisol levels.
Step 2: Gentle Scrubbing and Exfoliation
Once the skin is soft and hydrated from the soak, it is time to remove the dead skin cells that cause that “ashy” or rough appearance. A gentle scrub is essential because it clears the pathway for your moisturizers to actually penetrate the skin rather than just sitting on top of a layer of dead cells.
Choosing the Right Exfoliant
You do not need to buy a luxury scrub to get great results. A simple mixture of brown sugar and coconut oil creates an excellent manual exfoliant. The sugar granules act as the physical scrub, while the coconut oil provides immediate lubrication. When scrubbing, focus on the areas that get the most friction: the heels, the balls of the feet, and the knuckles of the hands. Remember to be “gentle” as the infographic suggests; over-scrubbing can lead to micro-tears in the skin, which can cause irritation or even infection.
Step 3: Precise Nail Trimming and Shaping
Nail health is a vital component of hand and foot care. Trimming your nails while they are still slightly soft from the soak prevents them from cracking or splintering. This step is about both aesthetics and hygiene, as well-groomed nails are less likely to harbor bacteria or snag on fabrics.
Safety and Technique
When trimming toenails, always cut straight across to prevent painful ingrown nails. For fingernails, you have more freedom to follow the natural curve of your fingertip. Use a high-quality emery board to smooth out any rough edges. Filing in one direction rather than a “sawing” back-and-forth motion helps maintain the integrity of the nail plate, preventing peeling over time.
Step 4: The Magic of Cuticle Oil
The cuticle is the skin’s natural seal, protecting the nail matrix from bacteria. When cuticles become dry, they can peel or tear, leading to painful hangnails. Applying a dedicated cuticle oil is one of the fastest ways to make a manicure or pedicure look professional and polished.
Why Oil Over Lotion?
Cuticle oils are typically formulated with smaller molecules than standard lotions, allowing them to sink deeper into the nail bed and the surrounding skin. If you do not have a specific cuticle oil, jojoba oil is a fantastic alternative because its chemical structure is very similar to the natural sebum produced by human skin. Massaging the oil in for 30 seconds per nail also stimulates blood flow to the area, which can encourage faster and stronger nail growth.
Step 5: Applying a Thick Moisturizer
Now that the skin is exfoliated and the nails are prepped, it is time for the heavy hitters. Step 5 focuses on the hands and the general surface of the feet. Since you have just opened up the pores and removed dead skin, your body is primed to drink up moisture.
Look for Key Ingredients
For the best results, look for moisturizers that contain humectants like glycerin or hyaluronic acid, which pull moisture into the skin, combined with occlusives like shea butter or cocoa butter, which lock that moisture in. Apply your moisturizer while the skin is still slightly damp to trap as much hydration as possible. This is the “base coat” of your hydration routine.
Step 6: Targeted Foot Cream and Heel Balm
The skin on our heels is roughly 20 times thicker than the skin on the rest of our body. This is why a standard body lotion often feels like it is doing nothing for cracked heels. Step 6 introduces specialized products designed for these tough zones.
Addressing Fissures and Cracks
Heel balms often contain “keratolytic” agents like urea or salicylic acid. These ingredients actually work to break down the thickened, calloused skin that causes cracking. If you have deep fissures, look for a balm that is thick and almost waxy in texture. Brands like the one shown in the infographic provide a protective barrier that stays in place much longer than a liquid lotion, ensuring that the active ingredients have hours to work their magic.
Step 7: The Overnight Seal
This is the secret weapon of the entire routine. By wearing cotton gloves and socks overnight, you are creating a “mini-sauna” for your hands and feet. This process, known as occlusion, significantly increases the absorption rate of the creams you applied in steps 5 and 6.
Why Cotton Matters
It is important to use cotton rather than synthetic materials like polyester. Cotton is breathable, which prevents your hands and feet from becoming uncomfortably sweaty or overheating, while still keeping the product pressed against your skin. When you wake up the next morning and remove the gloves and socks, you will notice an immediate difference in the texture and elasticity of your skin. It is truly the most effective way to “fast-track” the healing of extremely dry skin.
The Importance of Consistency
As the infographic notes, doing this routine 2 to 3 times weekly is the key to seeing lasting results. Skin cells take about 28 days to turn over, so you should commit to this routine for at least a month to see the full transformation. However, most people notice a significant improvement in comfort and appearance after just the first session.
Creating a Budget-Friendly Kit
One of the best things about this routine is that it does not require a massive financial investment. You can find high-quality basics at any local drugstore.
- A plastic basin: For soaking.
- Sugar and oil: From your kitchen for scrubbing.
- Nail clippers and a file: Standard grooming tools.
- Petroleum jelly or Urea-based cream: For the heavy-duty moisturizing.
- A pair of clean cotton socks: To wear overnight.
By keeping these items together in a small basket, you make it easy to start your routine whenever you have a spare 20 minutes in the evening.
Common Mistakes to Avoid
While the routine is simple, there are a few pitfalls to watch out for. First, avoid using water that is too hot. While a hot soak feels good, excessively high temperatures can actually strip the natural oils from your skin, leaving you drier than when you started. Stick to a comfortable, lukewarm temperature.
Second, do not skip the soak. Trying to scrub dry skin can be abrasive and ineffective. The water is what prepares the “canvas” for the rest of the work. Lastly, ensure your cotton socks and gloves are clean. Reusing the same pair multiple nights in a row without washing them can trap bacteria against your skin, which is counterproductive to a healthy skincare routine.
Conclusion: Step into a Softer Version of Yourself
Taking care of your hands and feet is not just about vanity; it is about comfort and health. Our feet carry us through the world, and our hands are our primary tools for interaction. By following this simple, 7-step budget-friendly routine, you are giving back to the parts of your body that do the most for you.
Whether you are dealing with the harsh dryness of winter or the exposure of summer, this weekly ritual provides a moment of peace and a lifetime of soft, healthy skin. Grab a bowl, put on your favorite podcast, and start your soak today. Your skin will thank you! Once you see the results for yourself, you will wonder why you ever waited so long to make hand and foot care a permanent part of your self-care calendar.