
6 Powerful Homemade Cleaners Easy DIY Recipes for a Naturally Clean Home
Keeping your home clean doesn’t have to mean buying a cupboard full of expensive cleaning products. With a few everyday ingredients, you can make simple homemade cleaners for countertops, glass, bathtubs, furniture, toilet bowls, and greasy kitchen surfaces. These DIY cleaning recipes offer practical ways to simplify your cleaning routine, reduce unnecessary packaging, and keep essential supplies close at hand.
From a quick dusting spray to a homemade kitchen degreaser, each recipe serves a different purpose. The key is choosing ingredients that suit the surface, using the right cleaning method, and understanding which combinations are safe. With a little preparation, you can build a more organized cleaning routine that works for your household.
Key Takeaways
- Discover six DIY cleaning ideas for common household tasks.
- Use dish soap, baking soda, and other ingredients carefully and appropriately.
- Choose cleaning methods based on the surface and type of dirt.
- Test homemade solutions on a small, hidden area before wider use.
- Never mix vinegar with bleach or other incompatible cleaning products.
- Label homemade mixtures clearly and store them safely away from children and pets.
1. Homemade All-Purpose Cleaner for Everyday Messes
An all-purpose cleaner is useful for tackling everyday dirt on suitable washable surfaces. Kitchen counters, cabinet exteriors, and dining tables often need a quick wipe to remove crumbs, fingerprints, and light spills. Rather than reaching for a different product every time, you can keep a simple cleaning solution ready for appropriate surfaces.
Ingredients and Supplies
- 1 teaspoon mild dish soap
- Warm water
- A clean spray bottle or small cleaning container
- A soft microfiber cloth
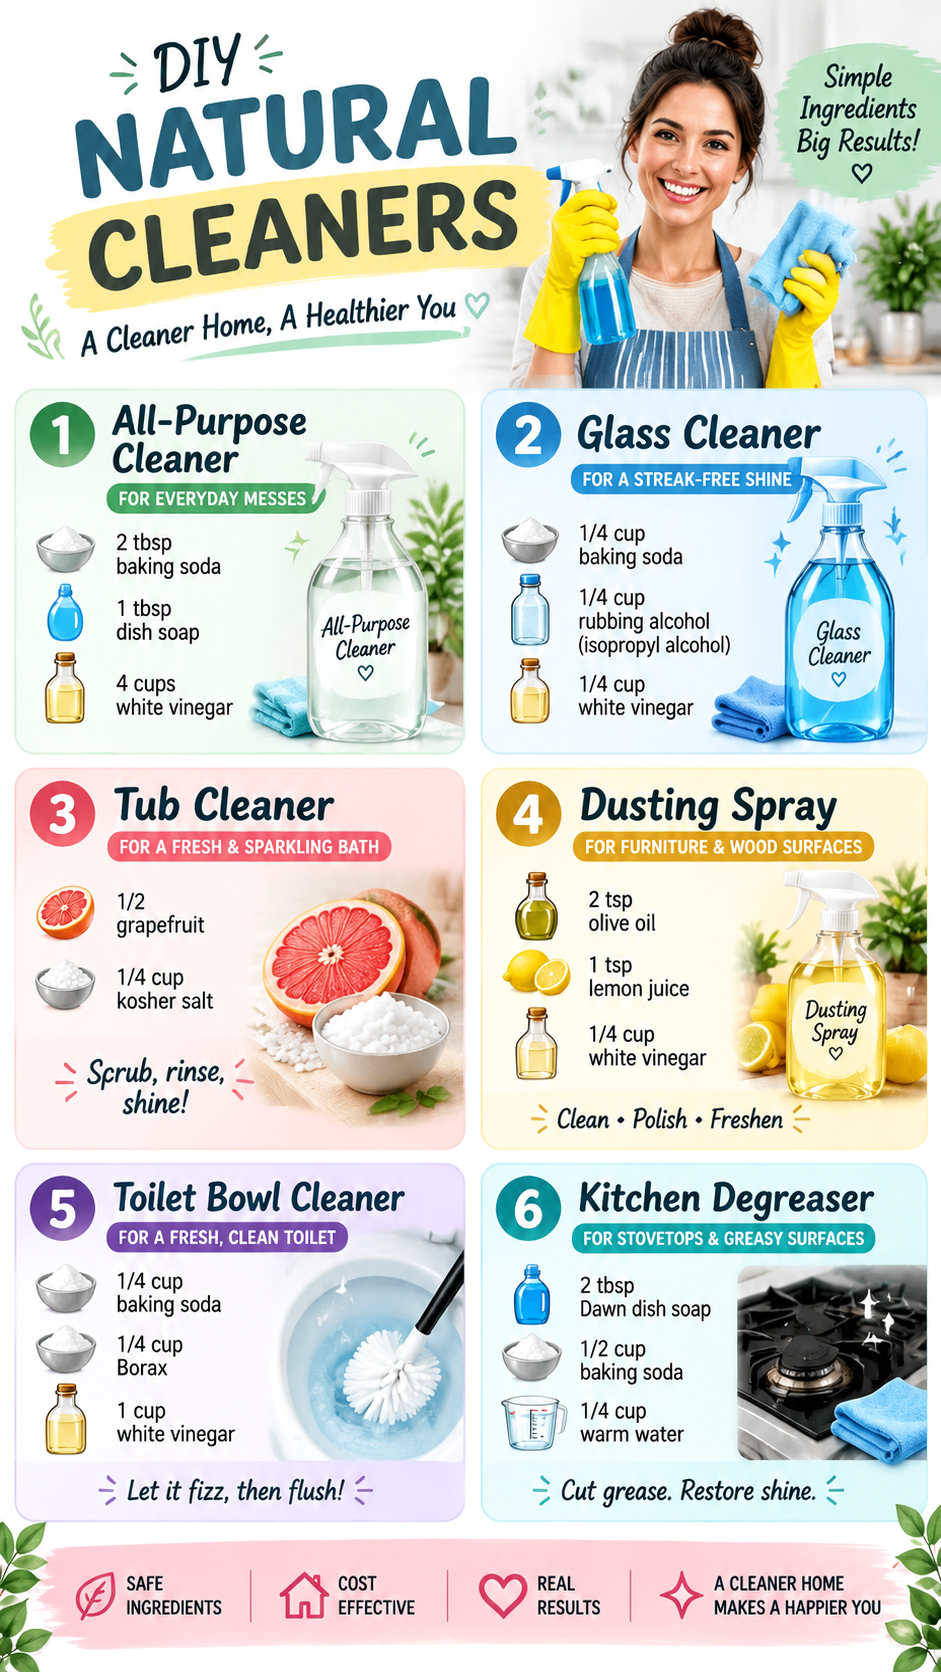
The original graphic suggests combining baking soda, dish soap, white vinegar, and warm water. However, baking soda and vinegar react with each other, producing carbon dioxide and water while reducing the ingredients’ individual effects. Adding them together does not automatically create a more powerful cleaner. A simple dish-soap solution is a more practical option for routine surface cleaning.
How to Make and Use It
- Add a small amount of mild dish soap to warm water.
- Mix gently until the soap is distributed without producing excessive foam.
- Dampen a microfiber cloth with the solution, or apply a small amount to a compatible surface.
- Wipe away dirt and soap residue with a clean, damp cloth.
- Dry the surface with a soft towel when necessary.
For surfaces that come into contact with food, follow the manufacturer’s cleaning instructions and rinse as directed. Avoid spraying electrical appliances, outlets, and unfinished wood directly. Apply the solution to the cloth instead when appropriate.
Important: An all-purpose cleaner is not suitable for every material. Natural stone, delicate finishes, unsealed wood, and certain coated surfaces can be damaged by common household ingredients. Always check the surface manufacturer’s care instructions before cleaning.
2. DIY Glass Cleaner for Windows and Mirrors
Clean windows and mirrors can make a room feel brighter and more inviting. The secret to a streak-free finish is not necessarily a complicated formula. It is usually a combination of an appropriate cleaning solution, a clean microfiber cloth, and careful drying.
The image features a glass-cleaning recipe using baking soda, rubbing alcohol, and white vinegar. Baking soda is not an ideal choice for glass because undissolved particles can leave residue or scratch delicate finishes. Instead, use a glass cleaner formulated for the surface or a simple method recommended by the window or mirror manufacturer.
What You Need
- A suitable commercial glass cleaner or clean water with a small amount of mild detergent, when appropriate
- Two clean microfiber cloths
- A dry towel for surrounding frames and ledges
Steps for a Streak-Free Finish
- Remove loose dust from the glass with a dry microfiber cloth.
- Apply a small amount of the chosen cleaner according to its instructions.
- Wipe gently, working from the top of the glass toward the bottom.
- Use a second, dry microfiber cloth to remove remaining moisture and marks.
- Wipe the window frame and surrounding surfaces if they become damp.
For the best results, clean windows when the glass is cool and out of direct sunlight. Strong sunlight can cause moisture to evaporate too quickly, leaving visible streaks behind.
What About Vinegar and Rubbing Alcohol?
Vinegar is acidic and can help loosen certain mineral deposits, but it can damage natural stone, some metal finishes, and other acid-sensitive materials. Rubbing alcohol is flammable and may affect coatings, sealants, and plastics. Use these ingredients only when the surface manufacturer confirms compatibility, and never combine cleaning products without checking their labels.
3. Grapefruit and Salt for Bathtub Cleaning
The bathtub-cleaning idea in the graphic uses half a grapefruit and kosher salt as a scrubbing combination. The fruit provides a textured surface, while the salt offers mild abrasive action. It is an interesting natural-cleaning idea, but it needs a little care because citrus juice is acidic and salt can scratch sensitive finishes.
This method is best treated as an occasional option for a compatible, durable surface rather than a universal bathroom cleaner. It should not be used on natural stone, delicate coatings, or materials whose manufacturer advises against acidic products or abrasives.
Materials to Prepare
- Half a grapefruit
- A small amount of salt, if compatible with the surface
- A soft sponge or cloth
- Clean water for rinsing
How to Clean a Suitable Bathtub
- Remove loose hair and debris from the bathtub.
- Check the bathtub manufacturer’s care instructions and test a small, inconspicuous area.
- If the finish is compatible, gently rub the cut side of the grapefruit over a small section.
- Use a soft cloth to loosen light residue without applying excessive pressure.
- Rinse thoroughly with clean water and dry the surface.
For routine soap scum and body-oil residue, a nonabrasive bathroom cleaner designed for your bathtub material is generally the safer choice. Avoid aggressive scrubbing, especially on acrylic tubs and glossy finishes.
Keep Your Bathroom Fresh Between Cleanings
Small habits can make bathroom cleaning much easier. Rinse the tub after bathing, remove standing water with a suitable squeegee, and allow the room to ventilate. Regularly drying damp surfaces can help reduce residue buildup and discourage mold growth in areas that remain wet.
4. Homemade Dusting Spray for Furniture
Dusting spray is intended to help remove dust and improve the appearance of suitable furniture surfaces. The image shows a mixture of olive oil, lemon juice, white vinegar, and warm water. Although these ingredients are common in many kitchens, the combination is not ideal for every type of furniture.
Olive oil can leave a greasy film, attract additional dust, or affect some finishes. Lemon juice and vinegar are acidic, which means they can damage certain coatings and natural materials. For most household dusting, a clean, slightly damp microfiber cloth is a simpler and safer starting point.
What to Use Instead
- A clean, dry microfiber cloth for ordinary dust
- A lightly dampened microfiber cloth for dust that clings to washable surfaces
- A furniture-care product specifically formulated for the finish, when needed
Simple Dusting Instructions
- Remove loose items from shelves, tables, and furniture.
- Start with higher surfaces and work downward so falling dust can be collected later.
- Wipe each surface with a clean microfiber cloth.
- For compatible washable surfaces, slightly dampen the cloth if dry dusting is not enough.
- Dry the surface promptly and replace decorative items after cleaning.
For finished wood, follow the furniture manufacturer’s maintenance guidance. Antique furniture, waxed wood, unfinished wood, and delicate veneers may require specialized care. Avoid soaking wooden surfaces or allowing water to pool around joints and edges.
Pro Tip: Use one cloth for dusting and another for polishing or drying when needed. This helps prevent collected dust from being spread across freshly cleaned furniture.
5. Toilet Bowl Cleaning with Baking Soda
Toilet bowls need regular cleaning to remove visible residue, mineral deposits, and everyday grime. The graphic suggests using baking soda, borax, and white vinegar. While these ingredients are commonly associated with DIY cleaning, combining several ingredients does not necessarily improve cleaning performance.
Baking soda can provide mild abrasive action, while acidic cleaners may help with some mineral deposits. Borax is an alkaline cleaning ingredient that requires careful handling. However, a toilet cleaner formulated for the bowl is often the most straightforward choice, especially when tackling stubborn stains or buildup.
Supplies for Routine Toilet Cleaning
- A toilet bowl cleaner compatible with your toilet
- A dedicated toilet brush
- Disposable or washable cleaning cloths for exterior surfaces
- Protective gloves, if recommended by the product label
Step-by-Step Cleaning Method
- Read the cleaner’s label and follow the recommended application instructions.
- Apply the product inside the bowl, paying attention to areas beneath the rim when directed.
- Allow the cleaner to sit for the specified contact time.
- Scrub the bowl with a dedicated toilet brush.
- Flush according to the product instructions.
- Clean the seat, lid, handle, and surrounding surfaces with suitable products, using separate cleaning materials.
Regular cleaning helps prevent ordinary buildup from becoming harder to remove. Ventilation is also important, particularly when using products with strong fumes.
A Crucial Toilet-Cleaning Safety Rule
Never mix vinegar or other acidic cleaners with bleach-based toilet products. This can release dangerous chlorine gas. Do not combine toilet bowl cleaners with ammonia, drain cleaners, or other household chemicals. Use one product at a time, follow its label, and rinse as directed before switching products.
6. DIY Kitchen Degreaser for Greasy Surfaces
Cooking often leaves behind splashes of oil and sticky residue on stovetops, range hoods, backsplashes, and cabinet fronts. A suitable degreasing cleaner can help break down this mess and make kitchen maintenance less frustrating.
The image shows a paste made with dish soap, baking soda, and warm water. This approach combines a detergent with a mildly abrasive powder. It may be useful for some durable, compatible surfaces, but it should not be used indiscriminately on every appliance or finish.
Ingredients for a Simple Cleaning Paste
- 2 tablespoons mild dish soap
- A small amount of baking soda, if the surface tolerates mild abrasives
- Water as needed to create a spreadable consistency
- A soft sponge or microfiber cloth
The original graphic uses half a cup of baking soda and a quarter cup of warm water. That amount can create a thick paste, but it may be unnecessarily abrasive for some surfaces. Start with a small quantity and choose a less abrasive cleaning method for delicate finishes.
How to Remove Kitchen Grease
- Turn off the stovetop and allow it to cool completely.
- Remove loose crumbs and wipe away excess grease with a disposable or washable cloth.
- Apply a small amount of a compatible degreaser or mild dish-soap solution.
- For a surface that tolerates baking soda, test a small area before using a gentle paste.
- Wipe without applying excessive pressure or allowing cleaner to enter openings.
- Remove all cleaning residue with a clean, damp cloth and dry the surface.
For greasy range hoods, check the manufacturer’s instructions for cleaning removable filters. Some filters can be washed, while others require a specific cleaning procedure or replacement. Never immerse electrical components or spray cleaner into burners, switches, vents, or control panels.
Surfaces That Need Extra Care
Stainless steel, glass cooktops, aluminum, painted cabinets, and stone countertops can respond differently to cleaning ingredients. Baking soda may scratch delicate finishes, and acidic cleaners can damage certain stone surfaces. Use a manufacturer-approved product whenever possible, particularly for induction cooktops and specialty appliance finishes.
Why This Matters
Effective cleaning depends on more than the ingredients in a recipe. The surface material, type of dirt, cleaning time, and amount of scrubbing all affect the result. A mild detergent and soft cloth can outperform an aggressive homemade mixture when the goal is to remove grease without scratching or damaging a finish.
Essential Safety Tips for Homemade Cleaning Products
DIY cleaning can help simplify your household routine, but natural ingredients are not automatically harmless. Vinegar is acidic, baking soda is mildly abrasive, rubbing alcohol is flammable, and borax can be harmful if swallowed or mishandled. Safe use starts with understanding the ingredients and the surfaces you intend to clean.
Never Mix Incompatible Cleaning Ingredients
- Bleach and vinegar: Mixing them can release toxic chlorine gas.
- Bleach and ammonia: Mixing them can produce dangerous chloramine gases.
- Bleach and rubbing alcohol: This combination can create hazardous compounds.
- Different commercial cleaners: Avoid combining products unless their labels explicitly permit it.
- Baking soda and vinegar: Their reaction produces carbon dioxide and neutralizes much of their acid-base action, so combining them does not guarantee better cleaning.
Safety first: Never experiment with cleaning chemical combinations. Use one suitable product at a time, ventilate the area, follow label directions, and keep all cleaners away from children and pets. If a mixture produces unexpected fumes or causes irritation, leave the area and seek appropriate medical or poison-control advice.
Label and Store Homemade Cleaners Properly
If you prepare a simple cleaning solution, label the container with its contents and preparation date. Never store homemade cleaners in beverage bottles or containers that could be mistaken for food. Use containers compatible with the ingredients, keep them securely closed, and store them in a safe place away from heat and direct sunlight when appropriate.
Water-based mixtures without a validated preservative system can support microbial growth over time. Make small batches, use them promptly, and discard any mixture that develops an unusual appearance, odor, or texture. Do not assume a homemade cleaner has a long shelf life simply because its ingredients are common household products.
Protect Your Surfaces Before Cleaning
Test an unfamiliar product in a hidden area first. Use soft cloths for delicate finishes, avoid abrasive powders on glossy surfaces, and never allow liquid to collect around electrical parts or unfinished edges. When in doubt, follow the manufacturer’s maintenance instructions rather than relying on a general DIY recipe.
How to Build a Simple, Budget-Friendly Cleaning Routine
You do not need six different homemade mixtures to keep your home tidy. A small collection of suitable cleaning supplies, used consistently, is often enough for most everyday tasks. Start with the areas that collect the most dirt and adjust your routine to your household’s needs.
Daily Cleaning Habits
- Wipe kitchen counters after food preparation.
- Clean up grease splashes before they harden.
- Dry water-prone bathroom surfaces when practical.
- Use a microfiber cloth to remove visible dust from frequently used furniture.
- Return cleaning supplies to their designated storage area after use.
Weekly Cleaning Tasks
- Clean mirrors and windows where fingerprints are noticeable.
- Give the toilet and bathroom fixtures a thorough clean.
- Wipe cabinet fronts, appliance exteriors, and suitable backsplash surfaces.
- Dust shelves, tables, and other frequently used surfaces.
- Inspect cleaning cloths and wash them according to their care instructions.
Grouping similar tasks together can save time. For example, dust an entire room before vacuuming, and clean kitchen surfaces after putting away food. Keep the supplies you use most often easy to access, but always store chemicals securely.
Common Questions About DIY Homemade Cleaners
Are homemade cleaners always cheaper?
Not necessarily. Some simple solutions use inexpensive ingredients, but the total cost depends on how much you need, the surface being cleaned, and whether you already have suitable supplies. A specialized product may be more economical when it lasts longer or is specifically designed for a particular cleaning task.
Can vinegar clean every surface?
No. Vinegar is acidic and can damage marble, limestone, and other acid-sensitive stone. It may also affect certain metals, sealants, grout, and specialty finishes. Check the manufacturer’s instructions before using vinegar on any surface.
Does a natural cleaner disinfect surfaces?
Not automatically. Removing visible dirt is different from disinfecting a surface. If disinfection is needed, particularly in areas affected by illness or contamination, use a registered or otherwise appropriately approved disinfectant suitable for the surface and follow its label instructions, including the required contact time.
How long do homemade cleaning mixtures last?
Shelf life varies with the ingredients, container, storage conditions, and whether the mixture contains preservatives. Water-based homemade solutions should generally be prepared in small quantities and used promptly. Label each container and discard questionable mixtures rather than keeping them indefinitely.
What is the easiest homemade cleaner to start with?
A small amount of mild dish soap diluted in water is a practical starting point for many compatible, washable surfaces. It is easy to prepare and can help remove everyday dirt and grease. Always check the surface instructions, avoid excess moisture, and rinse away residue when needed.
Quick Points: Six Cleaning Ideas at a Glance
- All-purpose cleaning: Use mild dish soap and water on suitable washable surfaces.
- Glass and mirrors: Choose a compatible glass cleaner and use clean microfiber cloths.
- Bathtubs: Avoid acidic ingredients and abrasive scrubbing on delicate finishes.
- Furniture: Remove dust with a microfiber cloth and follow the finish manufacturer’s care guidance.
- Toilets: Use a suitable toilet cleaner and never mix it with other chemicals.
- Kitchen grease: Choose a compatible degreaser and take care around electrical and appliance components.
Conclusion: Make Everyday Cleaning Simpler
A cleaner, more organized home often begins with small habits and the right supplies. These six homemade cleaning ideas offer inspiration for tackling everyday dirt, dusty furniture, bathroom residue, glass marks, and kitchen grease. With thoughtful ingredient choices and a little preparation, you can create a cleaning routine that is practical, manageable, and suited to your home.
The most important lesson is that simple does not mean using the same mixture everywhere. Dish soap and water can be useful for many washable surfaces, while glass, natural stone, delicate furniture, and specialized appliances may need different care. Choosing an appropriate product is often more effective than combining several household ingredients.
Remember to test unfamiliar cleaners, label containers, ventilate your space, and never mix incompatible chemicals. A few well-chosen supplies and consistent cleaning habits can make household chores feel less overwhelming and help you enjoy a fresher, more comfortable living space.
Save these DIY cleaning ideas for your next cleaning day, choose the methods that suit your surfaces, and build a routine that makes caring for your home a little easier.
Tags
Homemade Cleaners
DIY Cleaning Recipes
Natural Cleaning Tips
Budget-Friendly Cleaning
Kitchen Degreaser
Bathroom Cleaning
Eco-Conscious Home
Home Cleaning Hacks