15 Genius Kitchen Hacks That Save Time and Make Cooking Easier
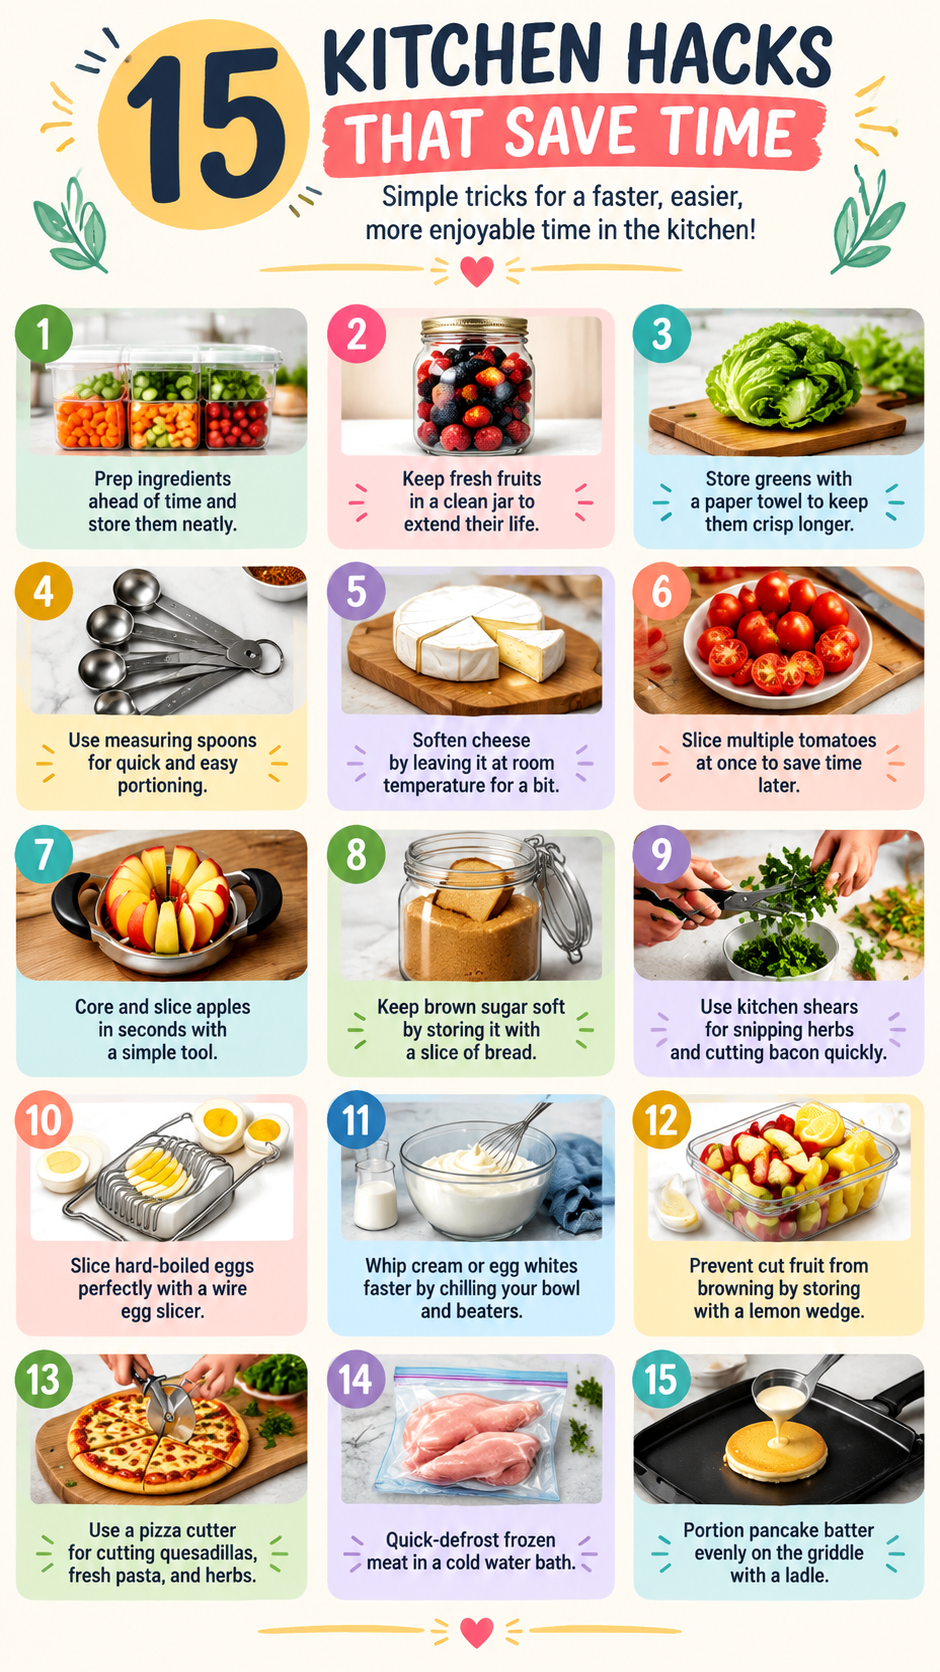
Want to spend less time on everyday food preparation and more time enjoying delicious meals? A few clever kitchen hacks can make a surprising difference in your daily routine. From freezing chopped onions and storing fresh berries to slicing cherry tomatoes in seconds, these simple cooking tips help you work smarter, reduce food waste, and keep your kitchen running smoothly.
Whether you are preparing quick weekday dinners, organizing ingredients for the week, or looking for easier ways to handle common kitchen tasks, these 15 time-saving kitchen hacks offer practical solutions you can start using today. Most rely on ordinary kitchen tools and simple techniques, making them useful for beginners and experienced home cooks alike.
Key Takeaways
- Prepare ingredients in advance to make everyday cooking faster and easier.
- Use simple tools such as kitchen scissors, a pizza cutter, and an egg slicer for repetitive tasks.
- Store fruits, vegetables, and pantry ingredients properly to help maintain their quality.
- Reduce food waste by freezing ingredients in useful portions and using leftovers creatively.
- Follow basic food safety practices when storing, thawing, and handling perishable foods.
- Choose kitchen shortcuts that fit your cooking habits and the meals you prepare most often.
1. Dice and Freeze Onions for Quick Meal Prep
Chopping onions is one of those small kitchen jobs that can make cooking feel more time-consuming than necessary. If your recipes frequently call for diced onions, prepare a larger batch at once and freeze the extra portions.
Start by peeling the onions and cutting them into evenly sized pieces. Divide the diced onions into small freezer-safe bags or airtight containers, choosing portions that match your usual recipes. Flatten the bags before freezing so they take up less space and are easier to store.
How to Use Frozen Diced Onions
- Add frozen onions directly to soups, stews, sauces, and cooked dishes.
- Label each container with the contents and freezing date.
- Freeze onions in small portions to avoid thawing more than you need.
- Use airtight, freezer-safe packaging to reduce freezer odors and drying.
Important: Frozen onions work best in cooked dishes because freezing softens their texture. They are not an ideal substitute for fresh onions in salads, sandwiches, or other recipes where a crisp texture matters.
2. Store Berries Carefully to Keep Them Fresh
Fresh berries are delicious in smoothies, breakfast bowls, desserts, and snacks, but they can spoil quickly if moisture collects around them. Good storage habits can help preserve their flavor and texture for longer.
Inspect berries when you bring them home and remove any that are moldy, leaking, or badly damaged. Refrigerate the remaining berries in a clean container that allows some airflow, ideally with a dry paper towel underneath to absorb excess moisture. Avoid washing them until you are ready to eat them unless you can dry them thoroughly before storage.
Does a Glass Jar Help?
A clean glass container can be useful for berry storage, provided the berries are dry and the container is not packed too tightly. A tightly sealed jar can trap moisture, so check for condensation and make sure the berries remain in good condition.
- Keep berries refrigerated.
- Remove damaged berries promptly.
- Store different varieties separately when their condition or moisture levels differ.
- Check the container regularly and remove any spoiled fruit.
For longer storage, spread clean, dry berries on a tray, freeze them until firm, and transfer them to a freezer-safe bag. Frozen berries are especially useful for smoothies, oatmeal, sauces, and baking.
3. Remove the Core from Iceberg Lettuce Quickly
Preparing iceberg lettuce for salads, burgers, wraps, and sandwiches is easier when you know how to remove the tough central core. Instead of carefully cutting around the core with a knife, use a simple technique to loosen it first.
Remove any damaged outer leaves and hold the lettuce head firmly. With the core facing downward, strike the core end against a clean, sturdy cutting board. The impact can loosen the core so you can twist and pull it out with your hand.
Finish Preparing the Lettuce
- Remove the core and discard it.
- Separate the leaves or cut the lettuce into wedges.
- Rinse thoroughly under clean running water.
- Dry the leaves using a salad spinner or clean kitchen towels.
- Refrigerate any unused lettuce in a suitable container.
Dry lettuce is especially useful when preparing salads because excess water can dilute dressings and make other ingredients soggy. If you are short on time, a salad spinner is a helpful tool for removing water efficiently.
4. Peel Ginger with a Spoon
Fresh ginger has an irregular shape that can make peeling with a knife or vegetable peeler awkward. A regular metal spoon offers a simple alternative, allowing you to scrape away the thin skin while following the root’s bumps and curves.
Hold the ginger firmly on a cutting board. Grip the spoon near its bowl and gently scrape its edge across the skin. Use short movements around small knobs and narrow sections, removing only the outer layer rather than cutting away large pieces of ginger.
Make Ginger Easier to Prepare
- Choose a spoon with a sturdy edge.
- Use a cutting board to keep the ginger stable.
- Cut large roots into manageable sections before peeling.
- Grate or mince only the amount required by your recipe.
This method is especially handy for fresh ginger used in stir-fries, soups, marinades, teas, and homemade dressings. If the ginger skin is clean and the recipe permits it, peeling may not always be necessary. Wash the root thoroughly before use.
5. Slice Soft Cheese with Unflavored Dental Floss
Soft cheeses can be difficult to cut neatly. A knife may compress delicate cheese, stick to the surface, or leave uneven edges. Clean, unflavored dental floss can provide a surprisingly effective alternative for certain soft cheeses.
Cut a length of floss and hold it tightly between your hands. Position it above the cheese and lower it straight through in one controlled movement. The thin strand can create a clean cut without pressing down as heavily as a conventional knife.
Which Cheeses Work Best?
This trick is useful for suitable soft or semisoft cheeses, including some fresh cheese logs and soft cheese rounds. The results depend on the cheese’s temperature and texture.
- Use only plain, unflavored floss without added flavorings or coatings.
- Keep the floss clean and use a fresh piece for food preparation.
- Chill very soft cheese briefly if it is difficult to handle.
- Use a proper food-safe knife for hard or crumbly cheeses.
For a cheese board, this technique can help create tidy portions that look attractive alongside crackers, fruit, and other snacks.
6. Slice Cherry Tomatoes Between Two Plates
Cutting a large quantity of cherry tomatoes individually can take longer than expected. The two-plate method helps speed up the process when you need tomatoes for salads, pasta dishes, sandwiches, or meal prep.
Place the tomatoes in a single layer on a stable plate or another suitable flat surface. Cover them with a second plate, leaving enough space for a sharp knife to pass between the two surfaces. Hold the upper plate securely without pressing too hard, then carefully slice horizontally through the tomatoes.
Tips for Better Results
- Choose tomatoes of similar size so they cut evenly.
- Use a sharp knife with a suitable blade.
- Keep your fingers away from the cutting path.
- Work on a stable surface and avoid squeezing the tomatoes.
Pro Tip: Never force a knife between unstable plates or hold the setup in your palm. Use a stable cutting surface and enough clearance for the blade. If the arrangement feels awkward, simply cut the tomatoes individually or use a purpose-made tomato slicer.
This kitchen shortcut is most useful when preparing several servings at once. It can reduce repetitive cutting, but safety and control should always come before speed.
7. Core Apples with an Apple Corer
If you regularly pack apple slices for lunch or prepare apples for baking, an apple corer can make the job quicker and more consistent. This simple tool removes the central core, including the seeds, while leaving most of the edible fruit intact.
Wash the apple and place it upright on a stable cutting board. Position the corer over the center and press down firmly using a controlled motion. Remove the tool and check that the core has come out completely.
When to Use an Apple Corer
- Preparing apple rings for snacks.
- Making apple slices for lunchboxes.
- Preparing whole apples for baking.
- Speeding up fruit preparation for salads and desserts.
Choose an apple corer that feels comfortable to grip and is easy to clean. If you do not have one, cut the apple into quarters and remove the core from each section with a small knife.
8. Keep Brown Sugar Soft with Proper Storage
Brown sugar can become hard when it loses moisture, making it difficult to measure or mix into recipes. Storing it in an airtight container is the most reliable way to slow this process and keep it easier to use.
Transfer brown sugar to a clean, dry, airtight container after opening the original package. Keep the container away from heat and moisture sources, and close the lid firmly after each use.
Can a Slice of Bread Help?
A small piece of bread placed in the container can help soften hardened brown sugar by transferring moisture. Check it regularly and replace it when it becomes dry or stale. Avoid leaving it in the sugar for longer than necessary.
For a quick fix, place the hardened sugar in a microwave-safe bowl with a slightly damp paper towel nearby, cover loosely, and heat in short intervals. Check frequently to prevent overheating. Use the softened sugar promptly because it can harden again as it cools.
The key is to prevent the problem in the first place. A good airtight container protects pantry ingredients and reduces the frustration of dealing with hardened sugar when you are ready to bake.
9. Use Kitchen Scissors to Chop Herbs and Cut Bacon
Kitchen scissors are useful for much more than opening food packages. They can quickly snip fresh herbs, cut strips of bacon, trim green onions, and divide some leafy ingredients directly over a bowl or pan.
For herbs such as parsley, cilantro, chives, and dill, gather a small bunch and snip it into a clean bowl. Use short, controlled cuts to create the size your recipe requires. For bacon, cut the strips into pieces on a clean cutting board before cooking, using scissors specifically designated for food preparation.
Why Kitchen Scissors Save Time
- They reduce the number of tools needed for small cutting jobs.
- They make it easy to portion herbs directly over prepared food.
- They are convenient for cutting green onions into thin rounds.
- They can simplify portioning ingredients before cooking.
Clean scissors thoroughly after every use, especially when cutting raw meat or other potentially contaminated foods. Wash and sanitize them according to the manufacturer’s instructions, and keep raw-meat tools separate from those used for ready-to-eat ingredients.
10. Slice Hard-Boiled Eggs with an Egg Slicer
An egg slicer is a simple kitchen gadget designed to produce even slices of hard-boiled eggs. Instead of repeatedly cutting each egg with a knife, place the peeled egg in the holder and lower the wire frame through it.
The result is a set of relatively uniform slices that work well in salads, sandwiches, breakfast plates, and snack boxes. Many slicers can also be used to cut certain soft foods, such as strawberries or mushrooms, if the product instructions permit it.
Get Cleaner Egg Slices
- Cook the eggs until the whites and yolks are fully set.
- Cool them promptly and peel once they are comfortable to handle.
- Place each egg securely in the slicer.
- Lower the wire frame steadily without forcing it.
- Wash the slicer after use, paying attention to the wires and hinges.
For meal prep, cook several eggs at once and store them safely in the refrigerator. Keeping them ready to use makes it easier to assemble quick breakfasts and protein-rich salads during a busy week.
11. Chill Your Bowl and Beaters for Faster Whipping
Whipped cream adds a light, creamy finish to cakes, pies, fruit bowls, and other desserts. If cream is too warm, it may take longer to whip and can be harder to handle. Chilling the mixing bowl and beaters before starting can make the process more efficient.
Place a clean metal or glass mixing bowl and the beaters in the refrigerator for a while before preparing the cream. You can also briefly chill them in the freezer, provided the equipment is freezer-safe. Keep the cream refrigerated until you are ready to use it.
How to Whip Cream Successfully
- Start with cold whipping cream that has enough fat to whip properly.
- Use a clean, chilled bowl and chilled beaters.
- Begin at a moderate speed and increase gradually if needed.
- Stop when the cream reaches the desired soft or firm peaks.
- Refrigerate the finished whipped cream until serving.
Chilling can also help when whipping egg whites, although the ideal preparation depends on the recipe. Egg whites need a clean, grease-free bowl, and they should be handled according to the requirements of the dish. Use pasteurized eggs for recipes that will not be thoroughly cooked.
Expert Insight
Temperature, preparation, and timing often matter more than buying another kitchen gadget. Cold cream, a chilled bowl, and clean beaters can make whipping easier, while properly dried produce and airtight storage can help ingredients stay in better condition. Small adjustments to your routine often deliver the biggest everyday benefits.
12. Slow Fruit Browning with Lemon Juice
Cut apples, pears, and some other fruits can turn brown after exposure to air. This natural process, known as enzymatic browning, affects appearance but does not automatically mean the fruit has spoiled.
Lemon juice can help slow browning because its acidity interferes with the reactions responsible for discoloration. To prepare fruit for lunchboxes, snacks, or fruit salads, squeeze a little lemon juice over the cut surfaces and toss gently to distribute it.
Other Ways to Keep Cut Fruit Looking Fresh
- Store cut fruit in a clean, covered container.
- Refrigerate prepared fruit promptly.
- Cut fruit closer to serving time whenever possible.
- Use lemon juice sparingly if you want to avoid a strong citrus flavor.
- Keep different fruits separate when their flavors or textures may affect one another.
For fruit salads, a small amount of lemon juice can add brightness as well as help preserve the color of certain ingredients. Orange juice or another acidic fruit juice may also work, depending on the flavor you want.
Remember that lemon juice does not make cut fruit shelf-stable. Keep perishable fruit refrigerated and discard anything that shows signs of spoilage.
13. Use a Pizza Cutter for Quesadillas, Pasta, and Herbs
A pizza cutter is a versatile kitchen tool that can handle more than pizza. Its rolling blade makes it useful for cutting quesadillas into wedges, dividing flatbreads, portioning certain fresh pasta sheets, and chopping soft herbs on a suitable cutting board.
For quesadillas, place the cooked food on a stable cutting board and roll the cutter through it in straight lines. This can produce neat portions without dragging the filling out of place. Allow the food to rest briefly before cutting if the filling is especially hot or soft.
Creative Ways to Use a Pizza Cutter
- Cut quesadillas into equal wedges for sharing.
- Divide flatbreads and thin wraps into strips.
- Cut fresh pasta sheets into ribbons on a suitable surface.
- Chop soft herbs with short rolling motions on a cutting board.
- Divide pastry dough into strips or small sections.
Use the tool only on surfaces that will not damage its blade. Keep your hands away from the rolling edge, clean the cutter thoroughly, and never use it while holding food in your palm.
14. Thaw Frozen Meat Safely in Cold Water
Forgetting to thaw meat ahead of dinner can disrupt your meal plan. A cold-water bath can be a faster alternative to refrigerator thawing when you need to prepare food sooner, provided you follow safe handling practices.
Keep the meat in a leakproof, sealed bag and submerge it in cold tap water. Change the water every 30 minutes to maintain a cold temperature. Once thawed, cook the meat promptly rather than leaving it at room temperature.
Safe Ways to Thaw Meat
- Refrigerator: The preferred method for gradual, controlled thawing.
- Cold water: Keep the meat sealed, use cold water, and change the water every 30 minutes.
- Microwave: Use the defrost setting and cook the meat immediately afterward.
Food Safety Reminder: Never thaw meat on the kitchen counter or in warm water. These methods can allow the surface to reach temperatures where bacteria multiply rapidly. Meat thawed using cold water or a microwave should be cooked immediately, and raw-meat juices must be kept away from ready-to-eat foods.
For a busy household, planning ahead is still the easiest option. Move frozen meat to the refrigerator in advance whenever possible, and place it in a container that catches any drips.
15. Portion Pancake Batter Evenly with a Ladle
Making pancakes is easier when every portion of batter is roughly the same size. A ladle provides a simple way to measure and transfer batter onto a griddle or frying pan, helping the pancakes cook more evenly and finish at a similar time.
Prepare your batter according to the recipe and preheat a lightly greased griddle or pan to a suitable medium heat. Fill the ladle consistently, then pour each portion into the pan, leaving enough space between pancakes for spreading and flipping.
Tips for Consistent Pancakes
- Use the same ladle or scoop for each pancake.
- Avoid overfilling the pan, which makes flipping more difficult.
- Let the pan reach an even temperature before adding batter.
- Flip when the edges begin to set and bubbles appear on the surface.
- Adjust the heat if the outside browns before the center cooks through.
A ladle is especially useful when cooking for a family or preparing a large batch for brunch. If you make pancakes frequently, you can also use a measuring cup or batter dispenser to create consistent portions with less mess.
How to Build a Faster Kitchen Routine
Knowing individual kitchen tricks is helpful, but combining them into a simple routine can save even more time. The goal is to reduce unnecessary steps, keep frequently used ingredients accessible, and avoid repeating the same preparation tasks every day.
Prepare Ingredients Before Cooking
Before turning on the stove, read your recipe and gather the ingredients you need. Wash produce, measure seasonings, and chop vegetables in advance. If you already have frozen diced onions or washed herbs ready to use, you can move through the recipe more smoothly.
Keep a small container nearby for vegetable scraps and other waste. When you finish preparing ingredients, clear the board and wipe the work surface before beginning the next stage of cooking.
Organize Your Most-Used Tools
Store kitchen scissors, a vegetable peeler, a pizza cutter, measuring tools, and other everyday utensils where you can reach them easily. Keep knives safely stored and use the right tool for each task.
You do not need a drawer full of specialized gadgets to cook efficiently. Start with versatile tools you already own, then consider adding a dedicated slicer or corer only if it solves a problem you encounter regularly.
Use Smart Food Storage Habits
Organize your refrigerator so ingredients are easy to find and stored appropriately. Keep raw meat sealed and separated from ready-to-eat foods, refrigerate perishables promptly, and label containers with dates when helpful.
In the pantry, use airtight containers for dry ingredients that need protection from moisture. In the freezer, portion foods before freezing and label them clearly so you can identify what you have without opening every package.
Common Kitchen Hack Mistakes to Avoid
Even a useful shortcut can create problems if it is used in the wrong situation. A few basic precautions help you save time without compromising food quality or safety.
- Overpacking storage containers: Crowded produce can become bruised or retain excess moisture. Leave enough room for suitable airflow.
- Freezing everything in one large bag: Large frozen blocks are difficult to portion. Divide food into amounts you will actually use.
- Using the wrong cutting surface: Choose a stable cutting board and avoid cutting directly on plates that may slip or break.
- Assuming citrus prevents spoilage: Lemon juice may slow browning, but it does not replace refrigeration or proper storage.
- Leaving thawing meat unattended at room temperature: Use the refrigerator, cold water, or a microwave according to safe thawing guidance.
- Buying tools you rarely use: A simple utensil that performs several jobs is often more practical than a collection of single-purpose gadgets.
The best kitchen hacks are those that fit your habits. If a technique feels awkward or unsafe, choose a more familiar method. Saving a few seconds is never worth risking a cut, damaging equipment, or mishandling food.
Quick Points: 15 Kitchen Hacks at a Glance
- Freeze diced onions in small portions for faster cooking.
- Keep berries dry and refrigerated in a suitable container.
- Loosen the iceberg lettuce core with a controlled strike against a sturdy cutting board.
- Scrape ginger skin with a spoon to reduce waste.
- Use clean, unflavored dental floss to portion suitable soft cheeses.
- Slice cherry tomatoes in batches using a safe, stable setup.
- Remove apple cores with a dedicated corer.
- Store brown sugar in an airtight container.
- Snip herbs and cut suitable ingredients with kitchen scissors.
- Use an egg slicer for neat, consistent hard-boiled egg slices.
- Chill cream, the mixing bowl, and beaters before whipping.
- Apply lemon juice to cut fruit to slow browning.
- Use a pizza cutter for quesadillas and other suitable foods.
- Thaw frozen meat safely in the refrigerator, cold water, or microwave.
- Use a ladle to portion pancake batter evenly.
Conclusion: Make Everyday Cooking Easier
Saving time in the kitchen does not require complicated recipes, expensive equipment, or a complete change to your routine. Often, the most useful improvements come from small adjustments: preparing onions in advance, storing berries carefully, using a spoon to peel ginger, or reaching for a pizza cutter instead of a knife for suitable tasks.
These 15 kitchen hacks can make food preparation more organized, help you use ingredients efficiently, and reduce some of the repetitive work involved in everyday cooking. Choose two or three tips that solve your biggest kitchen frustrations and try them this week. Once they become habits, add a few more.
Remember that the best shortcuts combine convenience with safe food handling. Store ingredients correctly, use stable cutting surfaces, clean utensils thoroughly, and thaw meat safely. With a little preparation and a few clever techniques, you can make your kitchen feel more efficient and enjoy a smoother cooking routine every day.
Save these time-saving kitchen tips for your next meal prep session, share your favorite trick with a fellow home cook, and keep experimenting with simple ways to make cooking easier.
Tags
Kitchen Hacks
Time-Saving Cooking Tips
Easy Meal Prep
Food Storage Tips
Cooking Shortcuts
Kitchen Organization
Food Waste Reduction
Beginner Cooking Tips