How to Sew Perfect Box Corners Easy Step-by-Step Sewing Hack for Beginners
Achieving a professional finish on handmade items often comes down to the smallest details. One of the most satisfying techniques to master is the creation of crisp, structural box corners. Whether you are crafting a sturdy canvas tote, a custom makeup pouch, or a fabric storage bin, the way you handle the corners defines the final shape and durability of your project. If you have ever struggled with lopsided bags or bulky seams that just will not sit right, you are in the right place. Today, we are diving deep into a precision marking and cutting method that takes the guesswork out of bag making and elevates your sewing from amateur to artisanal.
Understanding the Importance of Boxed Corners
A box corner is essentially a way of turning a two dimensional piece of fabric into a three dimensional object. By removing a specific amount of fabric at the base and sewing the resulting edges together, you create depth. This depth allows a bag to stand upright on its own and provides the necessary volume to carry items like laptops, books, or groceries. While there are several ways to “box” a corner, the precision method involving pre-cutting the corners is often favored by professional makers because it reduces bulk and ensures that both sides of your project are perfectly symmetrical.
When you look at high quality handmade goods, the corners are sharp and the seams align perfectly. This is not just for aesthetics; it also ensures that the weight of the bag’s contents is distributed evenly across the seams, preventing premature wear and tear. Mastery of this technique is a rite of passage for any sewist looking to move into more complex accessory design.
The Tools You Need for Precision Marking
Before you even touch your sewing machine, the preparation stage is where the magic happens. To replicate the precision seen in the image, you will need a few specific tools:
- A Clear Quilting Ruler: Being able to see through your ruler is vital for aligning the measurements with the raw edges of your fabric.
- Marking Pens: Use a heat erasable pen or a fine tipped tailor’s chalk. Precision is key, so avoid thick markers that might add an extra eighth of an inch to your measurements.
- Sharp Fabric Shears: Since you will be cutting through several layers of fabric or heavy duty canvas, your blades must be sharp to prevent fraying or shifting.
- The Base Material: This technique works exceptionally well on medium to heavy weight fabrics like canvas, denim, or reinforced cotton.
Step by Step Guide to Marking Your Fabric
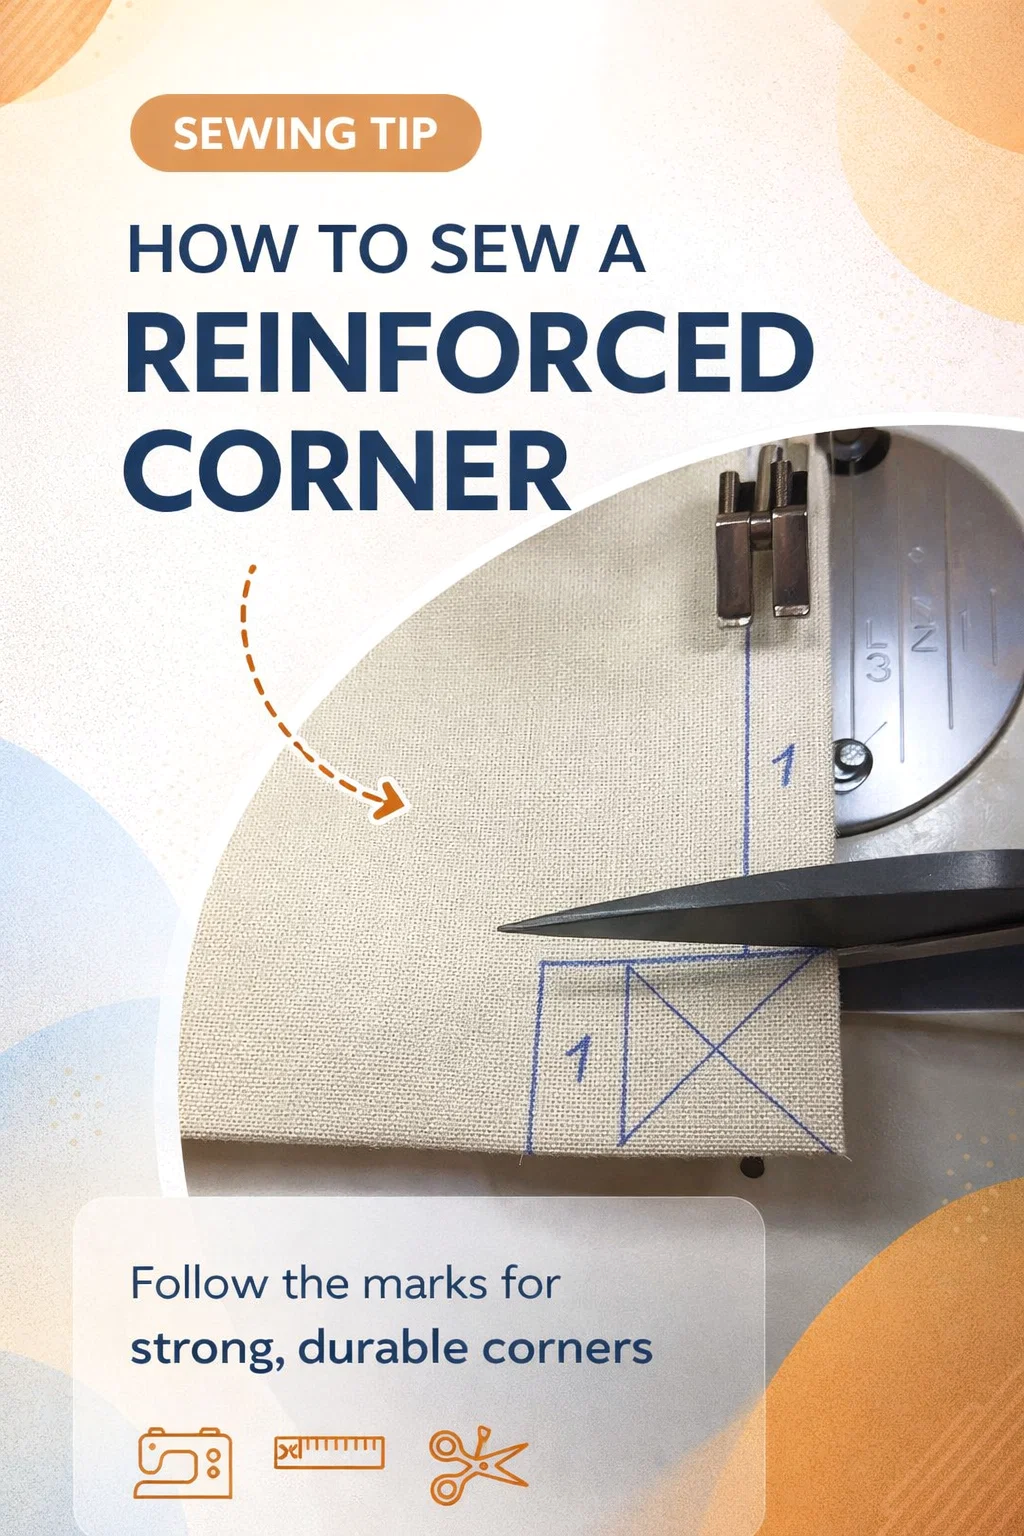
The image shows a very specific marking pattern that ensures accuracy. Let us break down exactly what those blue lines mean and how to replicate them on your own project.
Measuring the Square
In the demonstration, a 1 unit measurement (such as one inch or several centimeters depending on the desired depth) is used. You start by marking a square at the bottom corner of your fabric. However, there is a crucial secret here: you must account for your seam allowance. If you want a 1 inch box corner, you measure from the seam line, not the raw edge of the fabric, if you have already sewn the sides. If you are marking before sewing, you must add your seam allowance to the measurement to ensure the bag ends up the correct size.
The Diagonal Reference Line
Notice the “X” marked within the square in the image. This is not just for show. The diagonal line helps you find the true center of the corner. When you eventually pinch the fabric together to sew the box, this diagonal line acts as a guide to ensure your top and bottom layers are perfectly aligned. If the lines do not meet, your corner will be twisted.
Executing the Cut with Confidence
Many beginners feel a moment of hesitation before cutting into their fabric. It feels permanent because it is! However, following a measured grid gives you the confidence to make the cut. Using your fabric shears, you want to cut exactly along the vertical and horizontal lines of your marked square. Stop exactly where the lines intersect. If you overcut, you risk creating a hole in the corner of your bag that is difficult to repair. If you undercut, the fabric will bunch when you try to sew the seam.
Pro tip: When cutting, keep the fabric flat on the table. Lifting the fabric can cause the layers to shift, leading to asymmetrical squares on the front and back panels. Once the squares are removed, you are left with a notch that allows the fabric to fold into that signature 3D shape.
Sewing the Box Corner for Maximum Strength
Once your corners are cut, it is time to move to the sewing machine. You will open the fabric and flatten the notch so that the side seam and the bottom seam are touching. This is where your markings pay off. Match those blue lines up perfectly and pin them in place.
Nesting Your Seams
To reduce bulk even further, try “nesting” your seams. This means pushing the seam allowance of the top layer to the left and the seam allowance of the bottom layer to the right. They will lock together like puzzle pieces, creating a flat surface for your needle to pass through. This prevents your sewing machine from skipping stitches over thick sections of fabric.
Reinforcing the Stress Points
The corners of a bag take the most abuse. Every time you set your bag down, the weight of the contents presses against these seams. Always backstitch at the beginning and end of your box corner seam. For extra durability, some makers prefer to sew over the line twice or use a slightly shorter stitch length to ensure the seam is tight and secure.
Common Mistakes to Avoid
Even with a guide, things can occasionally go wrong. One common issue is forgetting to account for the thickness of the fabric. Very heavy canvas takes up space in the seam; if your markings are too tight, the bag might look slightly distorted. Always give yourself a tiny bit of breathing room when working with exceptionally thick materials.
Another pitfall is inconsistent measuring. If you cut a 2 inch square on the left side and a 1.75 inch square on the right, your bag will lean to one side. Always double check your measurements with a ruler before the scissors make contact with the cloth. Consistency is what separates a DIY project from a professional product.
Creative Applications for This Technique
While we usually talk about box corners in the context of tote bags, this skill is incredibly versatile. You can use it to create gussets in zippered pouches, giving them a “stand up” quality that makes it easier to find your pens or makeup. You can use it on the corners of handmade pillows to give them a more modern, boxed look rather than the traditional knife edge.
You can even experiment with the size of the box. A small 1 inch box creates a subtle depth, while a large 3 or 4 inch box creates a wide, flat bottom perfect for a grocery market bag or a laundry hamper. Once you understand the geometry of the cut, you can manipulate it to fit any design you can imagine.
Elevating Your Craft Through Precision
Sewing is as much about math and geometry as it is about creativity. The image of the carefully marked canvas reminds us that taking the extra two minutes to draw lines, check angles, and measure twice results in a superior product. It is a mindful practice. As you get faster at this technique, you will find that your projects come together more quickly because you aren’t fighting with the fabric or trying to “eye it” at the machine.
There is a unique pride in turning a flat piece of textile into a functional 3D object. When you flip your bag right side out for the first time and see those sharp, perfect corners popping out, you will know that the attention to detail was worth every second.
Conclusion: Your Journey to Professional Results
The transition from beginner to advanced sewist is paved with techniques like the one we explored today. By focusing on precision marking, careful cutting, and reinforced stitching, you turn a simple sewing project into a durable, professional piece of gear. The next time you sit down at your machine, remember that the prep work is just as important as the sewing itself. Grab your ruler, find your favorite fabric, and start practicing your box corners. With each project, your confidence will grow, and your finished items will stand as a testament to your dedication to the craft. Happy sewing!