DIY Mango Butter Soap Recipe for a Creamy, Nourishing Homemade Bar
Making your own mango butter soap is a wonderfully approachable way to create a creamy, tropical-inspired bath bar at home. The recipe shown features a melt-and-pour shea butter soap base enriched with mango butter, a lightweight conditioning oil, optional vitamin E, mango fragrance, and a soap-safe colorant. The result is a warm golden-orange bar with a smooth appearance and a fresh mango-inspired look.
Because this is a melt-and-pour soap recipe, it is especially appealing to beginners. There is no need to handle lye or wait for a traditional cold-process soap to cure. Instead, the pre-made soap base is gently melted, customized with carefully measured additions, poured into a mold, and allowed to become firm.
Key Takeaways
- A melt-and-pour soap base makes this mango soap project beginner-friendly.
- Mango butter adds a rich, creamy element to the formula.
- Jojoba or sweet almond oil can be included as shown, but additions should stay within the soap base manufacturer’s recommendations.
- Use only fragrance oils and colorants specifically approved for soapmaking.
- Small mango-inspired embeds or swirls can make finished bars more decorative.
- Always follow supplier instructions, especially for fragrance usage rates and additives.
What Is Mango Butter Soap?
Mango butter soap is a handmade soap formulated with mango butter as an additional ingredient alongside a soap base. Mango butter is a plant-derived butter commonly used in cosmetic formulations because of its rich, smooth consistency. In a melt-and-pour project, it can help create a more luxurious-feeling bar when used at an appropriate level.
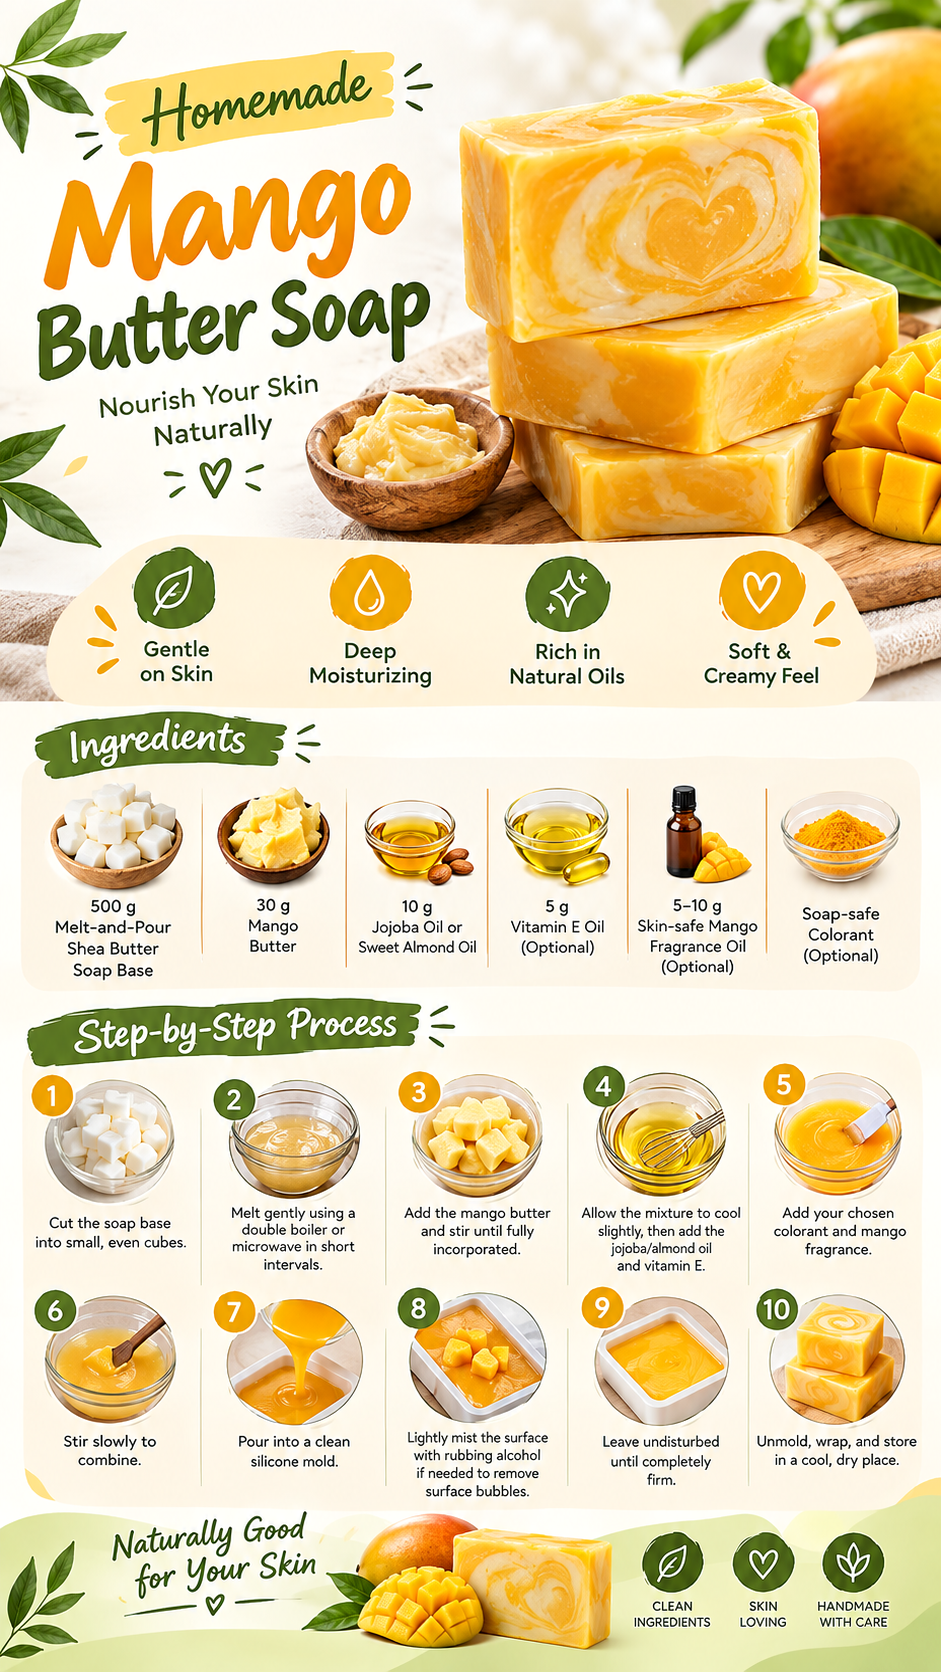
The recipe pictured uses a shea butter melt-and-pour soap base as its foundation. Mango butter is then incorporated into the melted base, followed by the selected oil and optional vitamin E. A mango fragrance and soap-safe colorant can be added to create the tropical theme.
The finished bars shown have a vibrant yellow-orange appearance with creamy lighter swirls. That visual effect makes this project particularly attractive for handmade bath collections, gift baskets, seasonal craft projects, or anyone who enjoys creating colorful homemade soap.
Ingredients for the Mango Butter Soap
The ingredient panel in the recipe shows a relatively simple formula. For a project based on the pictured quantities, gather the following ingredients and supplies:
- 500 g melt-and-pour shea butter soap base
- 30 g mango butter
- 10 g jojoba oil or sweet almond oil
- 5 g vitamin E oil, optional
- 5 to 10 g skin-safe mango fragrance oil, optional
- Soap-safe colorant, optional
The quantities shown are a useful visual starting point, but melt-and-pour bases differ in their tolerance for extra oils, butters, fragrance, and other additives. Before making a batch, check the technical instructions supplied with your particular soap base and fragrance.
Pro Tip: Fragrance should never be added simply because a recipe gives a convenient volume or weight. Always check the fragrance supplier’s recommended usage rate for soap and calculate the amount based on the actual weight of your batch.
Choosing the Soap Base
A shea butter melt-and-pour base is a natural fit for this design because the finished bars are intended to look creamy and substantial. Melt-and-pour soap is already saponified, meaning the soapmaking reaction has been completed before you purchase the base.
Look for a reputable cosmetic supplier and choose a base that clearly lists its ingredients and recommended melting instructions. If you substitute a different base, such as goat milk, glycerin, or a clear base, expect the final color, opacity, texture, and melting behavior to change.
Mango Butter
Mango butter is the star additive in this project. It has a firm, buttery consistency at room temperature and melts as it warms. When incorporated into a suitable soap base, it can contribute to the rich, creamy character associated with the recipe.
Use cosmetic-grade mango butter from a reliable supplier. Store unused butter according to the supplier’s recommendations and protect it from excessive heat and moisture.
Jojoba or Sweet Almond Oil
The pictured formula gives the option of jojoba oil or sweet almond oil. These ingredients can add a conditioning, emollient feel to a cosmetic formula, but they also increase the amount of unsaponified oil in a melt-and-pour soap.
That means more is not necessarily better. Excess oils can affect hardness, lather, clarity, longevity, and the overall stability of the finished bar. Keep additional oils within the limits recommended by the base manufacturer.
Fragrance and Colorant
A mango fragrance gives the bars their tropical character, while a soap-safe yellow or orange colorant can enhance the visual theme. Choose materials specifically labeled for use in soap or rinse-off cosmetic products.
Not every fragrance behaves identically in melt-and-pour soap. Some fragrances can discolor the base, accelerate setting, or change the final appearance. Testing a small batch is a smart way to learn how a new fragrance performs before making several bars.
How to Make Mango Butter Soap Step by Step
1. Prepare the Soap Base
Cut the melt-and-pour soap base into small, evenly sized cubes. Smaller pieces melt more consistently than one large block and make it easier to avoid overheating.
Place the cubes in a heat-safe container. You can use a double boiler or microwave, following the instructions supplied with the soap base. If using a microwave, heat in short intervals and stir between each interval.
2. Melt Gently
Heat the soap until it is mostly melted, then stir gently to finish melting any remaining pieces. Avoid unnecessary high heat because overheating can cause bubbles, discoloration, excessive moisture loss, or changes in the finished texture.
Important: Gentle heating is one of the most useful habits in melt-and-pour soapmaking. The goal is to melt the base completely without keeping it hotter than necessary.
3. Add the Mango Butter
Once the base has melted, add the mango butter and stir until it is thoroughly incorporated. Because mango butter is firm at room temperature, make sure there are no visible pieces remaining before moving to the next stage.
Stir slowly rather than whipping the mixture. Gentle mixing helps reduce the number of air bubbles trapped in the liquid soap.
4. Cool Slightly and Add the Oils
Allow the melted mixture to cool slightly, then incorporate the selected jojoba or sweet almond oil and optional vitamin E. Stir carefully until the ingredients are evenly distributed.
The cooling stage is useful because some fragrance materials can be affected by excessive heat. Follow the instructions supplied with your specific fragrance and soap base for the appropriate addition temperature.
5. Add Color and Mango Fragrance
Add a suitable soap colorant if you want a golden mango appearance. Liquid, mica, or other colorants may behave differently, so always use products intended for soapmaking and follow their recommended dosage.
Add the mango fragrance at the supplier’s recommended usage level. Stir slowly and thoroughly so the fragrance and color are distributed without creating unnecessary bubbles.
6. Pour Into the Mold
Pour the mixture into a clean silicone soap mold. Silicone is particularly convenient because finished bars can usually be released with minimal effort once they are fully firm.
If you notice surface bubbles, a light mist of appropriate rubbing alcohol is commonly used in melt-and-pour soapmaking to help break them. Use suitable ventilation and follow safe handling practices when working with alcohol.
7. Let the Soap Harden
Leave the filled mold undisturbed until the soap has completely firmed. Avoid moving the mold while the soap is setting because movement can create an uneven surface or disturb decorative effects.
Setting time varies with the soap base, mold size, room temperature, and amount of additional ingredients. Instead of relying on a fixed number of hours, check that the bars are fully firm before attempting to unmold them.
Expert Insight
The biggest difference between a good melt-and-pour soap project and a frustrating one is often temperature control. Melt slowly, mix gently, and avoid adding ingredients outside the soap base’s recommended limits. This helps preserve the texture and performance of the finished bars.
How to Create the Mango Swirl Look
The bars shown in the design have a beautiful marbled appearance rather than a completely uniform orange color. You can recreate a similar effect by dividing a small amount of the melted soap into a separate container and tinting it with a slightly different shade.
Pour the main golden mixture into the mold, then add small amounts of the contrasting shade. Use a clean skewer or similar tool to gently swirl the colors together. Do not overmix. A few controlled movements can create more visible marbling than vigorous stirring.
For an extra decorative touch, small soap embeds shaped like mango pieces can be placed on or within the bar, provided they are made from compatible soap materials and are properly secured.
Tips for Smooth, Professional-Looking Bars
Keep Moisture Under Control
Melt-and-pour soap can attract moisture from humid air, a process commonly called glycerin dew or sweating. Once your bars are fully firm, wrap them appropriately to help protect the surface, particularly if you live in a humid environment.
Measure Ingredients Carefully
A digital scale is one of the most useful tools for soapmaking. Measuring ingredients by weight gives you much more consistency than estimating with spoons or cups, especially when working with solid butter and soap base.
Avoid Too Many Additives
It can be tempting to keep adding oils, butters, colors, botanicals, fragrance, and decorative elements. However, every extra ingredient can affect the finished soap. A simple formula is often easier to control and repeat.
A Simple Beginner’s Approach
Start with the soap base, mango butter, and one carefully selected fragrance. Once you understand how your chosen base behaves, experiment with color, marbling, embeds, and other cosmetic additions in small test batches.
Safety and Storage
Even though melt-and-pour soap is beginner-friendly, safe handling is important. Work on a clean, stable surface and use heat-resistant containers and appropriate protective equipment when handling hot soap.
Only use ingredients intended for cosmetic or soapmaking applications. Fragrance oils, colorants, and other additives should come from suppliers that provide clear usage guidance. Do not substitute candle fragrance, craft colorants, or unidentified ingredients unless they are specifically approved for the intended cosmetic application.
For external use only. Patch-test finished cosmetic products when appropriate, discontinue use if irritation occurs, and keep handmade soap away from children’s unsupervised handling. Store completed bars in a cool, dry place with suitable wrapping or packaging.
Creative Ways to Customize Mango Soap
Once you are comfortable with the basic method, there are plenty of ways to give each batch its own personality. Try a soft cream-and-gold color combination for a subtle design, or create deeper orange swirls for a bold tropical look.
- Use a mango-shaped mold for a playful presentation.
- Create layered shades of yellow, cream, and orange.
- Add small soap embeds shaped like mango cubes.
- Experiment with different mold shapes for gift-sized bars.
- Pair the mango theme with complementary tropical-inspired fragrances.
- Wrap finished bars individually for handmade gifts or guest soaps.
For gifting, simple packaging can make the handmade bars feel especially polished. A paper band, small ingredient label, and coordinated ribbon can complement the warm golden color without taking attention away from the soap itself.
Common Mango Soap Mistakes to Avoid
Overheating the base: Excessive heat can affect the appearance and texture of melt-and-pour soap. Use gentle, controlled heating.
Adding too much fragrance: More fragrance does not automatically produce a better soap. Follow the supplier’s soap-specific maximum usage rate.
Using non-soap-safe colorants: Cosmetic and craft materials are not interchangeable. Select a colorant intended for soapmaking.
Adding excessive oils or butter: Extra oils and butters can soften the bar and alter its performance. Stay within the base manufacturer’s recommended additive levels.
Unmolding too soon: If the soap is still soft, it can lose its shape or develop dents. Give it enough time to become completely firm.
At a Glance
- Base: Melt-and-pour shea butter soap base
- Theme: Creamy golden mango
- Skill level: Beginner-friendly
- Design: Smooth bars with optional swirls and embeds
- Best practice: Follow supplier limits for all additives
Conclusion
This DIY mango butter soap is a simple and visually appealing project for anyone interested in melt-and-pour soapmaking. The combination of a creamy shea butter soap base, mango butter, optional conditioning oils, and mango-inspired color and fragrance creates a warm, tropical look that is easy to customize.
The most important part of the process is not complicated technique. It is careful measuring, gentle melting, suitable ingredients, and attention to the recommendations provided by your soap and fragrance suppliers. Once you have mastered those basics, you can experiment with swirls, layers, embeds, molds, and packaging to make each batch unique.
Whether you are making a few bars for personal use, preparing handmade gifts, or simply exploring a new craft, this mango-themed soap project offers plenty of room for creativity. Keep the formula controlled, work safely, and enjoy turning a simple melt-and-pour base into beautiful handmade bars.
Tags
Mango Butter Soap
DIY Soap
Melt and Pour Soap
Homemade Soap
Soap Making
Mango Soap Recipe
DIY Bath Products
Handmade Soap