DIY Hair Keratin Treatment at Home for Smooth, Shiny, Frizz-Free Hair
Dreaming of smooth, shiny, manageable hair without spending a fortune on salon treatments? A DIY hair keratin treatment at home using simple ingredients like rice water, yogurt, honey, and olive oil may be an appealing addition to your hair care routine. These familiar ingredients are often used in homemade hair masks to help soften strands, improve slip, and leave hair looking glossy and well-conditioned.
Although a homemade hair mask cannot reproduce the results of a professional keratin smoothing treatment, it can be a practical way to give dry, frizzy hair some extra attention. With the right preparation, careful application, and realistic expectations, you can create a simple hair conditioning treatment that fits comfortably into your weekly self-care routine.
Key Takeaways
- Rice water, yogurt, honey, and olive oil can be combined into a homemade conditioning hair mask.
- The mixture may help improve softness, shine, and manageability, especially when hair feels dry.
- A DIY hair mask is not equivalent to a salon keratin treatment and will not permanently straighten hair.
- Apply the mixture carefully, avoid the eyes and irritated scalp, and rinse thoroughly.
- Start with occasional use and adjust the ingredients according to your hair’s texture and needs.
- Consistent gentle hair care, heat protection, and conditioning are important for maintaining healthy-looking hair.
What Is a DIY Hair Keratin Treatment?
A DIY hair keratin treatment is a homemade hair care mixture intended to make hair feel smoother, softer, and easier to manage. Many popular recipes use kitchen ingredients that provide conditioning or help reduce the rough feeling associated with dry hair.
The term keratin treatment can be confusing because homemade masks and professional smoothing services work differently. Keratin is a structural protein naturally found in hair. Professional salon treatments use specialized formulations, and some rely on heat or chemical ingredients to produce a smoothing effect.
By contrast, a homemade mask containing rice water, yogurt, honey, and olive oil mainly offers conditioning benefits. It does not contain a professionally formulated keratin system unless a suitable keratin ingredient has specifically been added.
Important: Think of this recipe as a DIY hair conditioning mask rather than a true keratin treatment. It may help your hair look smoother and shinier, but it cannot permanently change your natural hair texture or repair damaged strands completely.
Who Can Benefit From a Homemade Hair Mask?
A simple conditioning mask may be useful if your hair feels rough after washing, looks dull, becomes tangled easily, or develops frizz in dry weather. It can also be an enjoyable addition to a routine focused on moisture and softness.
- Dry hair: Conditioning ingredients may help hair feel softer and less rough.
- Frizzy hair: Better conditioning and reduced friction may make strands easier to manage.
- Dull hair: Smoother strands can reflect light more evenly, creating a shinier appearance.
- Long hair: A mask can help improve slip during detangling, reducing unnecessary pulling.
- Heat-styled hair: Conditioning may improve feel, although it cannot reverse all heat damage.
Results vary depending on hair texture, porosity, existing damage, and the amount of product used. Fine hair may need a lighter mixture, while thicker or coarser hair may tolerate a richer conditioning treatment.
Natural Ingredients for a DIY Hair Smoothing Mask
The featured recipe combines four familiar ingredients: rice water, yogurt, honey, and olive oil. Each has a different role in a homemade conditioning mixture. Understanding these differences helps you create a recipe that suits your hair rather than relying on exaggerated promises.
1. Rice Water for Hair Care
Rice water is the starchy water left after rinsing or soaking rice, or after cooking it in water. It is popular in traditional hair care routines and is often used as a rinse for hair that needs extra slip.
Rice water contains starch and small amounts of other rice-derived compounds. Some people find that it makes their hair feel smoother or easier to detangle. However, strong claims about dramatic hair growth, permanent strengthening, or complete damage repair are not well established by high-quality clinical evidence.
How to Prepare Rice Water
- Measure approximately half a cup of plain rice.
- Rinse the rice to remove surface dust and debris.
- Place it in a clean bowl with about one to two cups of fresh water.
- Let it soak for 15 to 30 minutes, stirring occasionally.
- Strain the liquid into a clean container and use it promptly.
For a homemade hair mask, a small amount of fresh rice water is usually enough. Avoid adding excessive starch if your hair tends to feel stiff or coated after protein-rich or strengthening products.
Use freshly prepared rice water rather than leaving it at room temperature for extended periods. Discard any leftover mixture that smells unusual, changes appearance, or has been stored improperly.
2. Yogurt for a Creamy Conditioning Texture
Plain, unsweetened yogurt gives a homemade hair mask its creamy consistency. It contains water, fats in varying amounts, and milk proteins, depending on the type of yogurt used.
When applied as a rinse-off mask, yogurt may help coat the hair temporarily and make it feel softer. However, evidence that ordinary yogurt repairs the internal structure of damaged hair or delivers a lasting keratin-like effect is limited.
Choose plain yogurt without added sugar, fruit, fragrance, or other unnecessary ingredients. A thicker yogurt is often easier to mix and apply than a runny variety.
Because yogurt is a perishable food, prepare only enough for one application. Do not save a leftover yogurt-based hair mask for another day, even if it has been refrigerated.
3. Honey for Softness and Moisture
Honey is a humectant, meaning it can attract and retain moisture under suitable conditions. It is frequently included in homemade beauty recipes because of its texture and conditioning properties.
In a hair mask, honey can help create a smooth mixture and may contribute to a softer feel. It is sticky when used alone, so mixing it with yogurt and a little water makes it easier to distribute and rinse out.
Use a small quantity rather than pouring in a large amount. Too much honey can leave hair feeling tacky, particularly if the mixture is not thoroughly rinsed away.
4. Olive Oil to Condition Dry Hair
Olive oil is a rich emollient that can help lubricate hair strands and reduce friction. This can make dry lengths feel softer and may improve manageability during brushing or detangling.
It is particularly useful for hair that tends to feel rough along the mid-lengths and ends. However, olive oil can weigh down fine hair and may be difficult to remove if too much is applied.
Choose plain olive oil and begin with a small amount. If your hair is fine, naturally oily, or easily weighed down, consider leaving the oil out of the first batch and assessing how your hair responds.
DIY Hair Keratin Mask Recipe at Home
This simple recipe combines the four ingredients into a creamy rinse-off hair mask. It is intended to condition the hair and improve its feel, not to provide permanent straightening or a salon-equivalent keratin result.
Ingredients
- 2 tablespoons of freshly prepared, cooled rice water
- 2 tablespoons of plain, unsweetened yogurt
- 1 teaspoon of honey
- 1 teaspoon of olive oil, or less for fine hair
Step-by-Step Preparation
- Prepare a clean bowl. Wash your hands and use clean utensils to minimize contamination.
- Add the yogurt. Spoon the plain yogurt into the bowl to create the creamy base.
- Mix in the rice water. Add it gradually, stirring until the texture becomes smooth and spreadable.
- Add the honey. Mix thoroughly so that it does not remain in thick, sticky pockets.
- Stir in the olive oil. Add a small amount and mix until the ingredients are evenly combined.
- Check the consistency. The mask should be creamy enough to spread without dripping excessively.
- Use immediately. Apply the mixture during the same session and discard anything left over.
Pro Tip: If you have fine hair, start without olive oil or use only a few drops. For thick, dry lengths, a little more oil may improve slip. Adjust the consistency with a small amount of rice water instead of adding large quantities of every ingredient.
How to Apply the Homemade Hair Mask
Applying a mask correctly helps you distribute it evenly and makes rinsing easier. You do not need special salon equipment. A clean bowl, a wide-tooth comb, and a towel are usually sufficient.
Step 1: Prepare Your Hair
Start by gently detangling your hair with a wide-tooth comb. Remove knots carefully, working from the ends toward the roots to reduce pulling and breakage.
You can apply the mask to slightly damp hair or clean, dry lengths, depending on which method makes distribution easiest. Avoid soaking your hair immediately before application because excess water can dilute the mixture and make it run.
Step 2: Apply From Mid-Lengths to Ends
Divide your hair into several manageable sections. Take a small amount of the mixture and smooth it over each section, concentrating on the mid-lengths and ends where dryness and tangling are often most noticeable.
Use your fingers or a wide-tooth comb to distribute the product gently. Avoid pulling the hair tightly or rubbing the mixture aggressively into the scalp.
If your scalp is sensitive, irritated, or prone to reactions, it is best to avoid applying this food-based mixture directly to it. Do not use the mask on broken skin.
Step 3: Leave It on for a Short Period
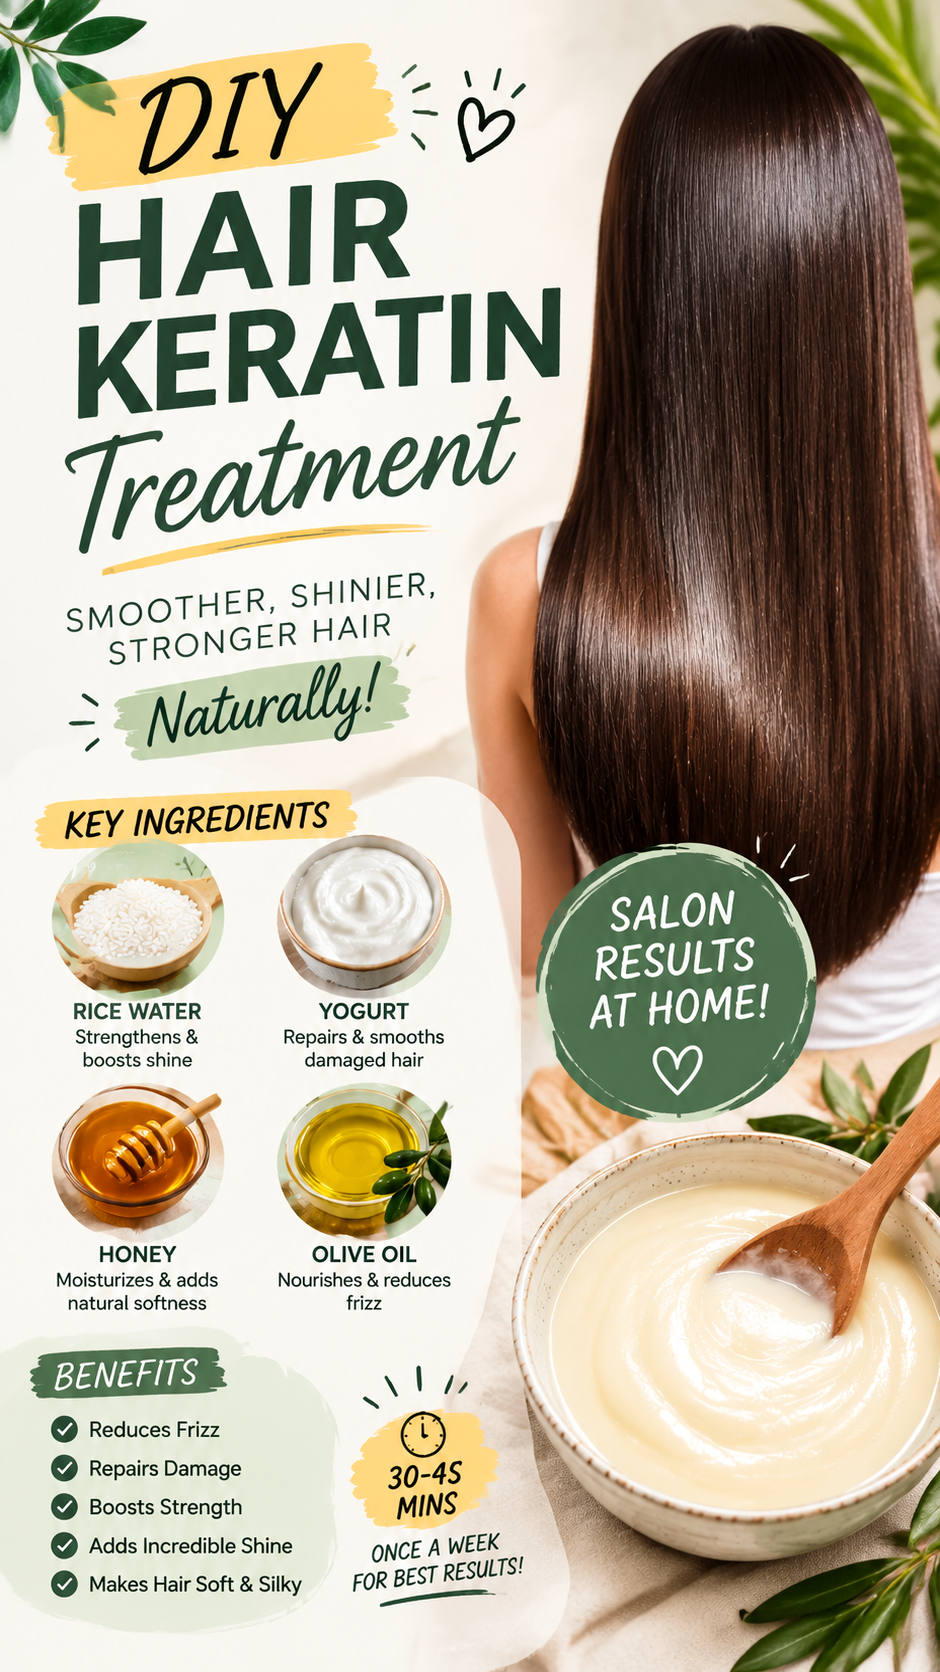
The featured pin suggests a treatment time of 30 to 45 minutes. For a first application, however, a shorter period of around 10 to 15 minutes is a more cautious starting point. You can assess your hair’s response before deciding whether to leave a future application on longer.
There is no strong evidence that leaving this particular mixture on for 45 minutes creates a keratin treatment effect. A longer application is not necessarily more effective, and prolonged contact may be uncomfortable for sensitive skin.
Do not use a heated cap or apply a hot styling tool over the mixture. The recipe does not require high heat to work as a basic conditioning mask.
Step 4: Rinse Thoroughly
Rinse with lukewarm water until the mixture is completely removed. Take extra care around the nape of the neck and behind the ears, where product can accumulate.
Follow with a gentle shampoo if your hair feels oily or coated, then apply your usual conditioner if needed. Use your fingers to loosen the mixture rather than scrubbing or tangling the hair.
Finish by squeezing out excess water with a soft towel. Avoid rough rubbing, which can increase friction and contribute to breakage, especially when hair is wet.
What Results Can You Expect?
A homemade hair mask may make your hair feel softer, easier to comb, and more manageable after rinsing. Hair that is better conditioned may also appear shinier because its surface reflects light more evenly.
However, the results are temporary and will vary. Some people may notice a clear difference in softness, while others may find that the mixture leaves their hair heavy, coated, or unchanged.
Can This DIY Treatment Reduce Frizz?
It may help reduce the appearance of frizz when dryness and friction contribute to the problem. Conditioning ingredients can improve how strands move against one another, which may make hair easier to smooth and style.
Frizz can also be influenced by humidity, curl pattern, hair damage, and the way hair is dried. A homemade mask will not eliminate every cause of frizz, and curly or coily hair does not need to be made straight to be healthy.
Will It Make Hair Straight and Silky?
The mask may improve softness and smoothness, but it will not permanently straighten hair. Natural curls, waves, and coils will generally retain their underlying pattern after the mixture is rinsed out.
If you want a straighter appearance, gentle blow-drying with a heat protectant or using a suitable styling technique may temporarily change the appearance of your hair. Excessive heat, however, can cause damage over time.
Can It Repair Damaged Hair?
Conditioning can improve the feel and appearance of damaged hair, but it cannot restore a split end to its original structure. Hair fibers are nonliving structures, so severely damaged areas cannot heal themselves in the same way living skin can.
To manage damage, combine occasional conditioning masks with gentle detangling, reduced heat exposure, protective styling when appropriate, and regular trimming of badly split ends.
Expert Insight
Smooth-looking hair is not necessarily the result of a keratin treatment. A well-conditioned hair surface, careful detangling, and reduced friction can all improve the way hair looks and feels.
- Prioritize conditioning and gentle handling over promises of instant hair repair.
- Choose the amount of oil according to your hair texture and how easily it becomes weighed down.
- Remember that a temporary cosmetic improvement is different from permanent structural repair.
How Often Should You Use a DIY Hair Mask?
The image suggests using the treatment once a week. For many people, that is a reasonable frequency to test for a simple conditioning mask, but weekly use is not necessary for everyone.
Start with one application and observe how your hair feels over the next few washes. If it feels soft and manageable without becoming greasy or coated, occasional use may suit your routine.
- Fine hair: Try a lighter mixture every two to four weeks, or as needed.
- Normal hair: An occasional application may be enough to improve softness.
- Thick or dry hair: Weekly use may be suitable if your hair responds well.
- Hair that feels stiff or coated: Stop using the mask until the residue is removed and reassess the ingredients.
These are starting points rather than strict rules. Hair needs change with weather, styling habits, washing frequency, and the products already in your routine.
Important Safety Tips for Homemade Hair Treatments
Natural ingredients can still cause irritation or allergic reactions. Before using a new mixture, test a small amount on a limited area of skin according to appropriate patch-testing guidance. Do not apply it if you have a known allergy to any ingredient.
- Keep the mixture away from your eyes, mouth, and irritated skin.
- Do not use it on a broken, inflamed, or infected scalp.
- Stop immediately and rinse thoroughly if you experience itching, burning, redness, or discomfort.
- Prepare the mixture fresh and discard leftovers because yogurt and other food ingredients can spoil.
- Do not add lemon juice, baking soda, essential oils, or other potentially irritating ingredients just to make the recipe stronger.
- Use a gentle shampoo if the mask leaves an oily or sticky residue.
Safety reminder: Homemade food-based hair masks are not formulated or preserved like commercial cosmetic products. Fresh preparation, careful use, thorough rinsing, and discarding leftovers are important. If you have persistent scalp irritation or unexplained hair loss, seek advice from a qualified healthcare professional.
DIY Hair Mask vs. Professional Keratin Treatment
Both homemade masks and salon smoothing treatments are discussed in the context of frizz control, but they have different purposes and levels of intensity.
Homemade Conditioning Mask
A DIY mask is inexpensive to prepare and lets you control which ingredients touch your hair. It can be a useful occasional conditioning step, especially when your main goal is improving softness and manageability.
Its limitations are equally important. The effect is temporary, results are unpredictable, and food ingredients are not designed to deliver the same performance as tested hair care formulations.
Professional Smoothing Treatments
Salon keratin and smoothing treatments use formulated products designed to change how the hair behaves during styling. Depending on the product, they may involve heat, chemical reactions, or ingredients that coat the hair fiber.
Some smoothing products can release formaldehyde or related compounds when heated. Others use different formulations. If considering a salon service, ask for the exact product name, review the ingredient information, and discuss ventilation, heat exposure, and suitability for your hair with a qualified stylist.
Never attempt to reproduce a professional chemical smoothing service by mixing household ingredients or using an unverified formula with a flat iron. A homemade mask does not require high heat or chemical straightening agents.
Extra Tips for Smoother, Shinier Hair
A homemade mask works best as one small part of a consistent hair care routine. Simple habits can help reduce friction, preserve the appearance of your hair, and make detangling less stressful.
Choose the Right Shampoo and Conditioner
Use a shampoo that suits your scalp and a conditioner that suits your hair lengths. If your hair is dry, focus conditioner on the mid-lengths and ends. If your scalp becomes oily quickly, avoid applying heavy oils directly to the roots.
Detangle Gently
Use a wide-tooth comb or a brush designed for your hair type. Work through knots in small sections and begin near the ends. This helps reduce unnecessary tension and breakage.
Limit Excessive Heat
Frequent high-heat styling can make hair feel dry and rough. When using a blow-dryer or flat iron, apply an appropriate heat protectant, select a suitable temperature, and avoid repeatedly passing a hot tool over the same section.
Protect Hair From Friction
Pat hair dry instead of rubbing it vigorously with a towel. Consider a smooth pillowcase or a loose protective hairstyle if your hair tangles overnight. Avoid styles that pull tightly on the hairline.
Adjust Your Routine With the Weather
Humidity can encourage frizz, while dry air may increase static and roughness. Use lightweight conditioning products when needed and avoid layering so many products that your hair becomes heavy or difficult to wash.
Frequently Asked Questions
Can I Make a Hair Keratin Treatment With Rice Water and Yogurt?
You can combine rice water and plain yogurt to create a homemade conditioning mask. However, these ingredients do not create a professional keratin treatment. The mixture may help hair feel softer, but it will not permanently straighten it or provide a guaranteed repair effect.
Can I Leave the Mask on Overnight?
No. An overnight application is unnecessary for this recipe. Because the mixture contains perishable food ingredients, it is better to use it as a short, rinse-off treatment and wash it out thoroughly.
Will the Mask Help Hair Grow Faster?
There is not enough reliable evidence to conclude that this particular mixture speeds up hair growth. Conditioning may reduce tangling and breakage during grooming, which can help you retain length, but that is different from stimulating faster growth at the scalp.
Can I Use It on Curly or Wavy Hair?
Yes, if you tolerate the ingredients and the mixture suits your hair. Apply gently to the lengths and ends, rinse thoroughly, and follow with products that support your natural curl pattern. The mask is not intended to straighten curls permanently.
Can I Store the Leftover Mixture?
It is best not to store leftovers. The recipe contains yogurt and other kitchen ingredients that are not preserved for cosmetic use. Make a small batch for one application and discard anything remaining after use.
Does the Recipe Work for Every Hair Type?
No single hair mask works equally well for everyone. Fine hair may become weighed down by oil, while thick or dry hair may benefit from a richer mixture. Hair that is sensitive to certain ingredients may react poorly, so start cautiously and stop if irritation occurs.
DIY Hair Care at a Glance
- Main ingredients: Rice water, plain yogurt, honey, and olive oil.
- Primary purpose: Temporary conditioning, softness, and easier detangling.
- First application: Start with 10 to 15 minutes and assess your hair’s response.
- Suggested frequency: Occasional use, adjusted to your hair’s needs.
- Important limitation: This homemade mask is not a professional keratin treatment and cannot permanently repair or straighten hair.
Conclusion: Enjoy a Simple DIY Hair Care Routine
A DIY hair keratin mask made with rice water, yogurt, honey, and olive oil can be an accessible way to experiment with homemade hair conditioning. These familiar ingredients create a creamy mixture that may help dry lengths feel softer, improve slip, and make hair easier to manage.
The secret is to keep your expectations realistic. A homemade hair mask is not a substitute for a professional keratin treatment, and no kitchen recipe can guarantee stronger, faster-growing, or permanently frizz-free hair. Its main appeal is the opportunity to give your hair some extra conditioning without making your routine complicated.
Start with a small batch, apply it carefully, rinse it out thoroughly, and pay attention to how your hair responds. Pair occasional masks with gentle shampooing, suitable conditioner, careful detangling, and reduced heat exposure for a more consistent approach to healthy-looking hair.
With a little patience and a routine tailored to your hair type, you can explore simple DIY hair care while keeping your strands comfortable, manageable, and naturally beautiful.
Tags
DIY Hair Care
Homemade Hair Mask
Rice Water for Hair
Natural Hair Care
Frizz Control
Shiny Hair Tips
Hair Conditioning
Healthy Hair Routine