12 Easy Cleaning Hacks for a Sparkling Home Quick Effective Cleaning Tips
Keeping your home clean does not have to mean spending hours scrubbing, buying expensive products, or tackling every mess the hard way. With a few simple household cleaning hacks, you can make everyday chores faster, easier, and more satisfying. From making your kitchen sink shine to removing carpet odors and keeping bathroom surfaces spotless, small changes to your cleaning routine can make a noticeable difference.
The best cleaning tricks often use everyday supplies such as baking soda, white vinegar, lemon, dish soap, and microfiber cloths. When used correctly, these affordable essentials can help you handle common household messes without making your cleaning routine complicated. Whether you are preparing for guests, refreshing your home for the weekend, or simply trying to stay on top of daily chores, these 12 easy cleaning hacks are practical additions to your routine.
Key Takeaways
- Use baking soda and water to clean suitable surfaces and loosen everyday grime.
- Refresh microwave interiors with steam from a bowl of water and lemon.
- Use microfiber cloths and appropriate cleaners to reduce streaks on glass.
- Freshen carpets with a light application of baking soda when the material allows it.
- Build a simple cleaning routine around small tasks rather than waiting for a major cleanup.
- Always check surface compatibility and follow product safety instructions before trying a new cleaning method.
1. Make Your Kitchen Sink Shine with Lemon and Baking Soda
The kitchen sink handles everything from food preparation to dirty dishes, so it can quickly develop stains, water spots, and unpleasant odors. A simple cleaning routine can help restore its fresh appearance without requiring a cupboard full of specialized products.
How to Clean a Sink Naturally
- Remove dishes, food scraps, and other debris from the sink.
- Rinse the basin with warm water.
- Apply a small amount of baking soda to a damp, compatible sponge.
- Gently scrub the surface, paying attention to areas around the drain and faucet.
- Rinse thoroughly and dry with a clean microfiber cloth.
- For a fresh citrus scent, use lemon only if it is suitable for your sink material, then rinse the surface completely.
Baking soda can help lift everyday grime through gentle abrasion, but it is not suitable for every finish. Avoid abrasive scrubbing on delicate surfaces, including some polished metals and specialty sink coatings. Check the manufacturer’s care instructions before using it.
Important: If you have a natural stone countertop or sink, avoid applying acidic ingredients such as lemon juice or vinegar unless the manufacturer specifically approves them. Acids can damage certain stone surfaces.
2. Clean Your Microwave with Lemon Steam
Splattered food can make a microwave look dirty and leave lingering cooking odors. Fortunately, you can loosen many dried-on food spots with steam before wiping the interior clean.
Step-by-Step Microwave Cleaning
- Pour water into a microwave-safe bowl and add a few lemon slices if desired.
- Place the bowl inside the microwave.
- Heat until the water produces plenty of steam, following your appliance’s instructions.
- Allow the bowl to sit briefly so the steam can loosen residue.
- Carefully remove the hot bowl using oven mitts and avoid direct contact with the steam.
- Wipe the interior walls, ceiling, turntable, and door with a soft cloth.
Steam helps soften dried food, making it easier to remove without aggressive scrubbing. Lemon can also provide a pleasant scent, although it does not replace proper cleaning or disinfection when those are needed.
Keep the Microwave Cleaner Longer
Cover food with a microwave-safe lid or splatter cover whenever possible. Wipe spills as soon as the appliance has cooled enough to clean safely. A quick weekly wipe can prevent food residue from building up and make future cleaning much easier.
3. Get a Streak-Free Mirror
Fingerprints, toothpaste splashes, and water spots can make a bathroom mirror look dull even when the rest of the room is clean. The right cloth and a small amount of suitable glass cleaner can help restore a clear, polished finish.
The Best Way to Clean Mirrors
- Remove dust with a dry microfiber cloth.
- Apply a glass cleaner approved for your mirror, or use a suitable diluted vinegar solution if the surrounding materials can tolerate it.
- Wipe the surface using a clean microfiber cloth.
- Buff away remaining streaks with a separate dry cloth.
For an appropriate vinegar solution, mix equal parts white vinegar and water in a spray bottle. Use it sparingly and avoid spraying directly onto mirror edges, frames, or nearby natural stone. Spraying the cloth rather than the mirror can reduce liquid seeping behind the glass.
Avoid paper towels that leave lint, and do not use a dirty cloth that may spread grease across the surface. Cleaning the mirror when direct sunlight is not heating it can also give you more time to wipe the solution evenly before it dries.
4. Refresh Your Toilet with a Simple Cleaning Routine
A clean toilet makes the entire bathroom feel fresher. Instead of relying on complicated cleaning methods, focus on regular brushing, an appropriate toilet cleaner, and careful attention to the areas that collect residue.
How to Clean the Toilet Bowl
- Put on household cleaning gloves and ensure the bathroom has suitable ventilation.
- Apply a toilet cleaner according to its label instructions.
- Allow the product to work for the recommended amount of time.
- Scrub beneath the rim and around the bowl with a dedicated toilet brush.
- Flush according to the product directions and rinse the brush as appropriate.
- Clean the seat, lid, handle, and exterior using a separate cloth and suitable cleaner.
Baking soda may help with light soil on compatible surfaces, but it is not a substitute for a toilet cleaner designed to remove heavy mineral deposits or a disinfectant when disinfection is necessary.
Safety First: Never mix vinegar with bleach or bleach-based toilet cleaners. Combining incompatible cleaning chemicals can release dangerous gases. Do not add baking soda or other household ingredients to a toilet that still contains a different cleaning product.
5. Remove Showerhead Limescale Carefully
Hard water can leave white mineral deposits around showerhead nozzles, reducing water flow and making the fixture look dull. A suitable descaling method can help dissolve these deposits and restore more even spray patterns.
Using Vinegar to Loosen Mineral Deposits
- Check the showerhead manufacturer’s instructions to confirm that vinegar is safe for the finish and internal components.
- If approved, place a small amount of white vinegar in a bag or container suitable for the showerhead.
- Secure it carefully so the affected area is in contact with the solution, without placing unnecessary weight on the fixture.
- Leave it for the period recommended by the manufacturer, checking periodically.
- Remove the solution, rinse the showerhead thoroughly, and run the water.
- Use a soft brush to remove any remaining loosened deposits if the finish allows it.
Not every showerhead should be soaked in vinegar. Some finishes, coatings, rubber components, and specialty fixtures can be damaged by acidic solutions or prolonged exposure. When in doubt, use a manufacturer-approved descaler.
6. Freshen Carpets with Baking Soda
Carpets can trap everyday odors from cooking, shoes, pets, and regular household activity. Baking soda is often used to help reduce mild odors, making it a useful option for occasional carpet freshening when the carpet manufacturer permits it.
How to Freshen a Carpet
- Vacuum the carpet to remove loose dust, crumbs, and hair.
- Test a small amount of baking soda on an inconspicuous area if the material is compatible.
- Sprinkle a light, even layer over the dry carpet.
- Leave it for around 15 minutes if appropriate for your carpet and vacuum manufacturer’s guidance.
- Vacuum slowly and thoroughly to remove the powder.
A light application is preferable to covering the carpet with a thick layer. Excess powder can be difficult to remove and may clog or strain some vacuum cleaners, particularly models with delicate filters.
Baking soda is not a replacement for treating the source of a persistent odor. If a carpet smells musty because of moisture, dry it promptly and investigate the cause. Lingering pet accidents may require an appropriate enzymatic cleaner, while extensive contamination may call for professional cleaning.
7. Keep Drains Clear and Fresh
Slow drains can result from hair, soap residue, grease, food particles, or other material accumulating inside the plumbing. Although baking soda and vinegar are popular household cleaning ingredients, their fizzing reaction does not reliably clear serious drain blockages.
A Better Approach to Drain Maintenance
- Remove visible debris from the drain opening when it is safe to do so.
- Use a drain strainer to catch hair or food scraps before they enter the plumbing.
- For a simple, accessible blockage, consider a suitable drain snake or cleaning tool designed for your drain type.
- Follow the plumbing fixture manufacturer’s recommendations for routine maintenance.
- Seek professional help if the drain remains blocked, multiple drains are slow, or wastewater backs up.
For a mild odor, cleaning the drain opening and removing trapped debris may be more effective than pouring household ingredients down the pipe. Do not use a plunger or add other products to a drain containing chemical drain cleaner unless the product instructions explicitly say it is safe.
Regularly removing food scraps and grease from the sink area can help prevent problems before they start. Never pour cooking grease down the drain, even if it is liquid when warm, because it can cool and contribute to buildup farther inside the plumbing.
8. Clean Glass Shower Doors for a Clear Finish
Glass shower doors often develop water spots, soap residue, and cloudy patches. Regular wiping helps prevent buildup, while a compatible cleaner can remove existing marks without damaging the glass or surrounding seals.
Simple Shower Glass Cleaning Steps
- Rinse loose soap residue from the glass.
- Apply a glass or shower cleaner that is suitable for the surface and finish.
- Wipe gently with a microfiber cloth or a nonabrasive sponge.
- Rinse if the product label requires it.
- Use a clean squeegee to remove water from top to bottom.
- Dry the edges and metal hardware with a separate cloth.
A mild solution of water, vinegar, and a small amount of dish soap is sometimes used for shower glass, but it is not suitable for every bathroom. Avoid acidic solutions on natural stone, and keep cleaners away from sensitive finishes unless approved by the manufacturer.
Prevent Water Spots Between Cleanings
Keep a squeegee near the shower and use it after bathing. This small habit removes much of the water that would otherwise dry on the glass. Better bathroom ventilation also helps surfaces dry faster and reduces lingering moisture.
9. Remove Sticky Residue with Cooking Oil
Price labels, adhesive stickers, and tape can leave stubborn residue on jars, containers, and other household items. Cooking oil can help soften certain adhesives, making them easier to wipe away without excessive scraping.
How to Remove Sticky Marks
- Remove as much of the paper label as possible without scratching the surface.
- Test a tiny amount of cooking oil on an inconspicuous area.
- Apply a small amount of oil to the adhesive residue using a cloth.
- Allow it to sit briefly so the adhesive can soften.
- Rub gently with a soft cloth or a suitable plastic scraper.
- Wash the surface with dish soap and water if the material allows it.
This method can work well on some glass jars and compatible hard surfaces, but it is not appropriate for every material. Oil can stain porous stone, untreated wood, fabrics, and other absorbent surfaces. It may also affect certain plastics, painted finishes, or rubber components.
For adhesive on a delicate item, choose a remover specifically designed for that material and follow the instructions. Avoid metal blades on glass or finished surfaces unless the manufacturer confirms they are safe to use.
10. Clean Your Stovetop Without Harsh Scrubbing
Cooking splashes, oil, and dried food can quickly make a stovetop look messy. Cleaning spills after the surface has cooled prevents residue from building up and makes routine kitchen maintenance much easier.
A Simple Stovetop Cleaning Method
- Turn off the stove and wait until all surfaces are completely cool.
- Remove loose crumbs and detachable components according to the appliance instructions.
- Apply a cleaner recommended for your stovetop material.
- For compatible surfaces, use a small amount of baking soda mixed with water to form a soft paste.
- Work gently with a soft cloth or nonabrasive sponge.
- Remove all residue with a clean damp cloth and dry the surface.
Always check whether your stove has a glass-ceramic, stainless steel, enamel, or another type of surface. These materials have different cleaning requirements. Abrasive powders and rough scrubbers can scratch glass cooktops, while some cleaners may damage special finishes.
Make Daily Cleanup Easier
Keep a dedicated kitchen cloth nearby and wipe small splashes after cooking once the surface is cool. Clean burner components only as directed by the manufacturer, and make sure everything is completely dry before reassembling the stove or using it again.
11. Freshen Your Garbage Disposal
Food particles can collect around the garbage disposal opening and beneath its splash guard, causing unpleasant odors. A simple maintenance routine can help keep the area cleaner and reduce the buildup responsible for lingering smells.
Safe Garbage Disposal Maintenance
- Turn off the disposal before inspecting or cleaning around the opening.
- Never place your hand inside the disposal, even when the switch is off.
- Clean the accessible sink and splash guard using a suitable brush or cloth according to the manufacturer’s instructions.
- Remove visible debris only with an appropriate tool and only when it is safe to do so.
- Run cold water and operate the disposal according to the appliance instructions when appropriate.
Lemon peels are often used to add a citrus scent, but they are not necessary for cleaning and may not be suitable for every disposal. Large pieces of peel, fibrous scraps, grease, and other unsuitable food waste can contribute to problems. Ice cubes are also not a universal cleaning solution, so follow the manufacturer’s recommendations rather than relying on them to sharpen or clean the blades.
Expert Insight: Odor control starts with removing the material that causes the smell. Clean the accessible splash guard and drain opening regularly, use the disposal as directed, and investigate persistent odors instead of covering them with fragrance.
12. Clean Tile Grout with a Gentle Scrub
Tile grout can collect dust, soap residue, and everyday grime, particularly around showers, sinks, and kitchen backsplashes. Because grout is often porous, using the right cleaner and a gentle brush is important for keeping it looking its best.
How to Clean Grout
- Remove loose dust and debris from the tiled area.
- Check the tile and grout manufacturer’s recommendations before choosing a cleaner.
- For compatible materials, mix baking soda with a small amount of water to make a paste.
- Apply it to a small test area and gently scrub with a soft grout brush or an old toothbrush.
- Wipe away the residue with a clean damp cloth.
- Rinse as needed and dry the area with a towel.
Use a light touch and avoid aggressive scrubbing that could damage grout or surrounding tile. Natural stone, colored grout, and specialty sealants may require specific products, so test first and follow the care instructions.
If grout remains dark despite cleaning, the discoloration may be caused by staining, deteriorated grout, or persistent moisture rather than ordinary dirt. Check for leaks and ventilation problems, and seek professional advice if the material is damaged or suspected mold keeps returning.
Why Simple Cleaning Habits Make Such a Difference
A cleaner home is not necessarily the result of a longer cleaning session. Often, the biggest improvement comes from preventing messes from becoming difficult jobs. Wiping the stovetop after cooking, drying shower glass after use, and cleaning small spills promptly can reduce the amount of effort required later.
Why This Matters
A consistent routine helps you focus on the areas that need attention most. Instead of cleaning the entire house at once, tackle one or two small jobs each day. This makes household maintenance more manageable and helps prevent grime, water spots, and odors from building up.
Create a Simple Weekly Cleaning Schedule
You do not need a complicated timetable to keep your home in good shape. A flexible schedule can help you spread tasks throughout the week and avoid spending an entire day cleaning.
- Monday: Wipe kitchen counters, clean the sink, and check the stovetop.
- Tuesday: Refresh bathroom mirrors, wipe fixtures, and clean the toilet.
- Wednesday: Vacuum carpets and rugs, paying attention to high-traffic areas.
- Thursday: Clean shower glass and inspect grout for residue or buildup.
- Friday: Wipe frequently touched surfaces and empty household waste bins.
- Weekend: Choose one deeper cleaning task, such as the microwave, showerhead, or kitchen appliances.
Adjust the schedule to suit your household, available time, and the amount of activity in each room. Homes with pets, children, or frequent visitors may need more frequent attention in certain areas.
Essential Cleaning Supplies to Keep on Hand
Having a few reliable supplies ready can make household chores simpler. You do not need to buy a different product for every surface, but it is important to use cleaners that are suitable for the material being cleaned.
- Microfiber cloths: Useful for wiping dust, polishing glass, and drying compatible surfaces.
- Baking soda: Helpful for some light cleaning jobs and mild odor control when the surface and appliance instructions allow it.
- White vinegar: Useful for certain mineral deposits and glass-cleaning tasks, but unsuitable for some stones, finishes, and other materials.
- Dish soap: A practical option for many washable surfaces when diluted and used according to directions.
- Soft cleaning brushes: Helpful for grout, corners, and other hard-to-reach areas.
- Rubber gloves: Useful for protecting your hands during appropriate household cleaning tasks.
- A spray bottle: Convenient for storing a clearly labeled, compatible cleaning solution.
Store all products in their original containers when possible, or use clearly labeled containers for homemade solutions. Keep cleaning supplies away from children and pets, and never store homemade mixtures in beverage bottles.
Important Safety Tips for DIY Household Cleaning
Natural ingredients can be useful, but natural does not automatically mean harmless or suitable for every surface. The safest cleaning method is one that works for the material, follows product directions, and avoids unnecessary chemical exposure.
- Never mix cleaning chemicals. In particular, never combine bleach with vinegar, ammonia, or acidic cleaners.
- Use good ventilation. Open a window or use an exhaust fan when appropriate.
- Test first. Try unfamiliar cleaners on a small, hidden area before treating an entire surface.
- Protect delicate finishes. Avoid abrasive materials on polished metal, glass cooktops, and sensitive coatings.
- Follow appliance instructions. Check recommendations before cleaning microwaves, garbage disposals, stovetops, or showerheads.
- Keep products away from children and pets. Store supplies securely and clean up spills promptly.
- Use disinfectants correctly. When disinfection is necessary, choose an appropriate product and follow its contact time and safety instructions.
Another useful habit is to use separate cloths for different areas of the home. A cloth used to clean the toilet should never be reused on kitchen counters. Washing reusable cleaning cloths regularly helps prevent the spread of dirt and germs between surfaces.
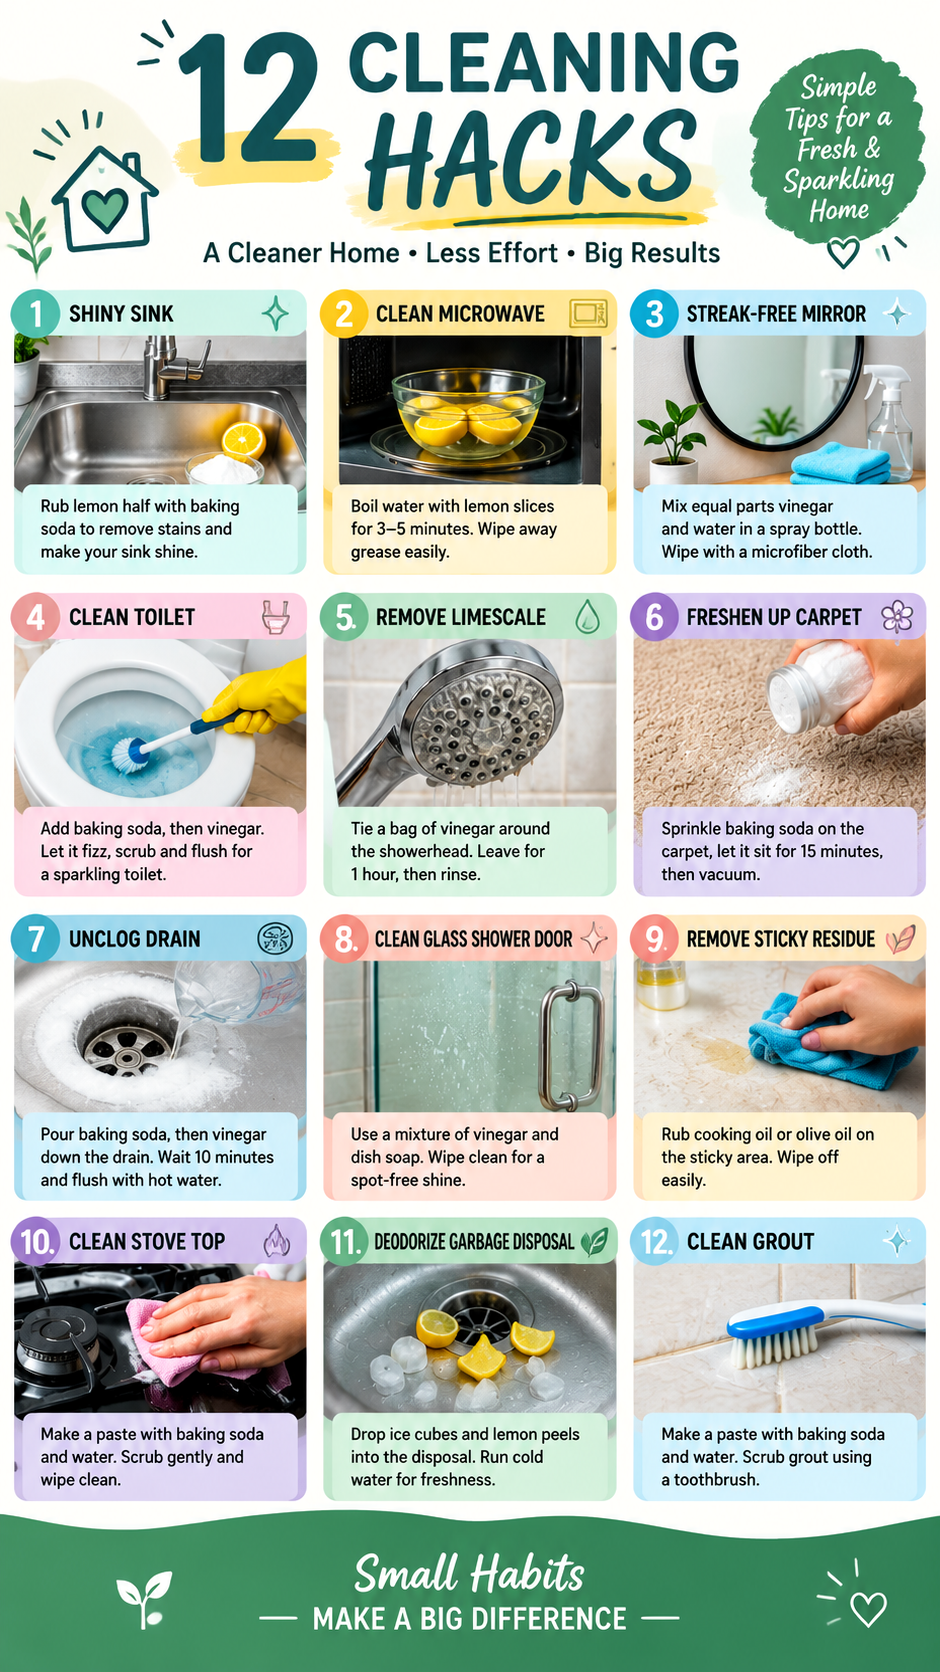
Quick Points: 12 Cleaning Hacks at a Glance
- Kitchen sink: Gently clean with a compatible product and dry to reduce water spots.
- Microwave: Use water and lemon steam to loosen dried food before wiping.
- Mirror: Use a suitable glass cleaner and a clean microfiber cloth.
- Toilet: Follow toilet cleaner directions and scrub regularly.
- Showerhead: Use a manufacturer-approved method for mineral deposits.
- Carpet: Try a light application of baking soda only when the carpet and vacuum instructions allow it.
- Drain: Remove debris and use suitable tools rather than relying on fizzing mixtures to clear blockages.
- Shower glass: Clean with a compatible product and use a squeegee after bathing.
- Sticky residue: Test cooking oil on suitable hard surfaces before using it.
- Stovetop: Wait until the surface is cool and use a recommended cleaner.
- Garbage disposal: Clean accessible areas safely and follow appliance guidance.
- Grout: Use a gentle brush and a cleaner suitable for the tile and grout.
Conclusion: Make Home Cleaning Easier, One Hack at a Time
Keeping your home fresh and sparkling does not have to be complicated. With these 12 easy cleaning hacks, you can tackle common household messes using simple techniques, practical supplies, and a little consistency. From steaming away microwave splatters to maintaining clear shower glass and refreshing carpets, each small task can help your home feel cleaner and more comfortable.
The secret is to choose the right method for each surface, clean small messes before they become stubborn, and build habits that fit your everyday routine. You do not need to try every hack in one day. Start with the area that needs the most attention, test your chosen method carefully, and make a few minutes of cleaning part of your regular schedule.
Remember that safe cleaning matters just as much as a sparkling result. Follow product labels, protect delicate materials, avoid mixing cleaning chemicals, and use the right tools for the job. With a thoughtful approach, household cleaning can become less stressful and more manageable.
Choose one or two of these household cleaning tips to try this week, then save your favorite ideas for the next time you refresh your home. Small efforts can make a meaningful difference, one clean surface at a time.
Tags
Cleaning Hacks
Household Cleaning Tips
DIY Cleaning
Natural Cleaning
Kitchen Cleaning
Bathroom Cleaning
Clean Home Tips
Home Maintenance