Easy Crochet Strawberry Tutorial Beginner-Friendly Step-by-Step Pattern
If you are looking for a small crochet project that is cute, practical, and beginner-friendly, a handmade crochet strawberry is a wonderful place to start. This charming little amigurumi-style project combines simple crochet techniques with bright red and green yarn to create a berry that can be used as a keychain, bag charm, handmade gift, or cheerful decorative accent.
The project is especially appealing because it does not require a long list of supplies. With red yarn, green yarn, a small crochet hook, scissors, and a little stuffing, you can create a dimensional strawberry with a recognizable shape, leafy top, and decorative white seed stitches. The step-by-step approach also makes it approachable for anyone learning the basics of crochet.
Key Takeaways
- A crochet strawberry is a fun small project for beginners.
- Red and green yarn create the classic berry-and-leaf combination.
- A magic ring provides a neat starting point for the strawberry body.
- Increasing and decreasing stitches help shape the rounded berry.
- Light stuffing gives the finished strawberry its dimensional form.
- White seed stitches add the final recognizable strawberry detail.
Why Crochet a Strawberry?
Small crochet projects have a special advantage: they let you practice useful techniques without committing to a large, time-consuming piece. A crochet strawberry is a perfect example. The finished project is compact, visually satisfying, and versatile enough to become something you can actually use.
The bright red body immediately gives the project a playful personality, while the green leafy cap creates contrast and makes the shape instantly recognizable. Once the berry is complete, small white stitches can be added to represent the seeds, giving the finished piece an extra layer of texture and character.
Important: The beauty of this project is its simplicity. You do not need a complicated color palette or a large collection of tools. Keeping the materials basic makes it easier to concentrate on stitch placement, shaping, stuffing, and finishing details.
Materials for a Crochet Strawberry
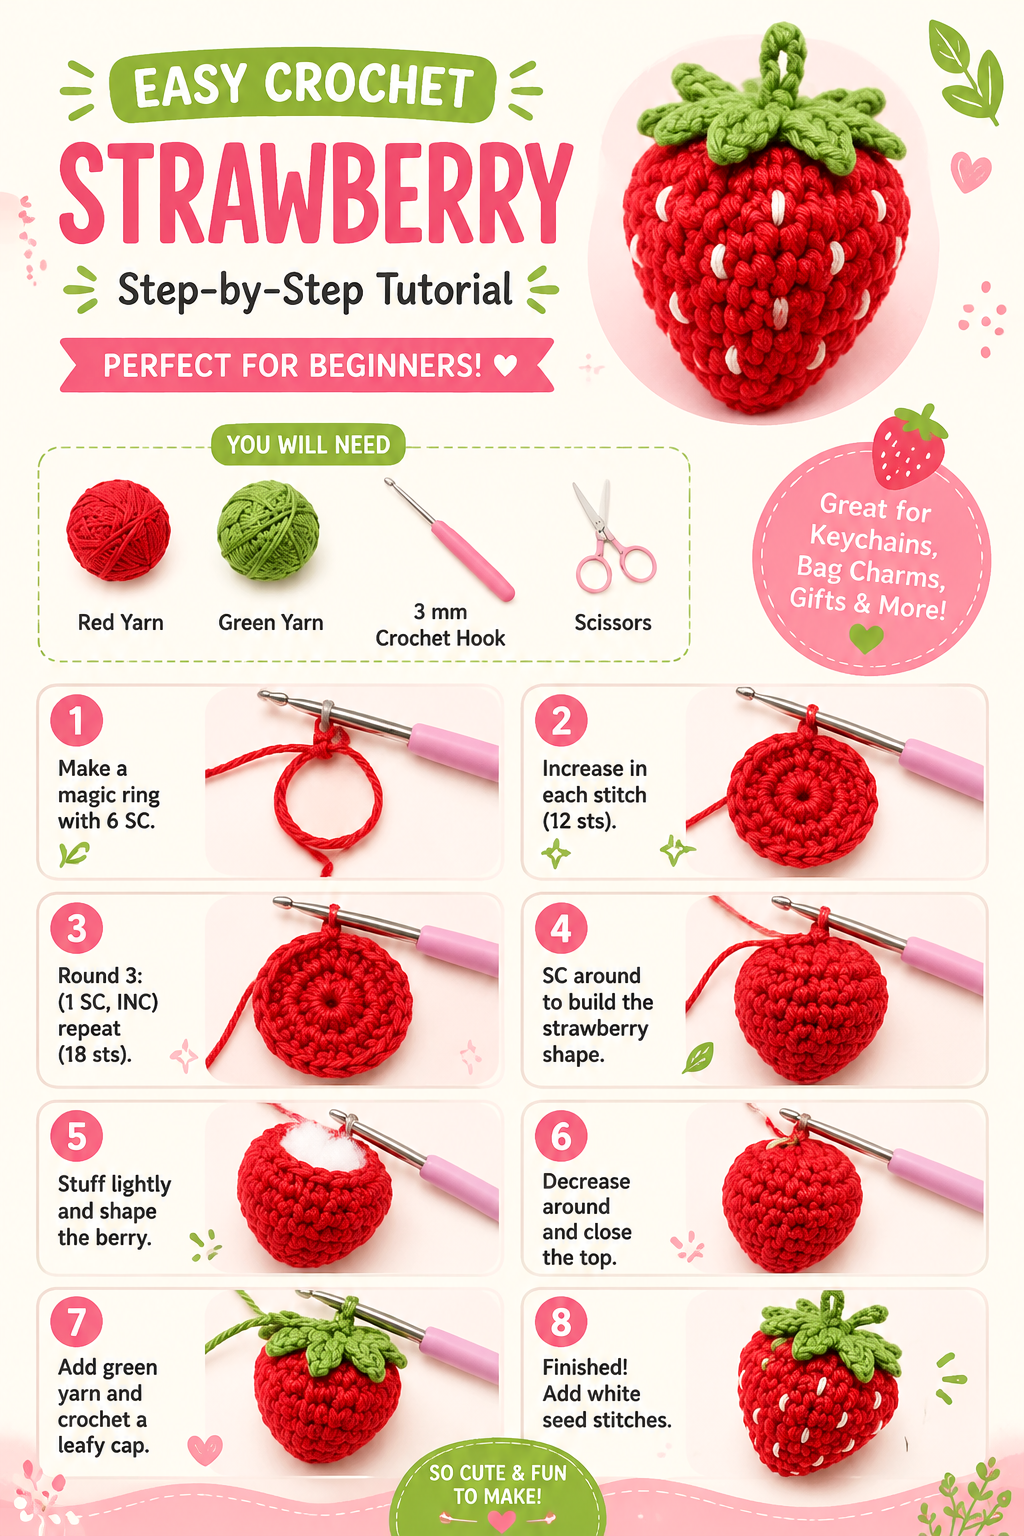
Before starting, gather everything you need so you can work comfortably from beginning to end. The pictured project uses a small crochet hook along with red and green yarn. Scissors are also needed for trimming yarn ends, while stuffing helps transform the crocheted fabric into a soft, three-dimensional berry.
- Red yarn: Used for the main strawberry body.
- Green yarn: Used for the leafy top and stem details.
- Small crochet hook: A 3 mm hook is shown in the project example.
- Scissors: Useful for cutting yarn when changing colors or finishing.
- Fiberfill or soft stuffing: Used to lightly fill the strawberry.
You can use similar yarn and hook combinations depending on what you already have available. Just remember that changing yarn weight or hook size can change the final dimensions and texture of the strawberry.
Understanding the Crochet Strawberry Shape
The strawberry begins as a small circular crochet foundation and gradually develops into a rounded berry. The basic construction relies on increases to expand the initial circle, several rounds of single crochet to build the body, and decreases toward the top to bring the shape inward.
This makes the project useful as a miniature lesson in crochet shaping. Rather than creating a flat circle, you are learning how stitch counts affect the direction and volume of your work. Increasing stitches causes the fabric to expand, while decreasing stitches pulls it back together.
The Magic Ring
The magic ring is used as the starting point for the strawberry. It allows you to crochet stitches into a small adjustable loop and then tighten the center. This creates a neat foundation with a relatively closed middle, which is particularly useful for stuffed crochet projects.
If the magic ring feels unfamiliar, practice it separately with scrap yarn before beginning the strawberry. Once you become comfortable with the motion, it becomes a valuable technique for many crochet projects, including amigurumi, flowers, small ornaments, and circular motifs.
Building the First Rounds
The next stage uses increases to expand the foundation. The pictured tutorial shows six single crochet stitches in the initial ring, followed by an increase round that brings the stitch count to twelve. A following round combines single crochet and increases to continue widening the shape.
Keeping track of stitches is especially important during these early rounds. If you accidentally add or skip a stitch, the strawberry may become uneven or develop an unexpected curve. A stitch marker can be helpful when working in continuous rounds.
Expert Insight
For a neat crochet strawberry, consistent tension matters more than speed. Keep your stitches firm enough to hold their shape, but avoid pulling the yarn so tightly that your hook becomes difficult to insert into the next stitch.
How to Build the Strawberry Body
After the initial increases, the project starts looking less like a flat circle and more like a small berry. Single crochet stitches worked around the piece create the sides of the strawberry and gradually build its height.
At this stage, take a moment to check the overall shape. The crochet fabric should begin to curve naturally. Avoid stuffing too early because the opening needs to remain accessible while you continue shaping the body.
Keeping the Shape Even
Consistent tension is one of the easiest ways to improve the appearance of small crochet projects. Try to maintain a similar stitch size throughout each round. If some stitches are noticeably looser than others, the surface may look uneven once the strawberry is stuffed.
Pro Tip: Stuff gradually rather than filling the berry all at once. Small amounts of stuffing can be added and shaped as you work, helping you create a plump strawberry without stretching the stitches too much.
Adding Stuffing and Closing the Top
Once the strawberry body has reached the desired size, lightly stuff it. The goal is to give the crochet fabric enough support to hold a berry-like shape while still keeping the finished piece soft and attractive.
After stuffing, decrease rounds bring the opening closer together. Work carefully as you approach the final stitches, making sure the stuffing stays inside and does not interfere with the crochet hook.
The final closure should leave you with a compact berry shape that is ready for its leafy green top. This is one of the most satisfying moments of the project because the simple crochet rounds have transformed into a recognizable strawberry.
Creating the Green Leafy Cap
The green top gives the strawberry its signature appearance. Using green yarn, crochet a leafy cap that sits over the upper portion of the red berry. The leaf shapes can be arranged around the top to create a natural-looking crown.
A small loop or stem at the center can also add a useful finishing detail, particularly if you plan to turn the strawberry into a charm or hanging decoration. Keep the green section secure so it sits neatly against the berry.
Why the Green Details Matter
Color contrast does much of the visual work in this project. The rich red body immediately attracts attention, while the green leaves frame the top and create a natural color combination. Even a very simple crochet shape can look polished when the colors and finishing details work together.
Adding the White Strawberry Seeds
The final decorative detail is the addition of small white seed stitches across the red surface. These little accents make the berry instantly recognizable and give the finished crochet strawberry a playful, handmade appearance.
You can space the seed details around the visible sides of the berry rather than trying to make every section perfectly identical. Slight variations can actually enhance the handmade character of the finished piece.
When adding decorative stitches, keep the yarn tension controlled. The white details should sit visibly on the surface without pulling the red crochet fabric out of shape.
Creative Ways to Use Your Crochet Strawberry
One reason this crochet strawberry makes such a fun project is its versatility. Because it is small and lightweight, you can turn a finished berry into a variety of handmade accessories or decorations.
- Keychain: Add a suitable keychain finding or loop for a cheerful everyday accessory.
- Bag charm: Attach it to a tote, backpack, purse, or craft bag.
- Gift accessory: Use a handmade strawberry as a charming addition to a wrapped present.
- Craft decoration: Display several crochet berries together in a handmade arrangement.
- Seasonal handmade project: Combine strawberries with other colorful crochet fruits for a playful collection.
You can also experiment with different yarn colors to create variations. A traditional red strawberry is instantly recognizable, but the same basic concept can inspire other playful color combinations and miniature fruit designs.
Beginner Tips for Better Crochet Results
Small amigurumi-style projects can sometimes feel challenging because the stitches are compact and the work becomes increasingly dimensional. Give yourself permission to work slowly, especially during the first few rounds.
- Count stitches at the end of important increase and decrease rounds.
- Use a stitch marker to identify the beginning of continuous rounds.
- Keep your tension consistent throughout the project.
- Stuff lightly and gradually to maintain the shape of the berry.
- Check your work before closing the top completely.
- Secure yarn ends carefully so the finished project stays intact.
Most importantly, do not worry if your first strawberry is not perfectly symmetrical. Handmade crochet has character, and small differences in stitch tension or leaf placement can make each finished berry unique.
A Simple Project for Practicing Crochet Skills
This crochet strawberry brings several foundational techniques together in one approachable project. You can practice starting with a magic ring, increasing to create width, crocheting rounds to build height, decreasing to close a shape, adding stuffing, changing colors, and attaching decorative details.
That combination makes the project more than just a cute craft. It is also a practical way to build confidence with techniques that appear in many other crochet patterns. Once you understand how the strawberry is shaped, you may find it easier to approach other small stuffed crochet designs.
Why This Matters
- Small projects are excellent for practicing shaping techniques.
- Color changes introduce simple finishing skills without overwhelming beginners.
- The finished strawberry can become a useful handmade accessory.
How to Make Your Strawberry Look More Polished
A few finishing habits can make a noticeable difference. Before attaching the green leaves, check that the red body is evenly stuffed and that the top is securely closed. Arrange the leafy cap so it covers the closure and sits naturally on the berry.
Next, look at the white seed stitches from different angles. If they are too tightly pulled, gently adjust them. If one area looks crowded, you can redistribute the decorative placement on future versions.
Finally, trim and secure loose yarn ends neatly. A clean finish keeps the project looking intentional and helps it withstand everyday handling when used as a bag charm or keychain.
At a Glance
- Begin with a magic ring and a small number of single crochet stitches.
- Increase gradually to create the rounded strawberry base.
- Build the body with single crochet rounds.
- Stuff lightly before completing the decrease rounds.
- Finish with green leaves and small white seed stitches.
Conclusion
A crochet strawberry is a delightful small project for anyone who enjoys handmade crafts. Its compact size makes it approachable, while the combination of shaping, stuffing, color changes, leaves, and seed details gives you plenty of opportunities to practice useful crochet skills.
Whether you are learning crochet for the first time or simply searching for a quick project to enjoy between larger creations, this strawberry is an excellent choice. Make one as a cute bag charm, turn it into a thoughtful handmade gift, or create several berries in different sizes and colors for a playful collection.
Gather your red and green yarn, pick up your crochet hook, and enjoy the process one stitch at a time. The finished berry is small, but it delivers that satisfying feeling of turning a few simple materials into something cheerful and completely handmade.
Tags
Crochet Strawberry Beginner Crochet Crochet Tutorial Amigurumi Easy Crochet Projects Crochet Keychain DIY Crochet Gifts Cute Crochet Ideas